Shopify GA4 ecommerce tracking implementation
Posted on 11/17/2023
Reviewed by Arnt Eriksen updated at 12/3/2023
Introduction
Google Analytics 4 is a popular analytics reporting tool used by millions of businesses. It is commonly recognized as the tool that tells businesses how much web traffic they receive, monitors key marketing channels, and tracks their primary KPIs.
In this step-by-step guide, we will explain how to configure GA4 e-commerce tracking on a Shopify store with a Plus plan.
There are two kinds of plans for Shopify stores — basic, so-called Non-Plus, and the Plus version. The implementation of Google Analytics 4 eCommerce tracking depends on the version of your online store. If you have the standard Non-Plus version, you can install Google Analytics on all of your store’s pages (excluding the checkout pages), while Shopify Plus lets you put the tracking code (or Google Tag Manager) on all pages of your store.
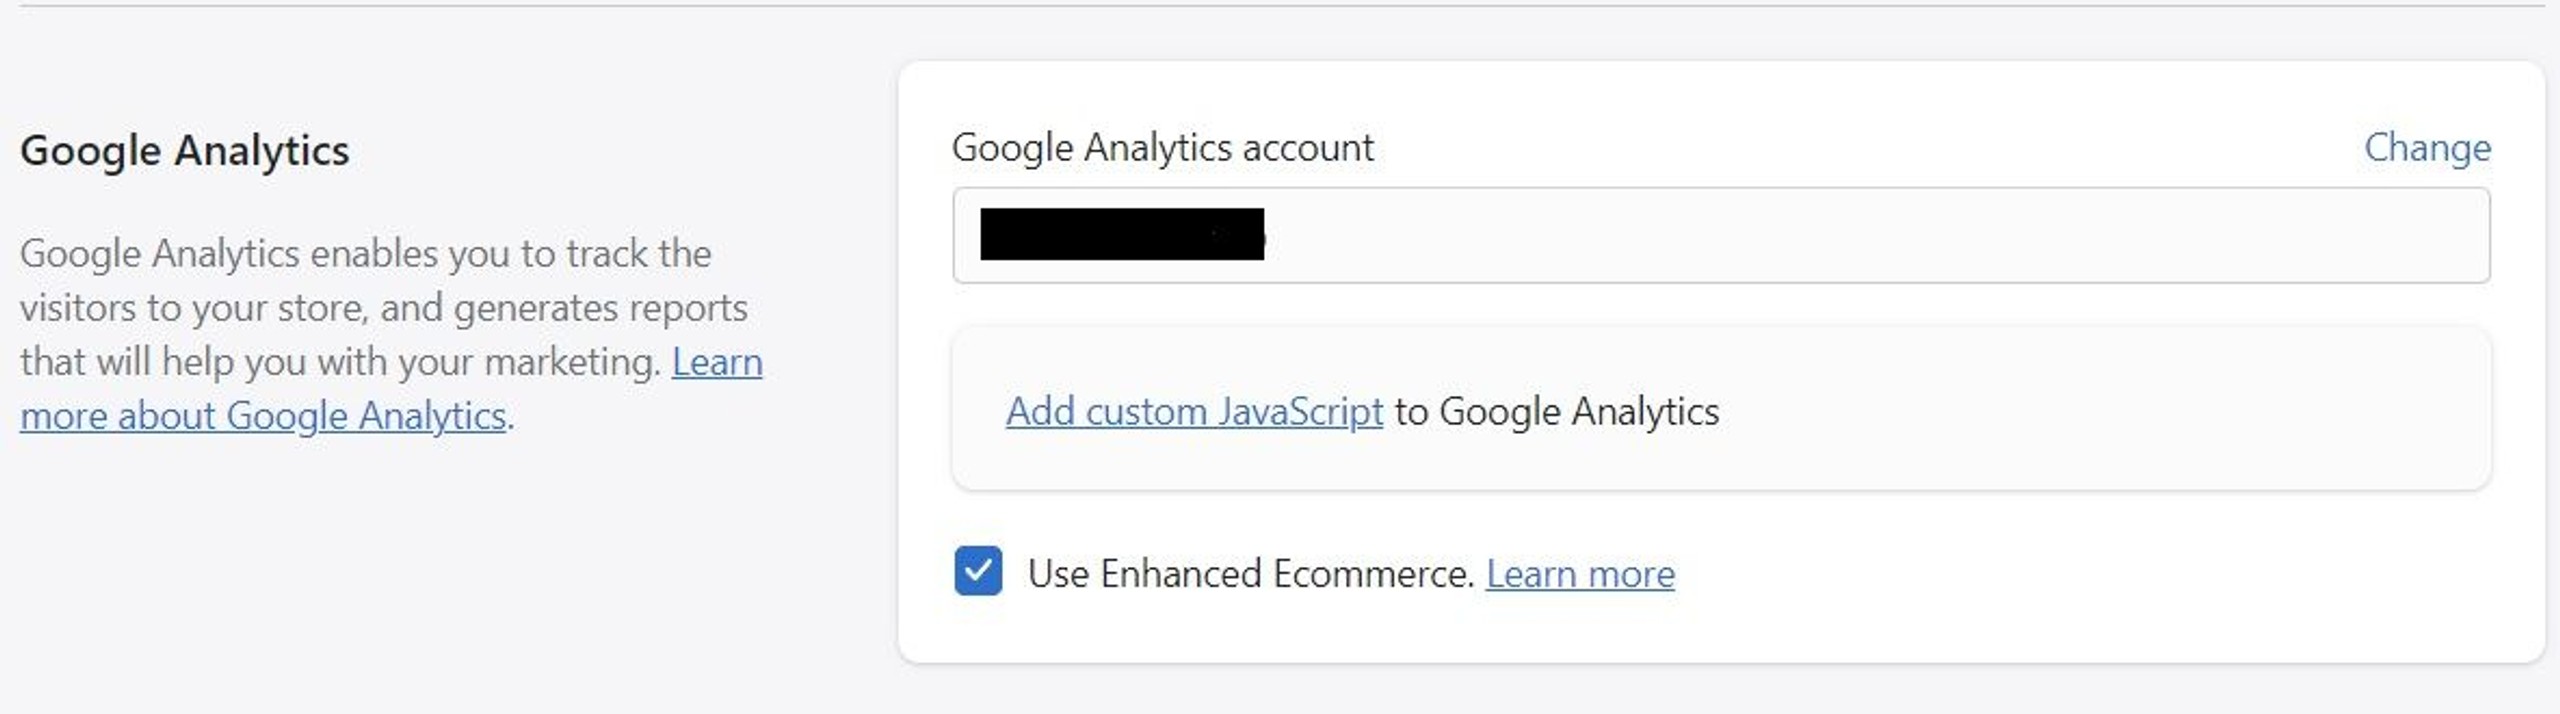
At the time of writing this guide, there is no built-in solution in Shopify settings that integrates Shopify store with GA4 in a similar way to the solution with Universal Analytics. With Universal Analytics, you could simply enable Enhanced ecommerce tracking with a click of a button and all ecommerce data is automatically sent to your Universal Analytics property.
With GA4, the process is a bit more complicated.
We have already implemented this tracking for many of our clients and can help you configure it even if you have the Non-Plus version of your store.
Installing GTM to your store
At the beginning of GA4 configuration, you need to decide which way you will add GA4 tracking code to your Shopify store. There are 2 ways of configuring – by adding tracking code with Global site tag (gtag.js) method or by Google Tag Manager. We prefer to use Google Tag Manager as it allows you to configure your tracking simply and easily instead of adding hard and bulky gtag.js codes manually to your website. In addition, you may need to ask your developer for help when at the same time you could do it yourself in GTM.
Here is the official documentation from Google about all Ecommerce events and their parameters, as well as their examples when you decide to pass them to GA with gtag.js.
When you choose to implement ecommerce tracking with GTM (assuming you have already created your GTM container), you need to install it to your Shopify store code. For this, go to your GTM account – Admin – Install Google Tag Manager:

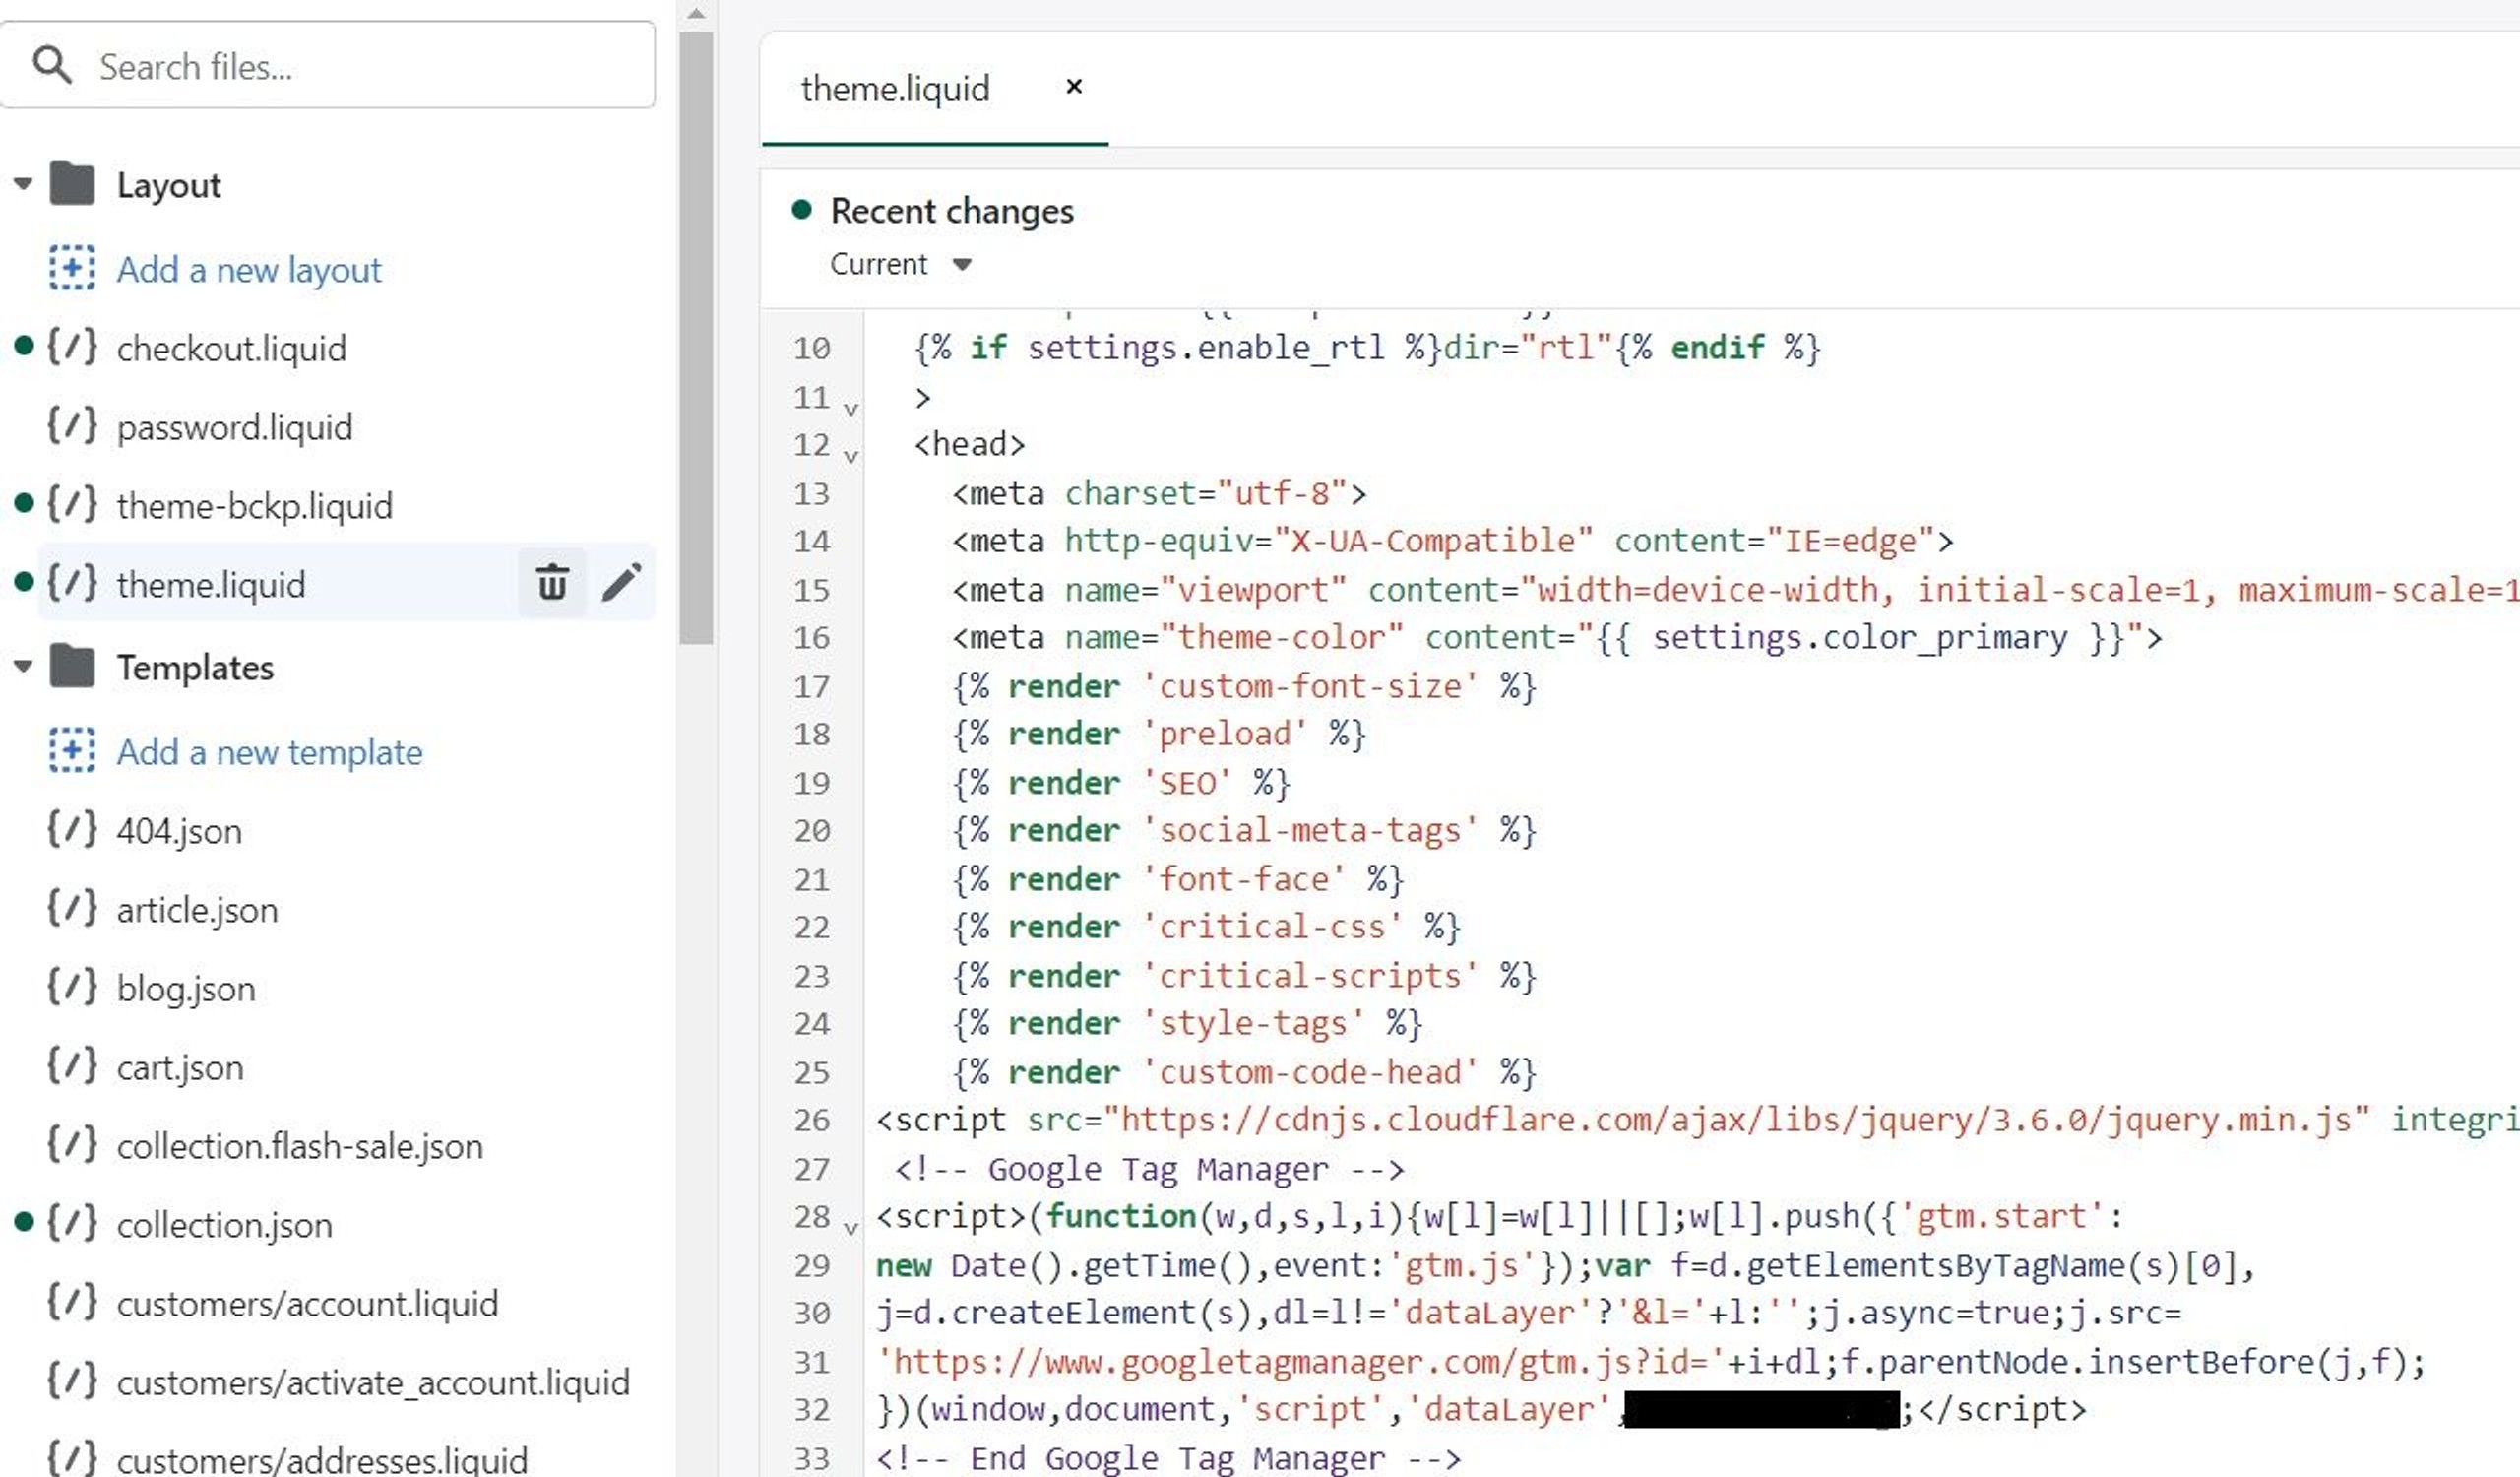
Then copy the first snippet and paste it to your theme.liquid and checkout.liquid files as high as possible after <head> tag in Online store settings – Edit code of current theme:
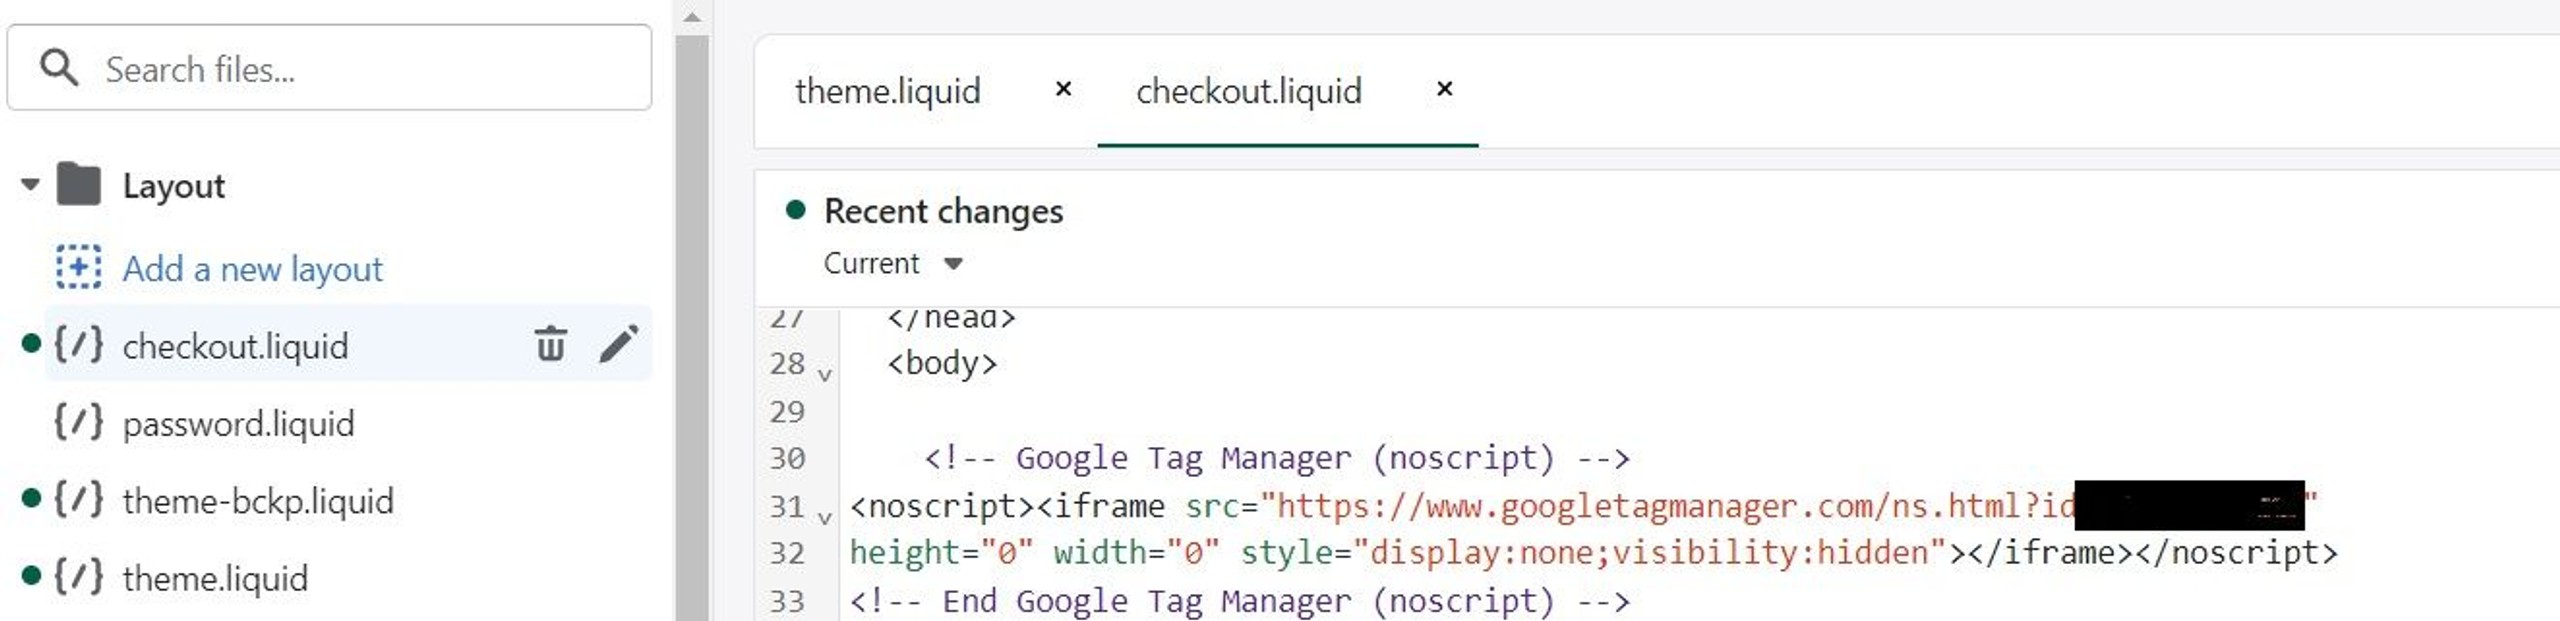
The second GTM snippet should be installed both in theme.liquid and checkout.liquid files but after <body> tag:
So now that you have GTM successfully installed to your store, the next step is to create a Data Layer with all the necessary events and parameters to let GA4 grab its information with the help of GTM.
Creating Data Layer code
In brief, Data Layer is a virtual layer, also an array, on a website where developers or other tools can store data (such as user or content information). Using that information, Google Tag Manager uses triggers, tags, variables to send data to other tools, including Google Analytics, Google Ads, Facebook Pixel, and so on.
Google has excellent official documentation where you can read everything about its declaration, its processing and Data Layer variables.
There are a lot of open-source solutions that you can find now with ready Data Layer code for Shopify ecommerce events (tip – use GitHub resource).
At the next step of our implementation, we create a snippet called ‘dataLayer-allPages’ and paste all the code from our solution with Data Layer there.
The example of the dataLayer code pushing ecommerce event view_item:
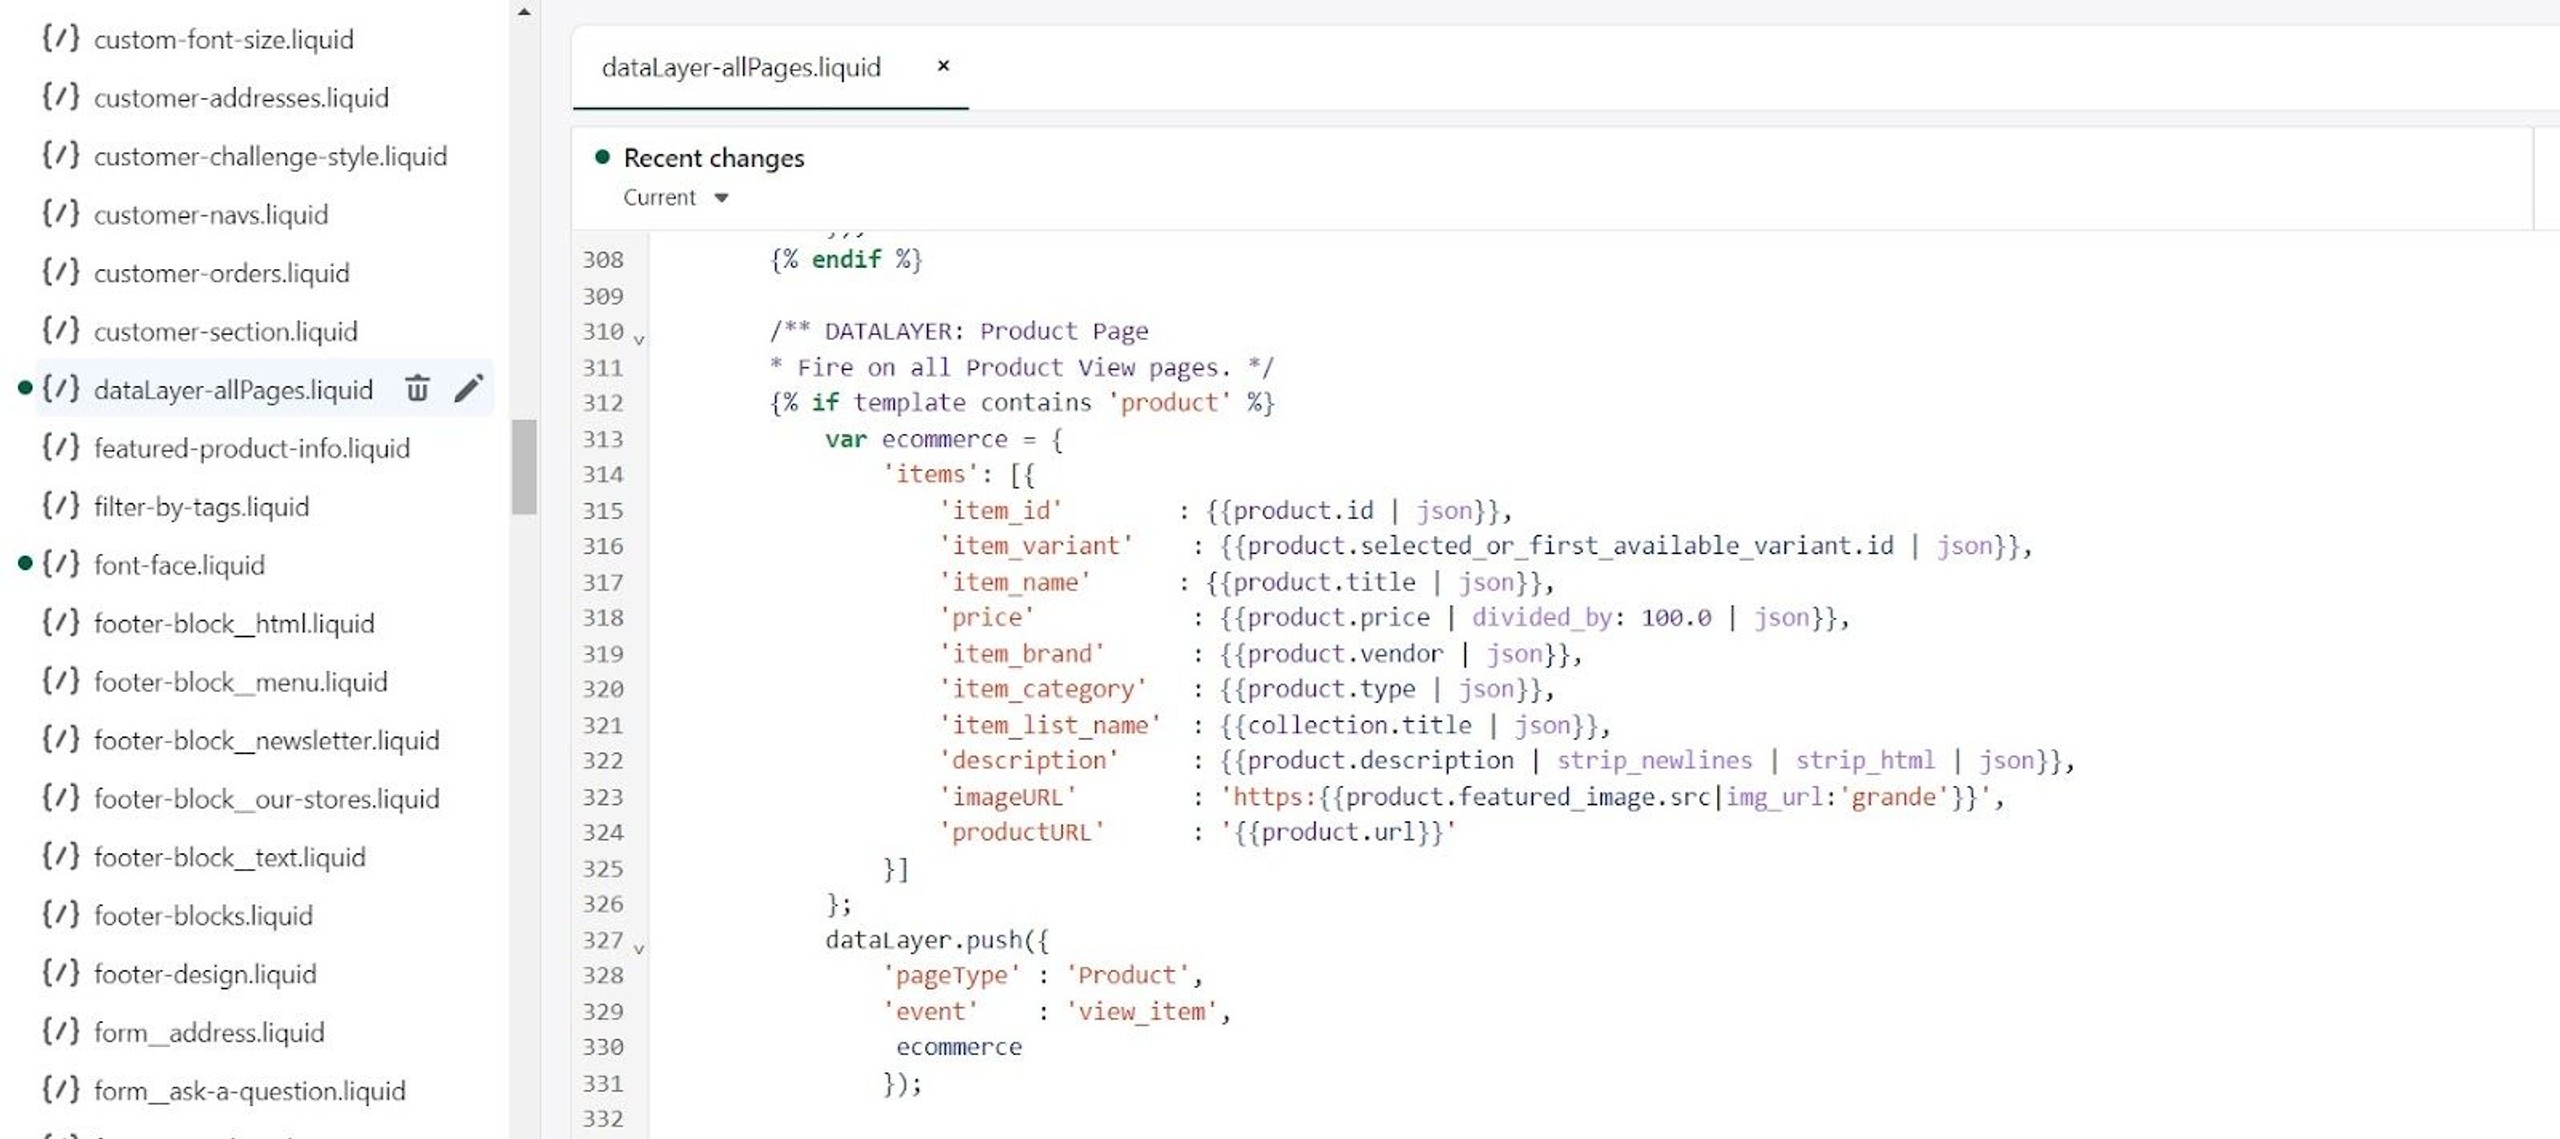
Please note here that you will need to apply the divided_by: 100.0 operator in order to get a float for the parameters like ‘price’, ‘discount’ or ‘value’ that should be correct even for different currencies or formats.
Our solution offers code with the following ecommerce events: view_item_list | view_item | add_to_cart | view_cart | begin_checkout | add_shipping_info | add_payment_info | purchase | search | remove_from_cart .
As bonus events, we also configure blog and 404 events. Every blog page fires the blog event with post author, post creation date, and post title information if you have a corresponding site section.
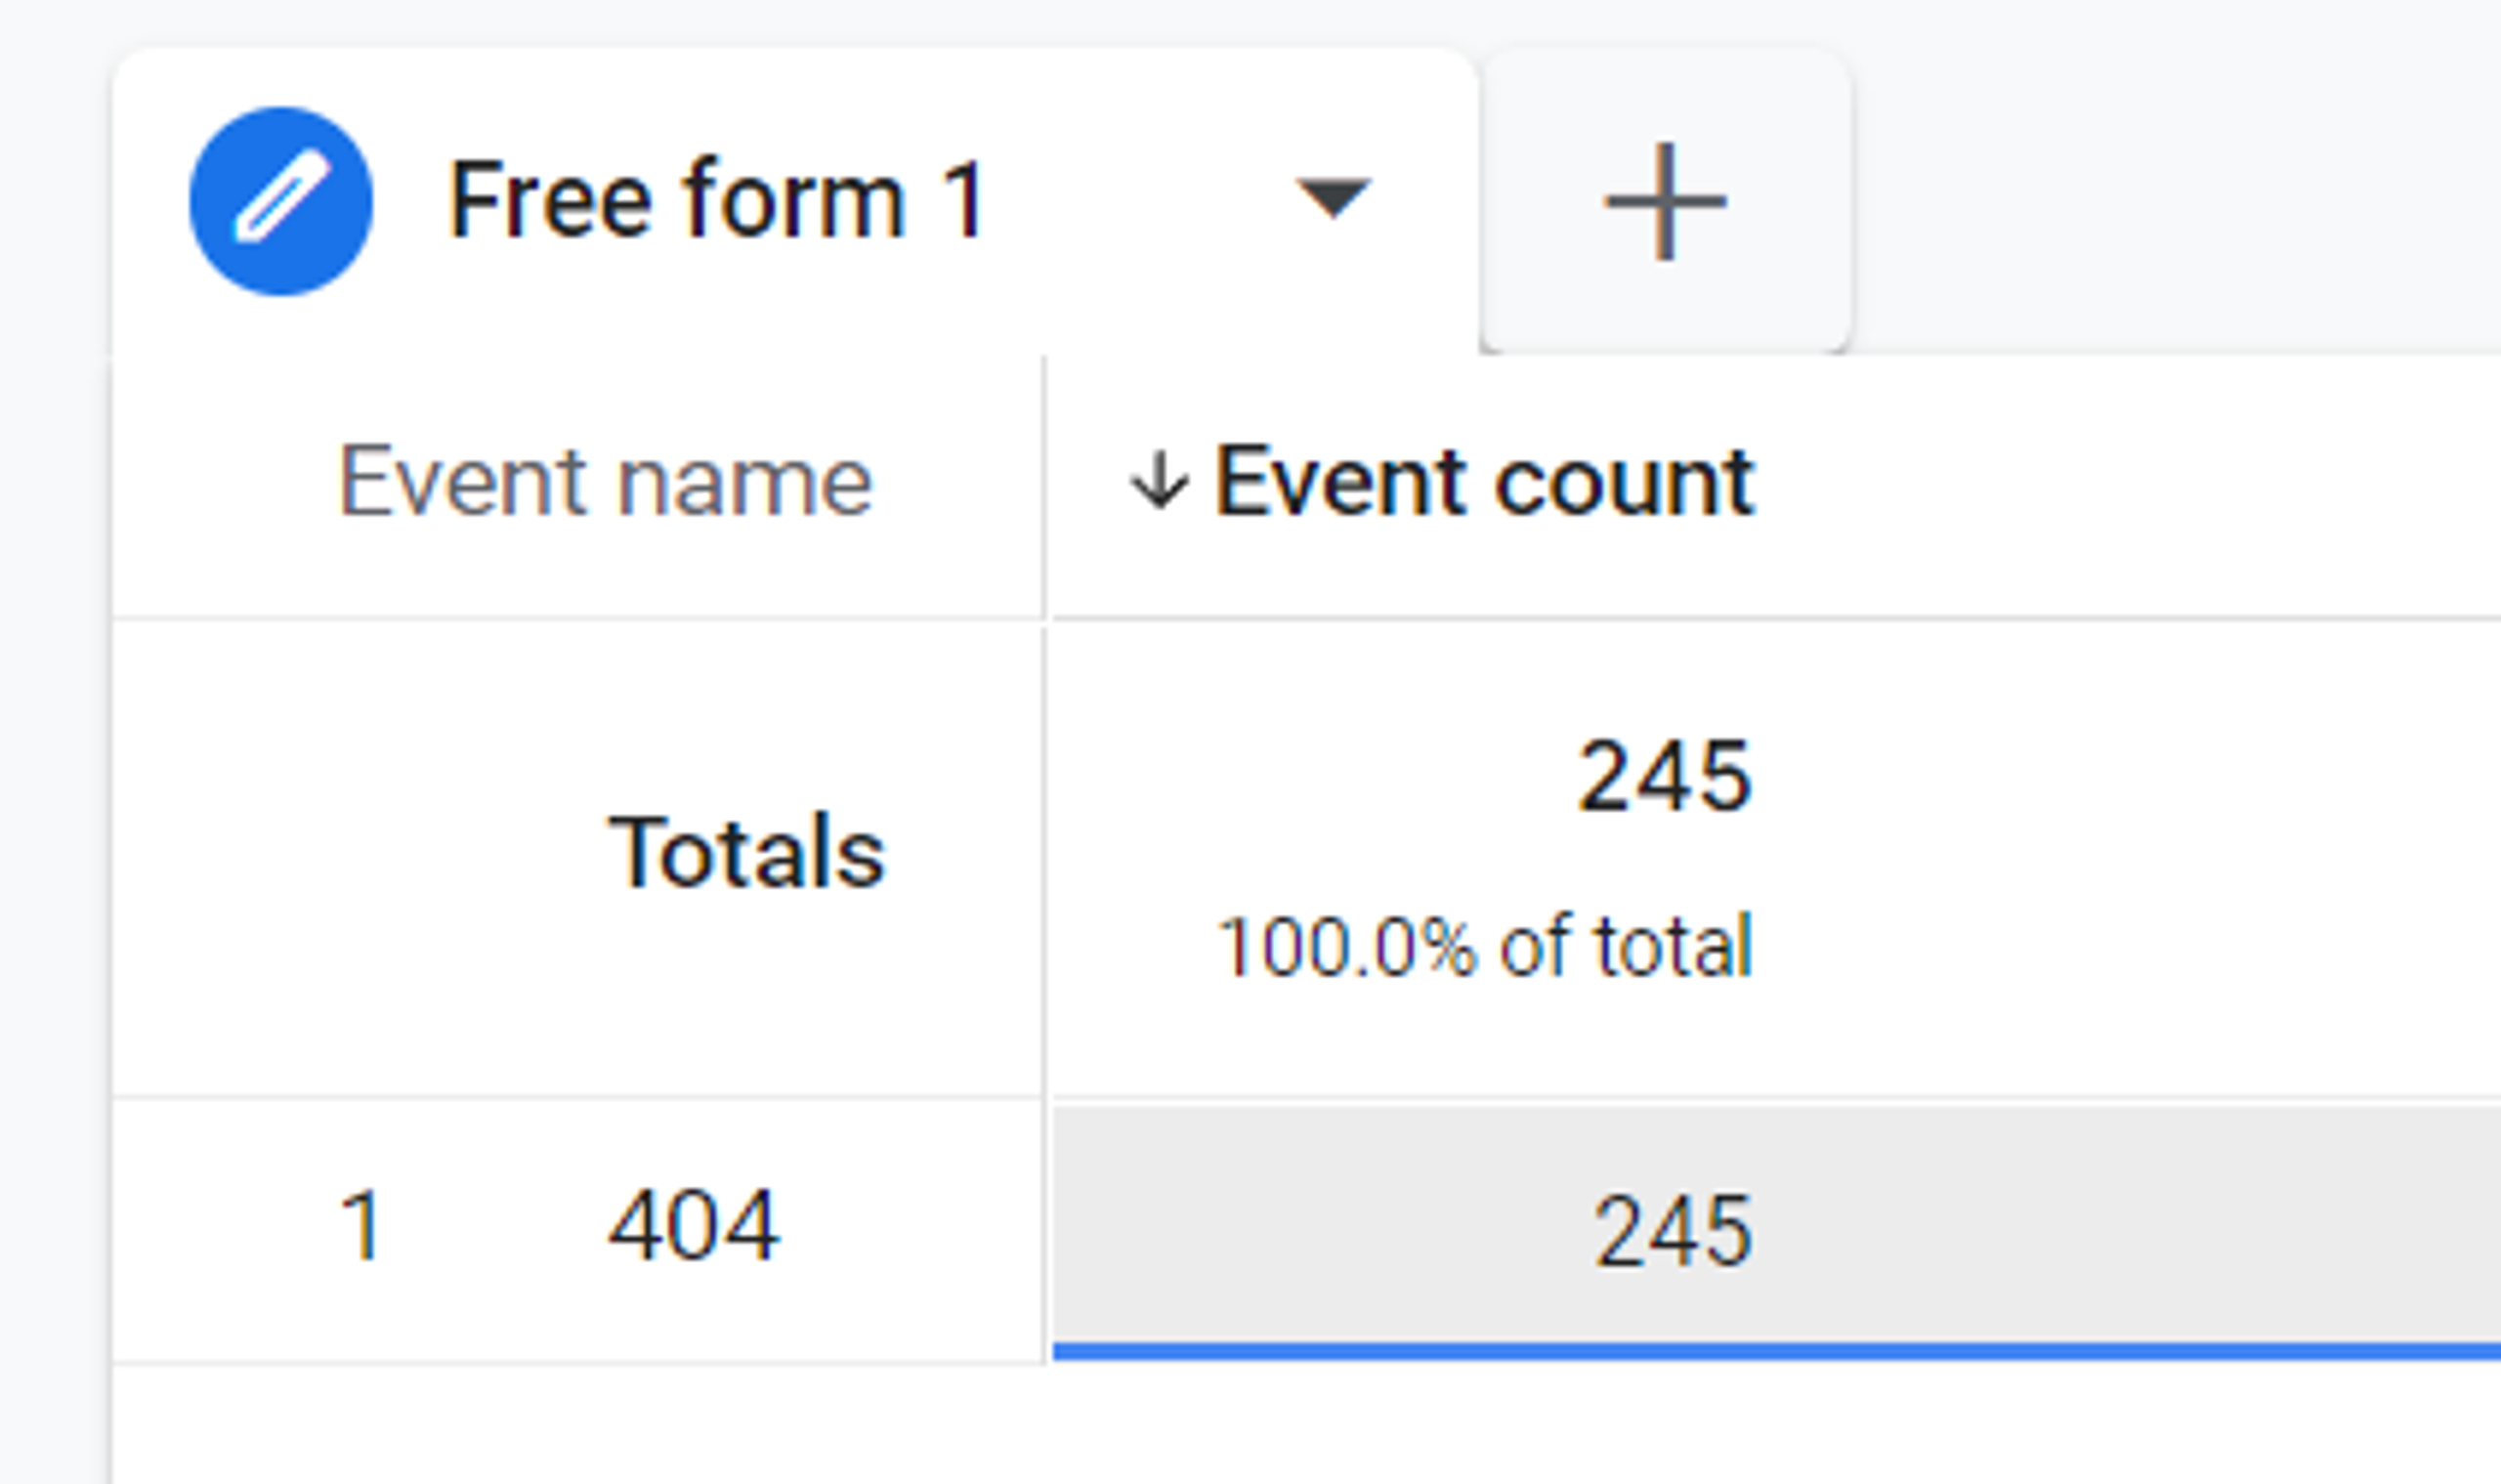
404 event is fired if a not found file/page is visited, pushing the URL path information.
By adding page location dimension in your explore reports in GA4 it can help you with analyzing how many times users visited such pages:
As a further step for your Plus store here you should place snippet ‘dataLayer-allPages’ to your liquid file. Add this code {% include ‘dataLayer-allPages’ %} right before the closing </head> tags within the theme.liquid and checkout.liquid layouts:

As we mentioned above, Shopify does not allow stores with Non-Plus plan to make changes to the code of the checkout pages, and there is no access to the checkout.liquid file for these stores. That’s why there is no option for such stores to get events of the checkout stage (begin_checkout, add_shipping_info, add_payment_info).
For Plus store you will have purchase event firing in Data Layer checkout.liquid code, and for Non-Plus store you will need to paste a special script to your order confirmation page. To do this you should find Order status page section – Additional scripts in Settings – Checkout and paste script there:
Do not forget to also paste your main GTM snippet right after this script so that your order confirmation will be properly tagged and you will be able to send purchase event to GA4.
There you have it – your Data Layer is ready and the next step is to configure your GTM variables, triggers and tags to send information from this Data Layer to GA4.
Configuring GTM tags
There are several ways to configure your GTM in order to send ecommerce information to GA4. One of them is to import ready GTM container with all necessary tags, triggers and variables already set up. The other way is to create tags on your own. We’ll use a ready-made GTM container and import it in a GTM account. Go to the Admin section of your GTM account, select Import Container, choose a json file with GTM container, then Workspace and Overwrite or Merge option.
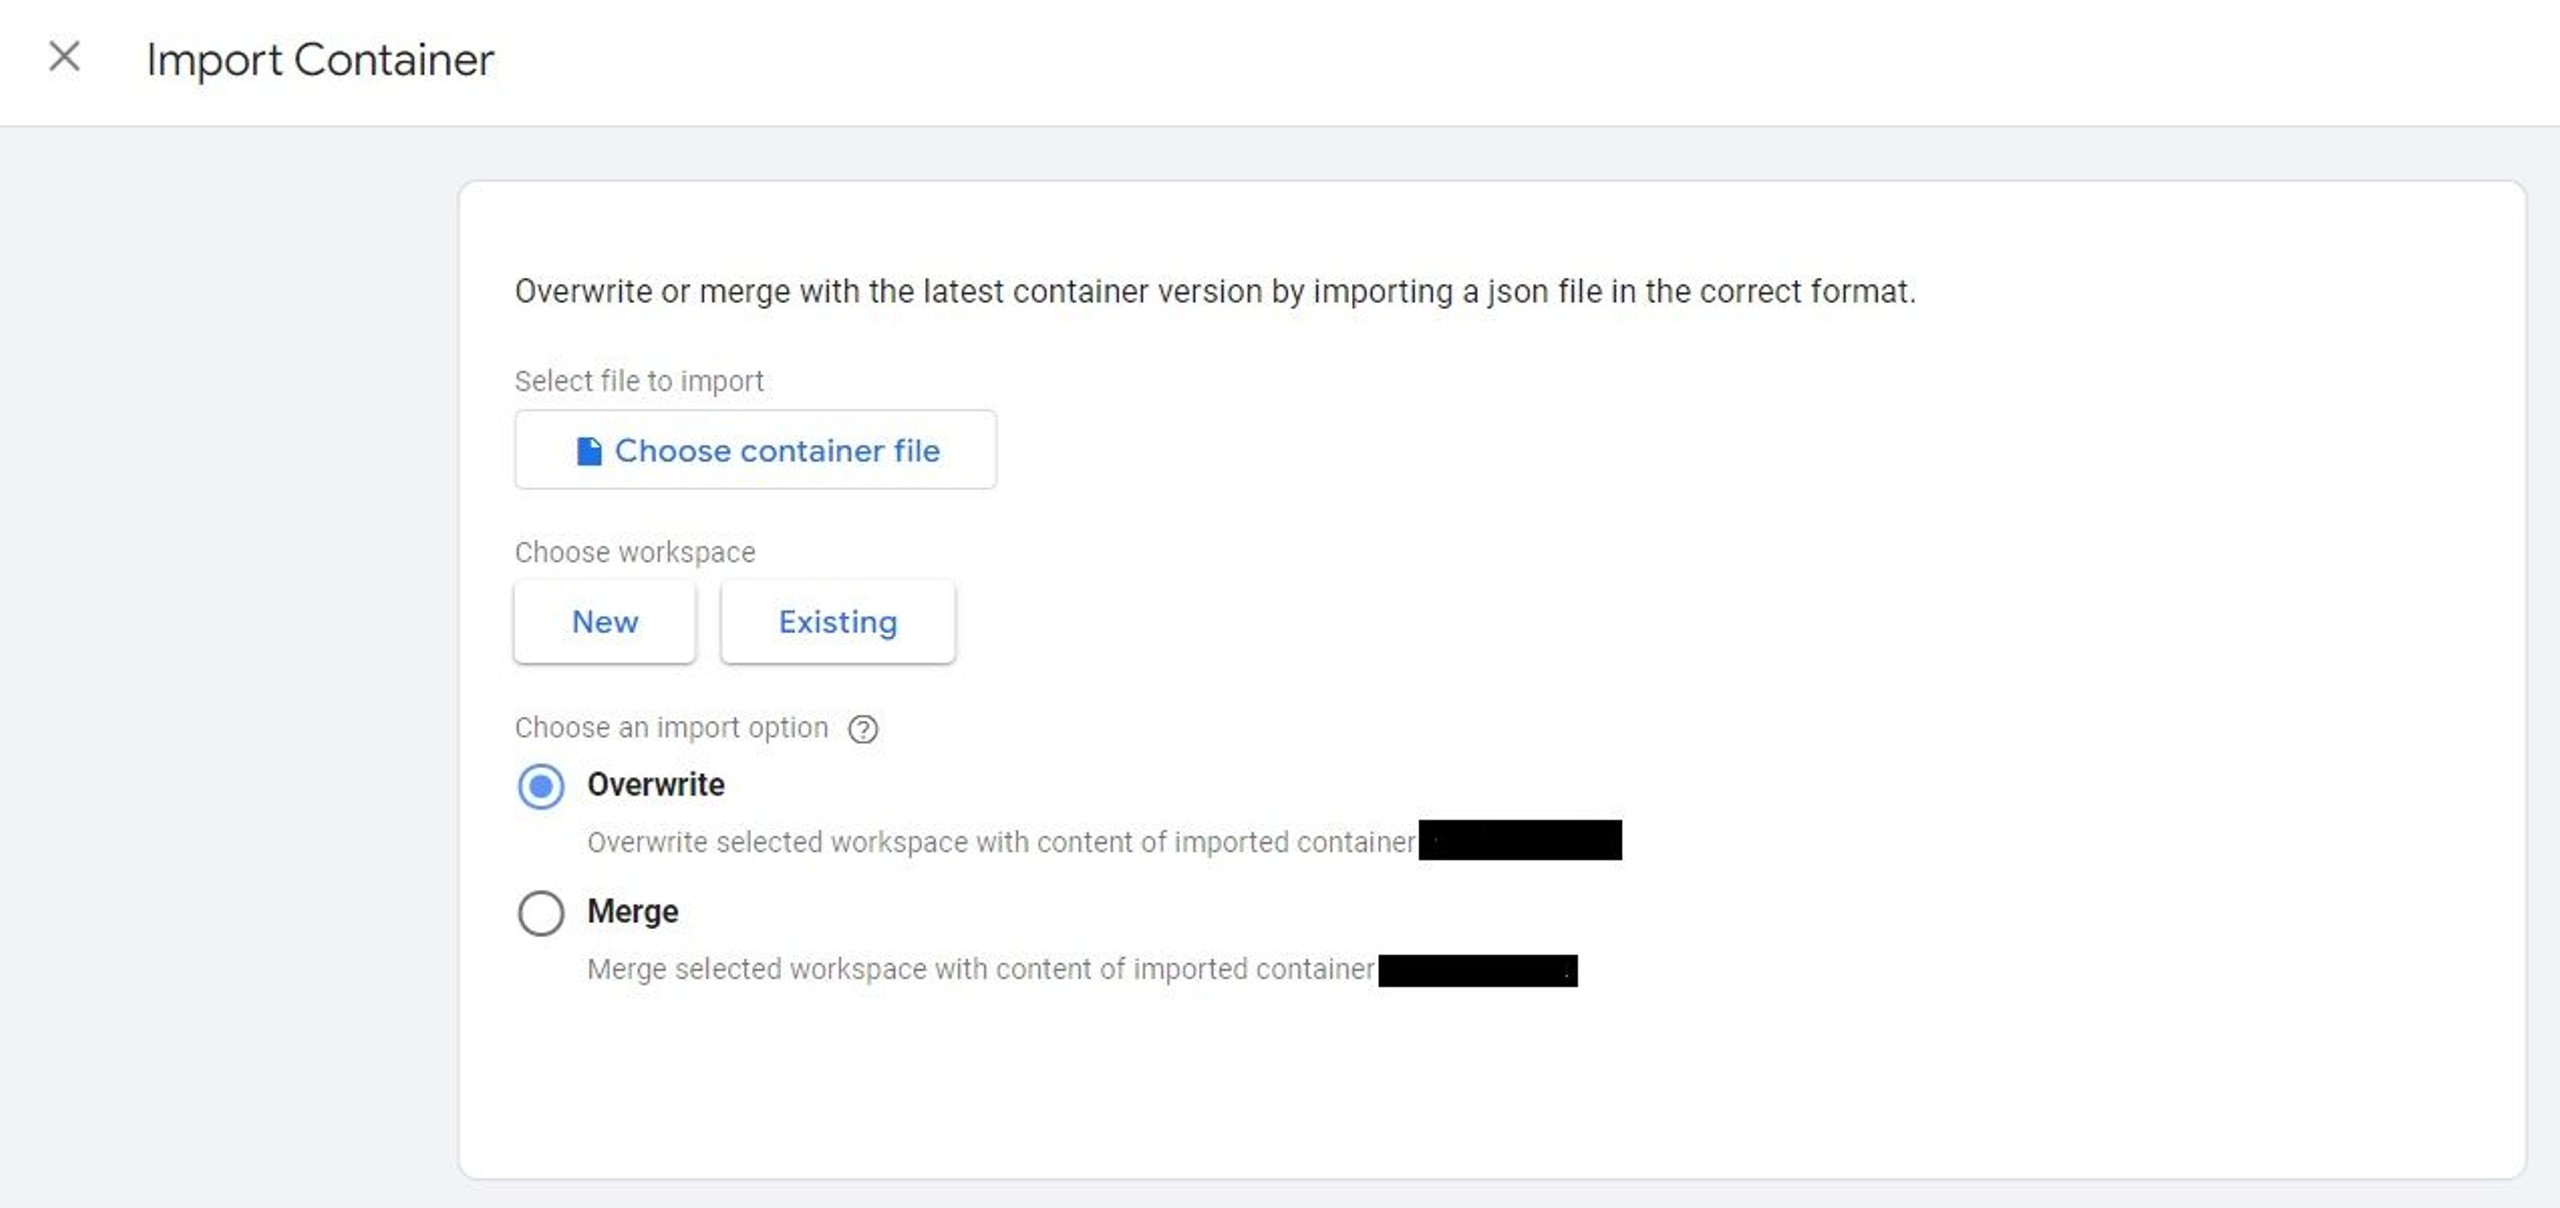
Be careful here when you choose to overwrite your current workspace so as to not lose important content.
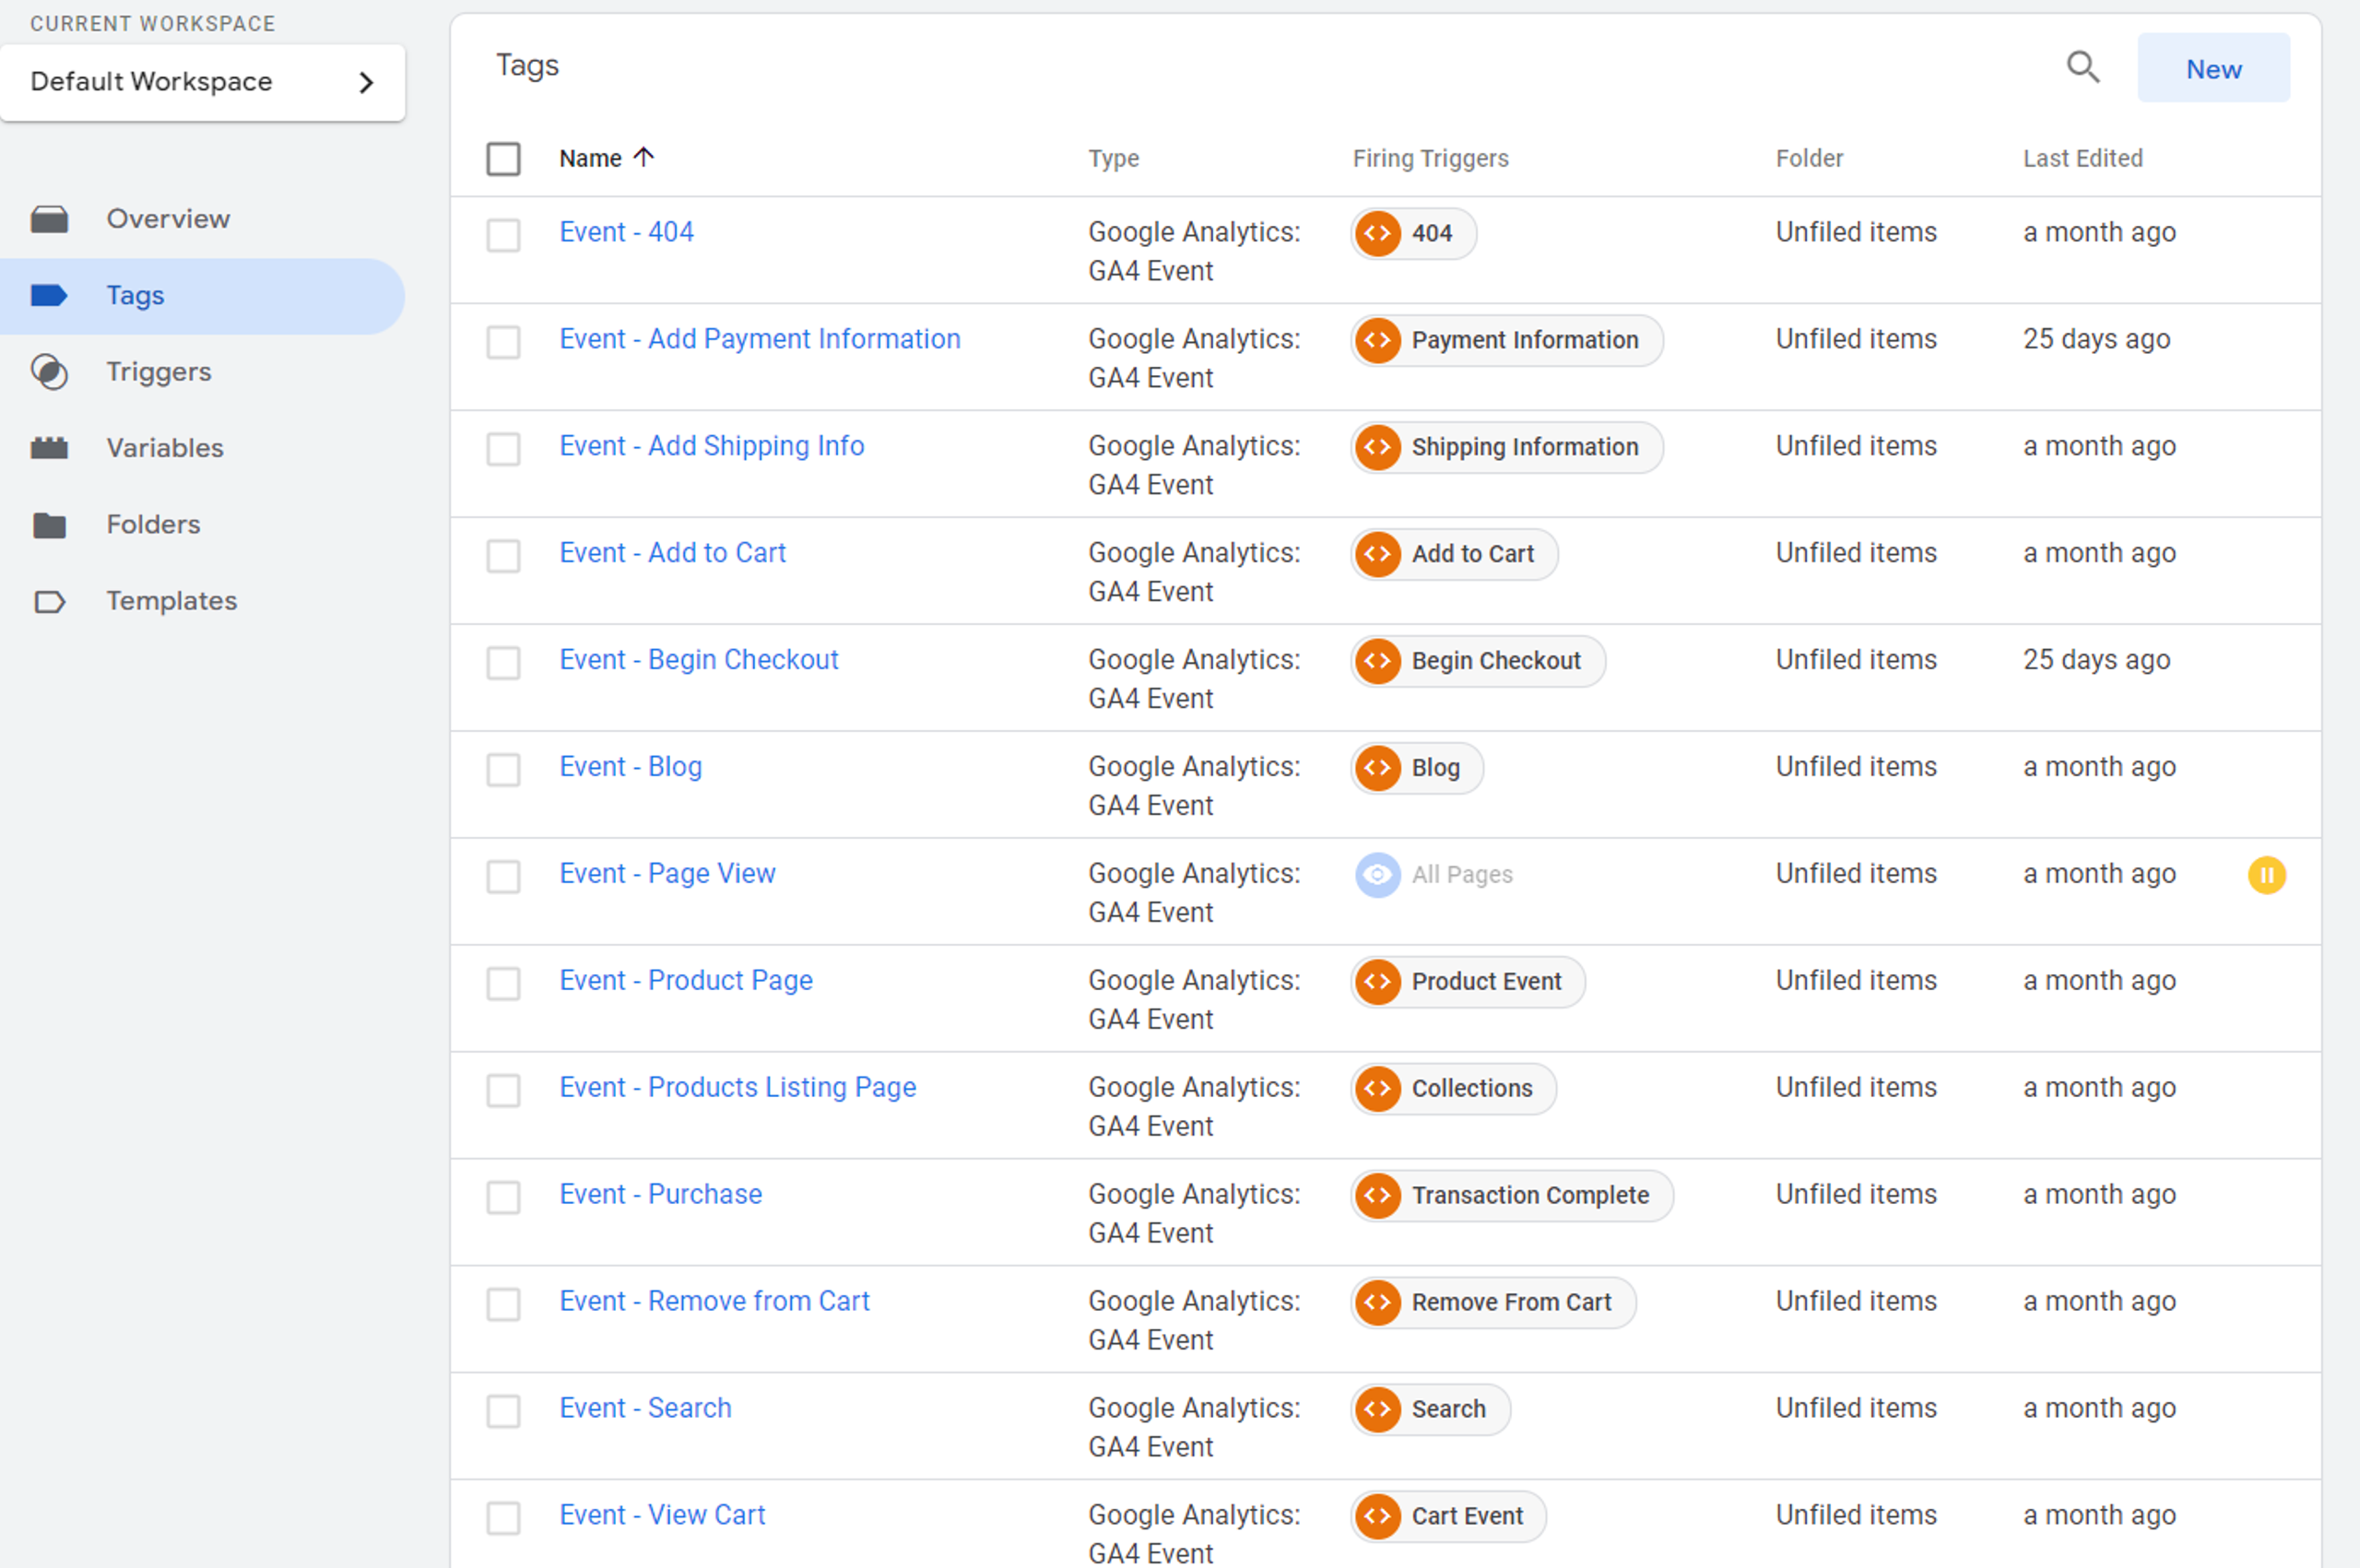
After this you will find in your workspace all the existing tags with eCommerce events, variables and triggers.
Let us overview an example of data layer variables and trigger that we use in the Data Layer to create the tag sending view_item event.
At first, you create data layer variables that will grab information from the Data Layer about product viewed (added to cart or viewed in the cart also). Later you will be able to transfer important details of ecommerce data to Google Analytics with the help of these user defined variables.
Our variable is called Products, but it is also helpful when you work with other users in GTM and have a naming convention to call it something like ‘dlv-products’ in order to provide information in a useful way.
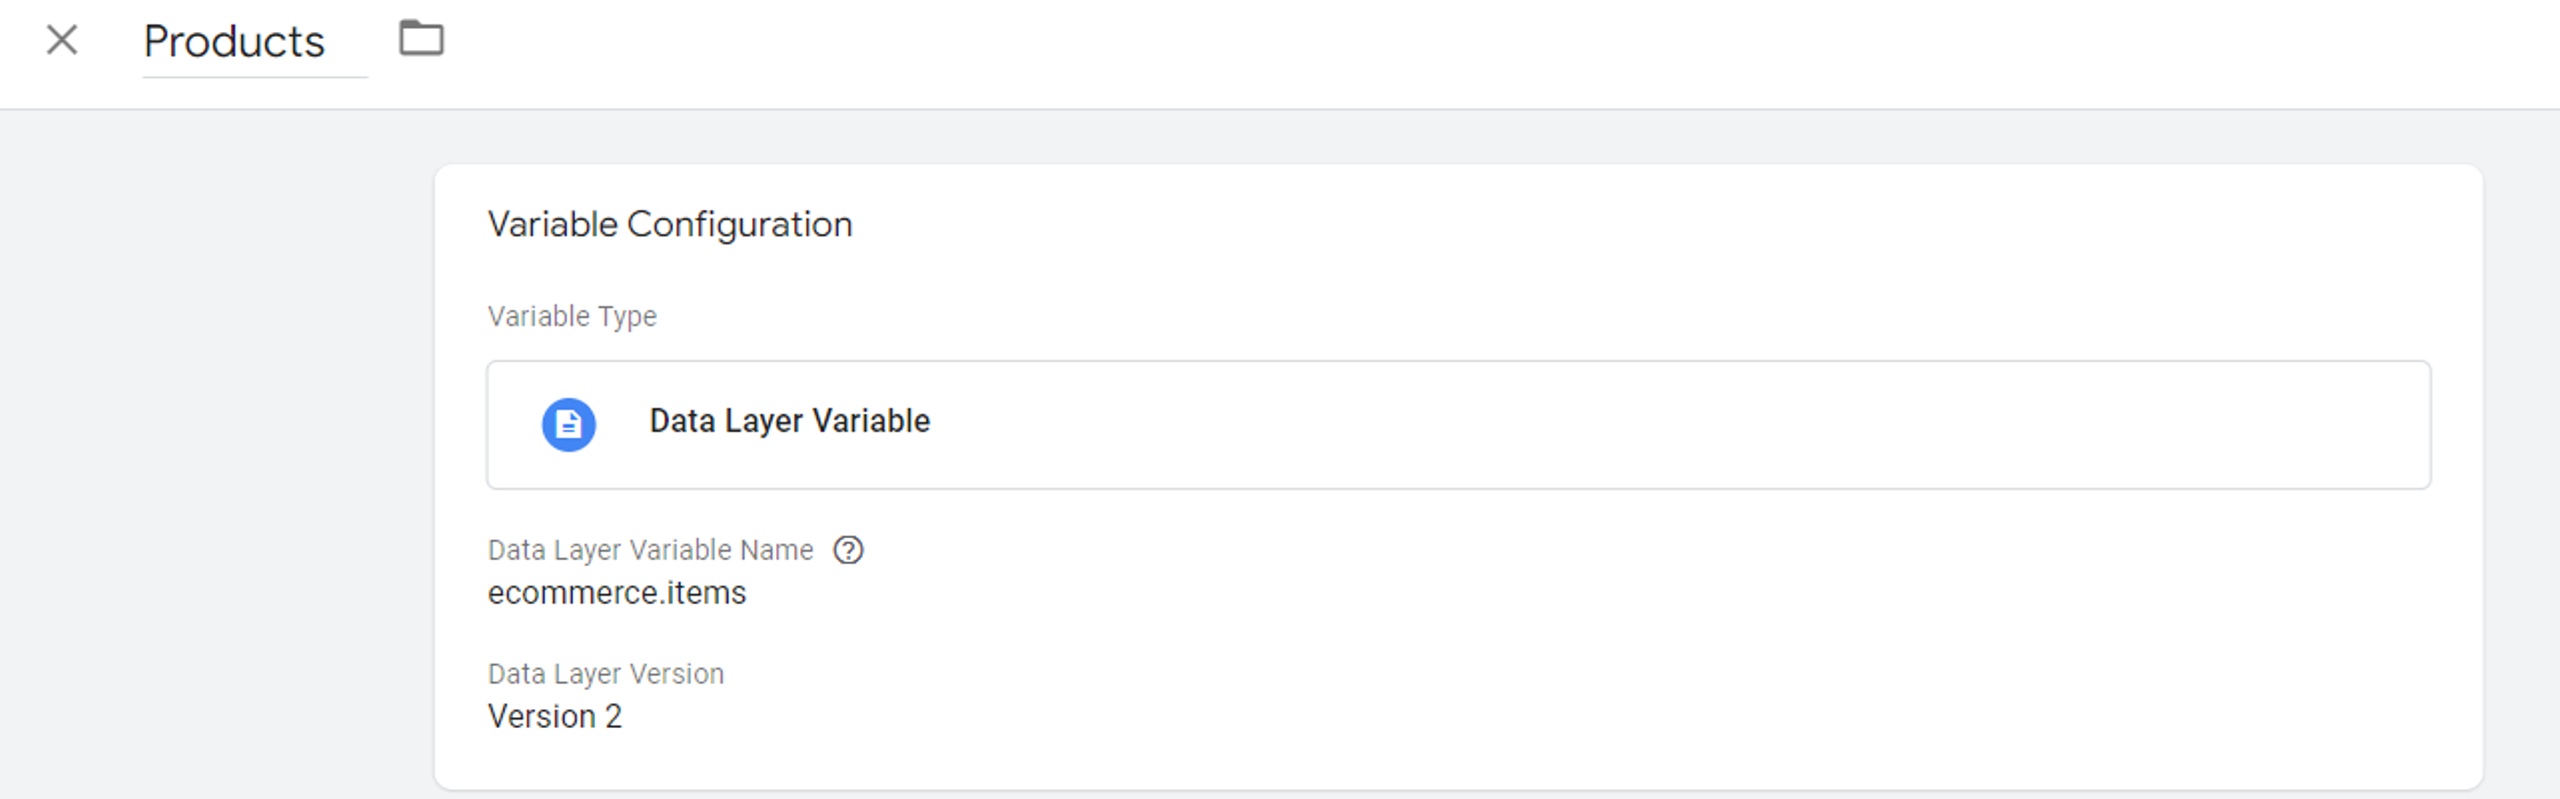
Make sure the Data Layer Variable name value matches your name in the Data Layer exactly. You can see in the picture above where we placed code with the dataLayer.push of view_item event that it has Data Layer variable ecommerce with items array.
After that you can create a trigger with type: Custom Event and enter the Event name exactly as in your dataLayer.push:
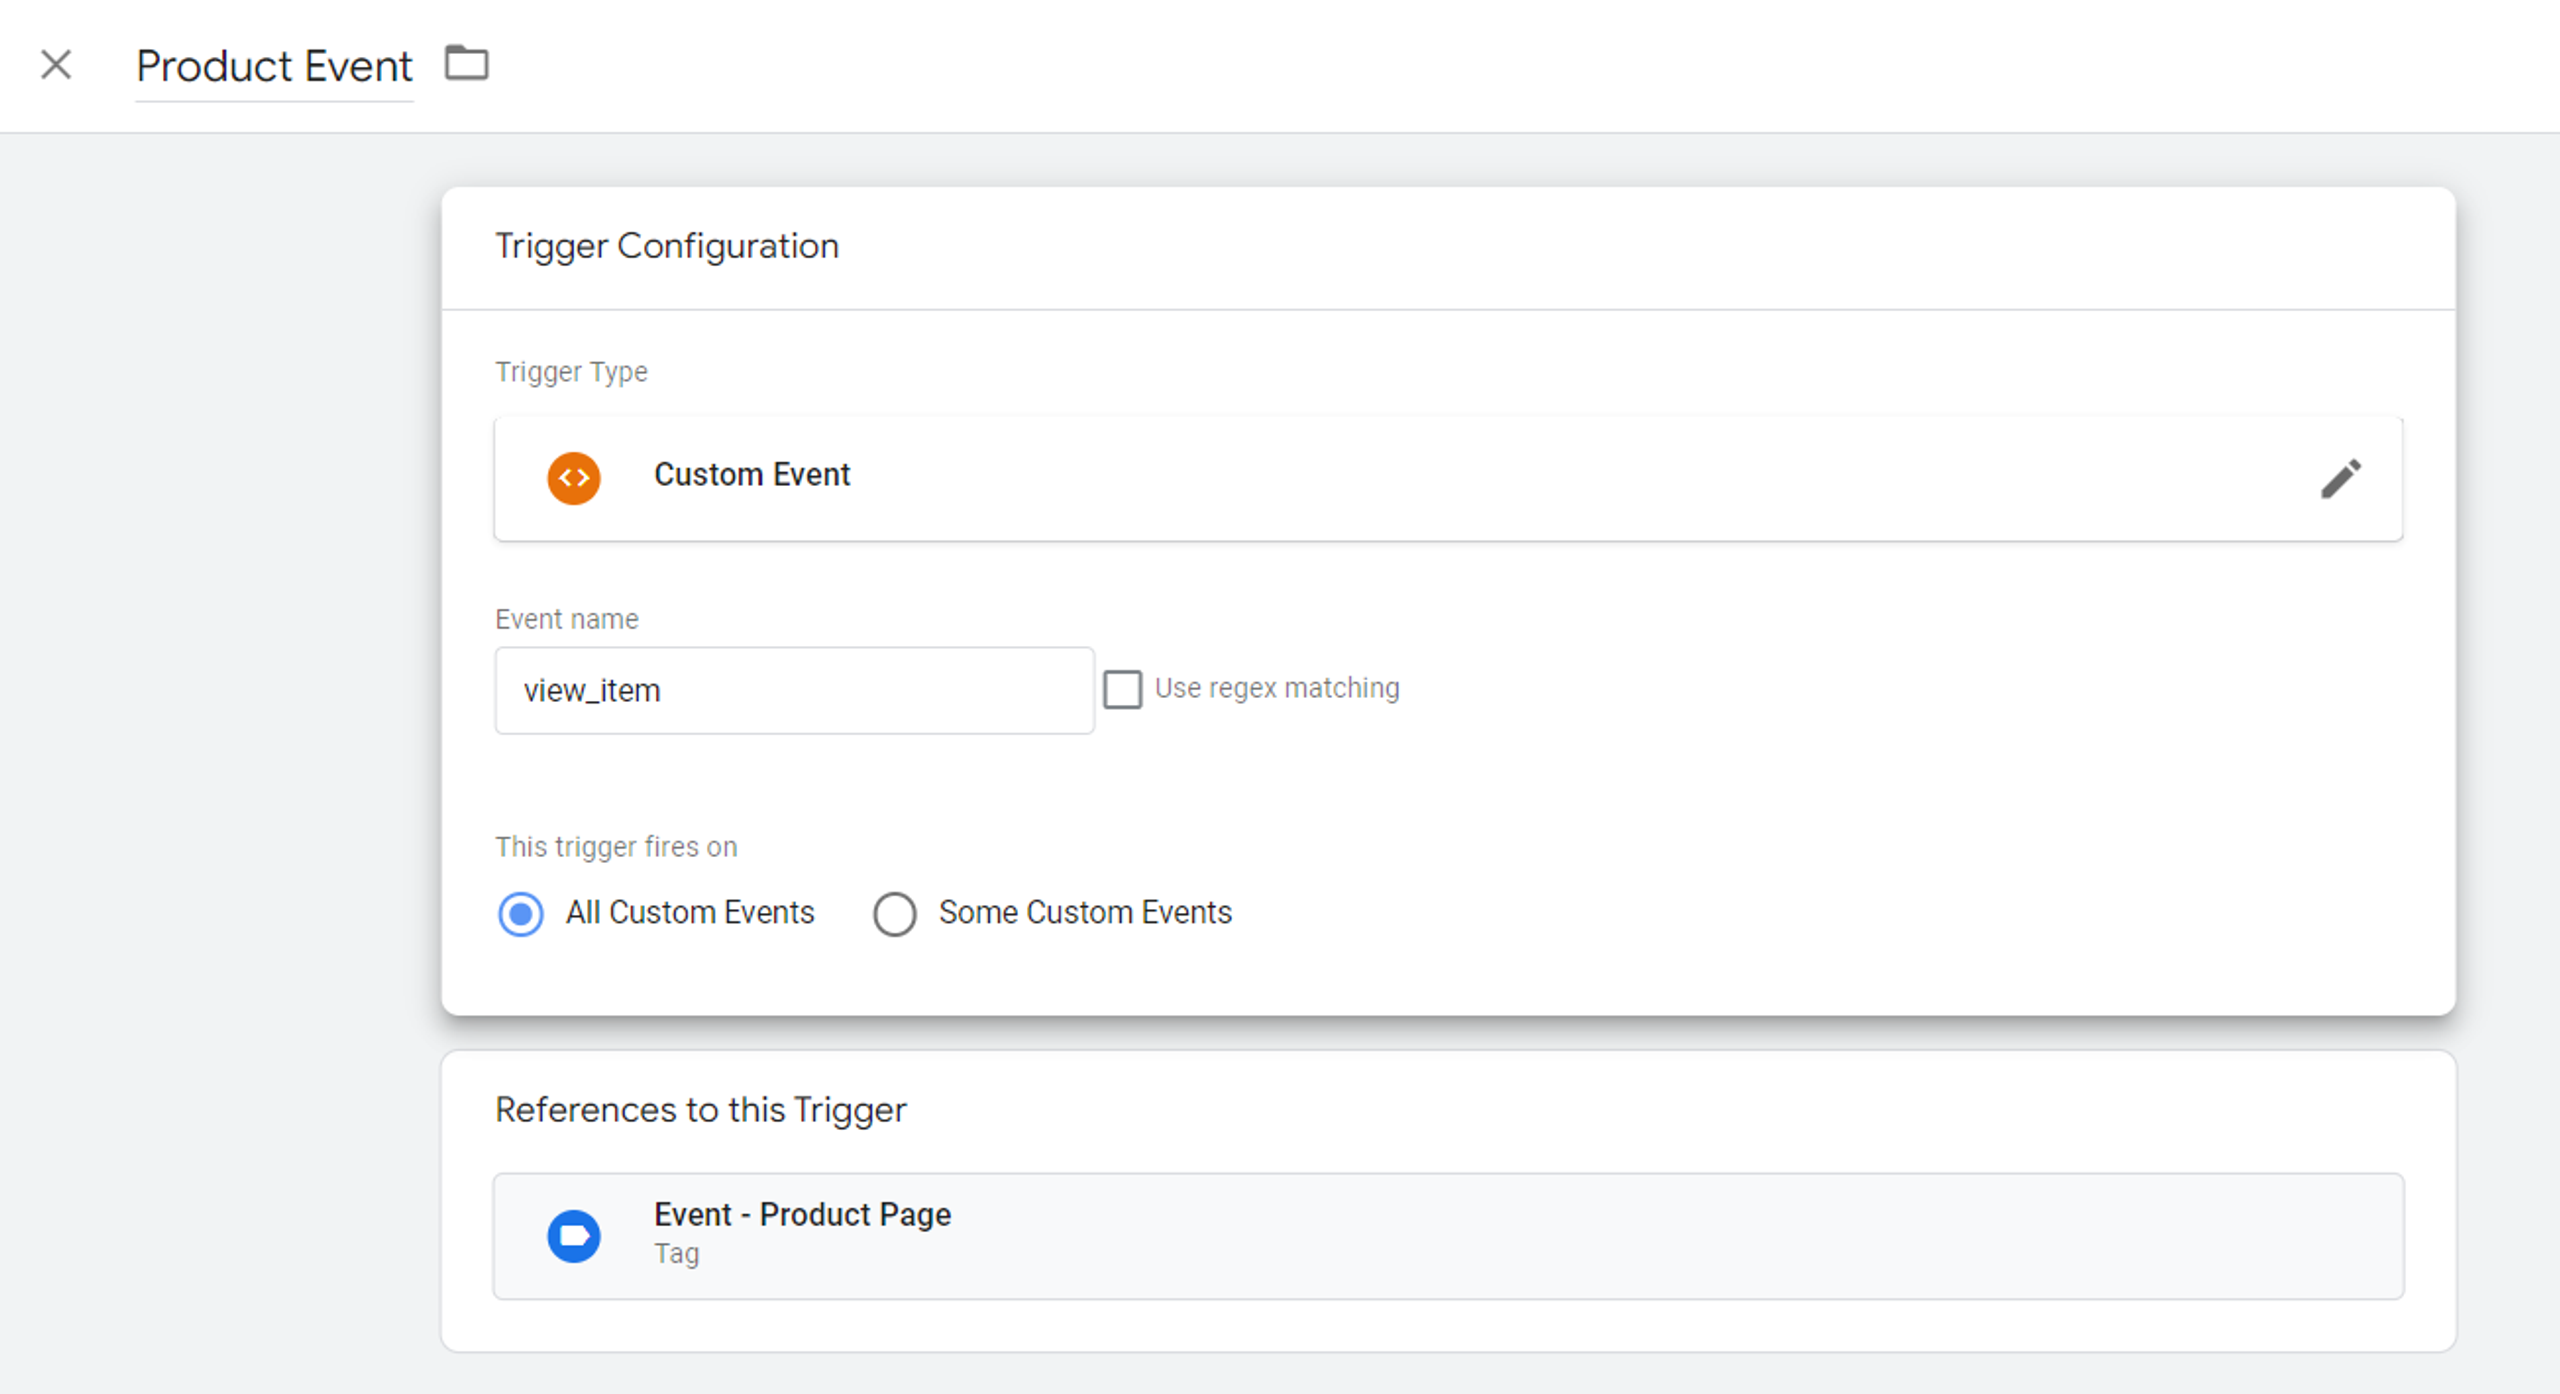
Now everything is ready for setting up the tag.

Enter the parameter name Items in the Event parameters that will be sent to GA4 as the view_item event parameter and its value will be the Data Layer variable created earlier. As for the Configuration tag, you need to choose your general GA4 tag with the measurement ID of your GA4 Data Stream.
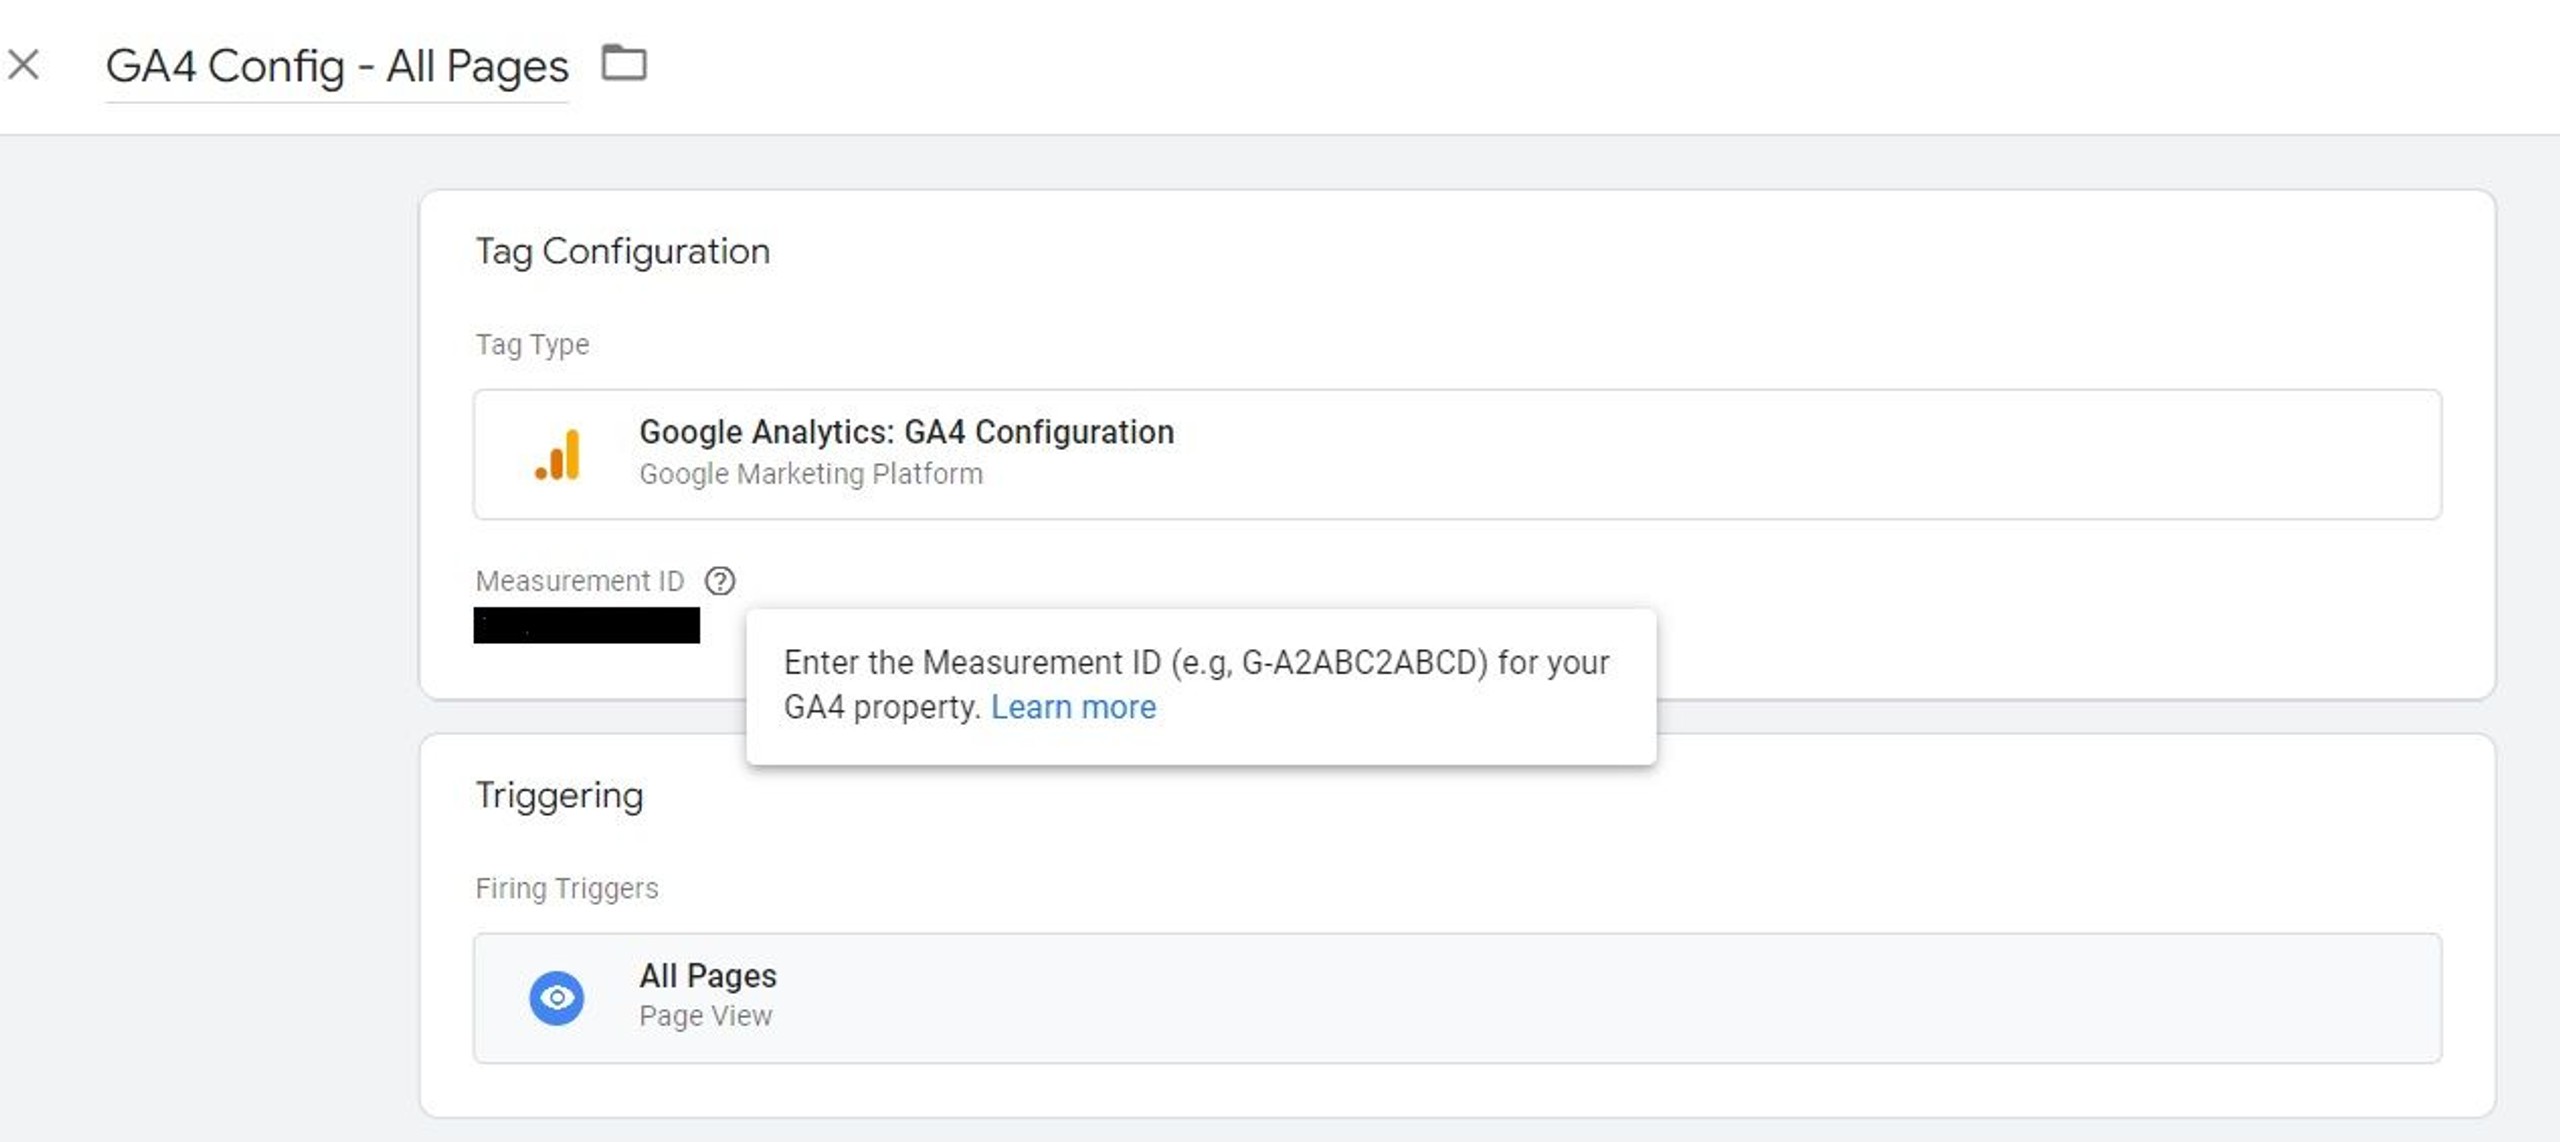
Click Save and congratulations! Now your view_item event is configured. In the same way you’ll set up all other ecommerce events. This is an example of a purchase event tag:

It’s time to debug and make some test purchases.
Testing and debugging set up
Having configured all the tags, you should verify they are fired properly and GA4 receives all information. For this, open GTM Preview mode in your GTM account, try to view the products, add them to your cart, start checkout and make a test purchase.
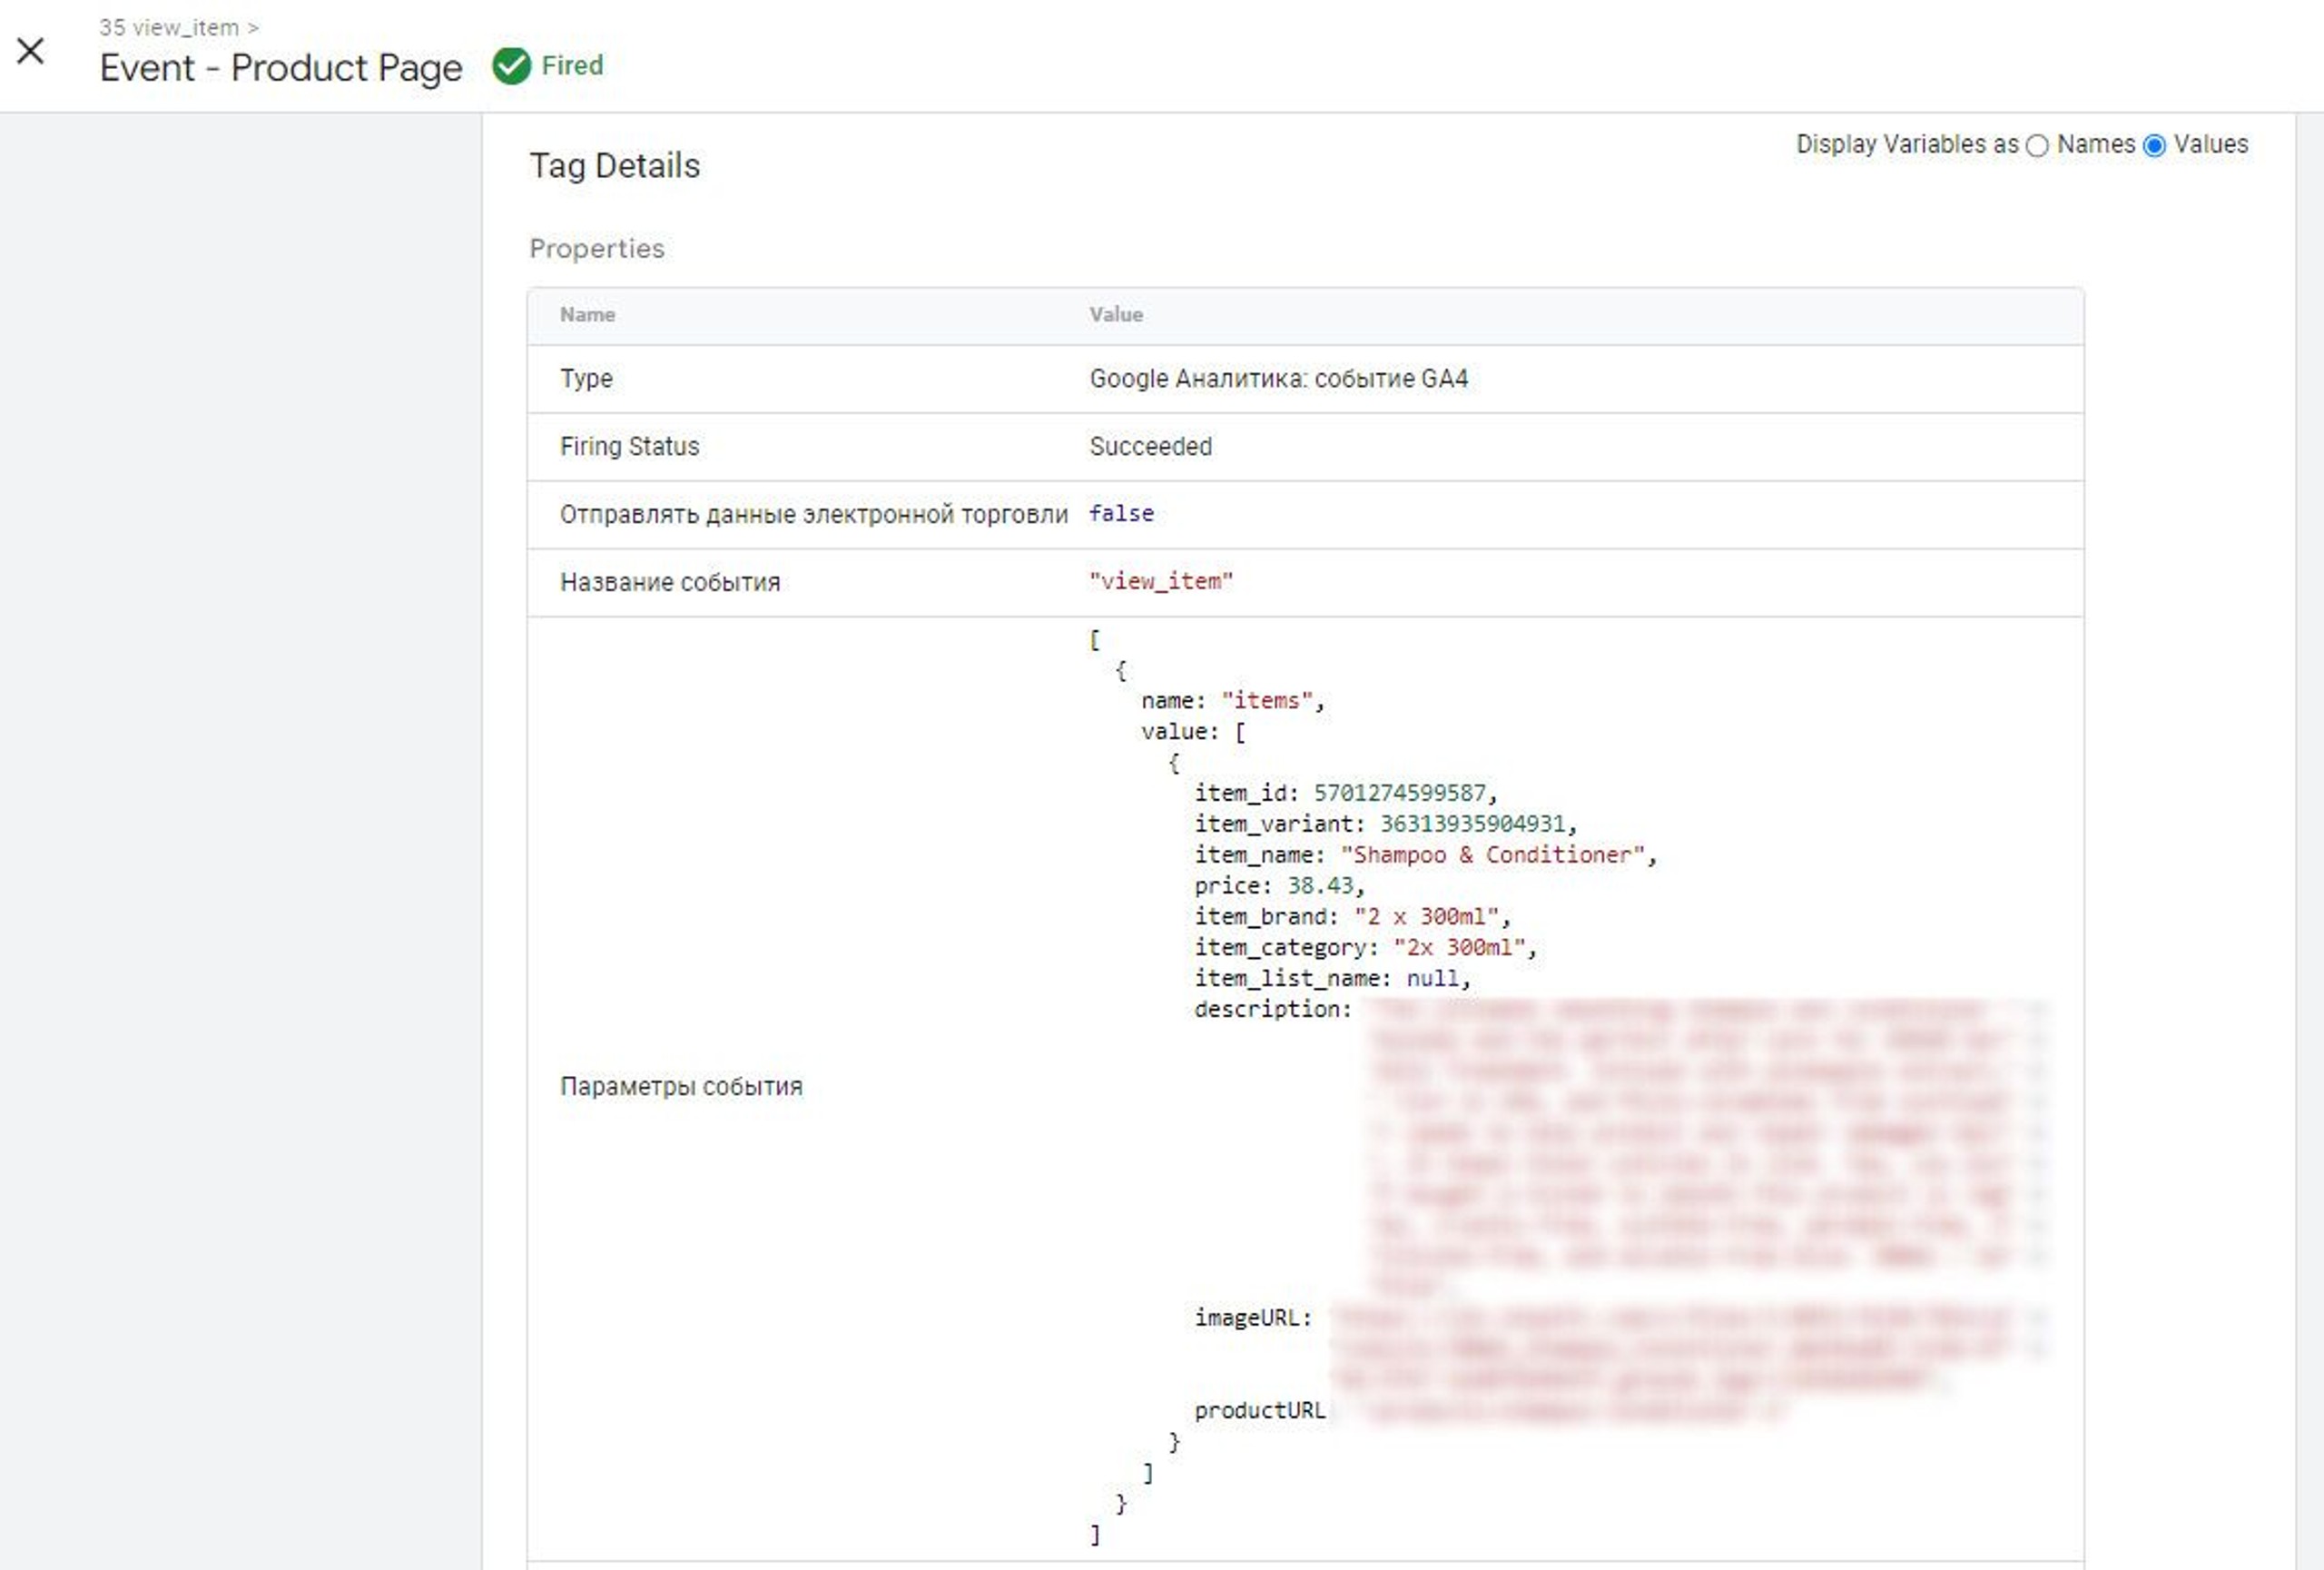
Let’s inspect Data Layer in Tag assistant by opening product page
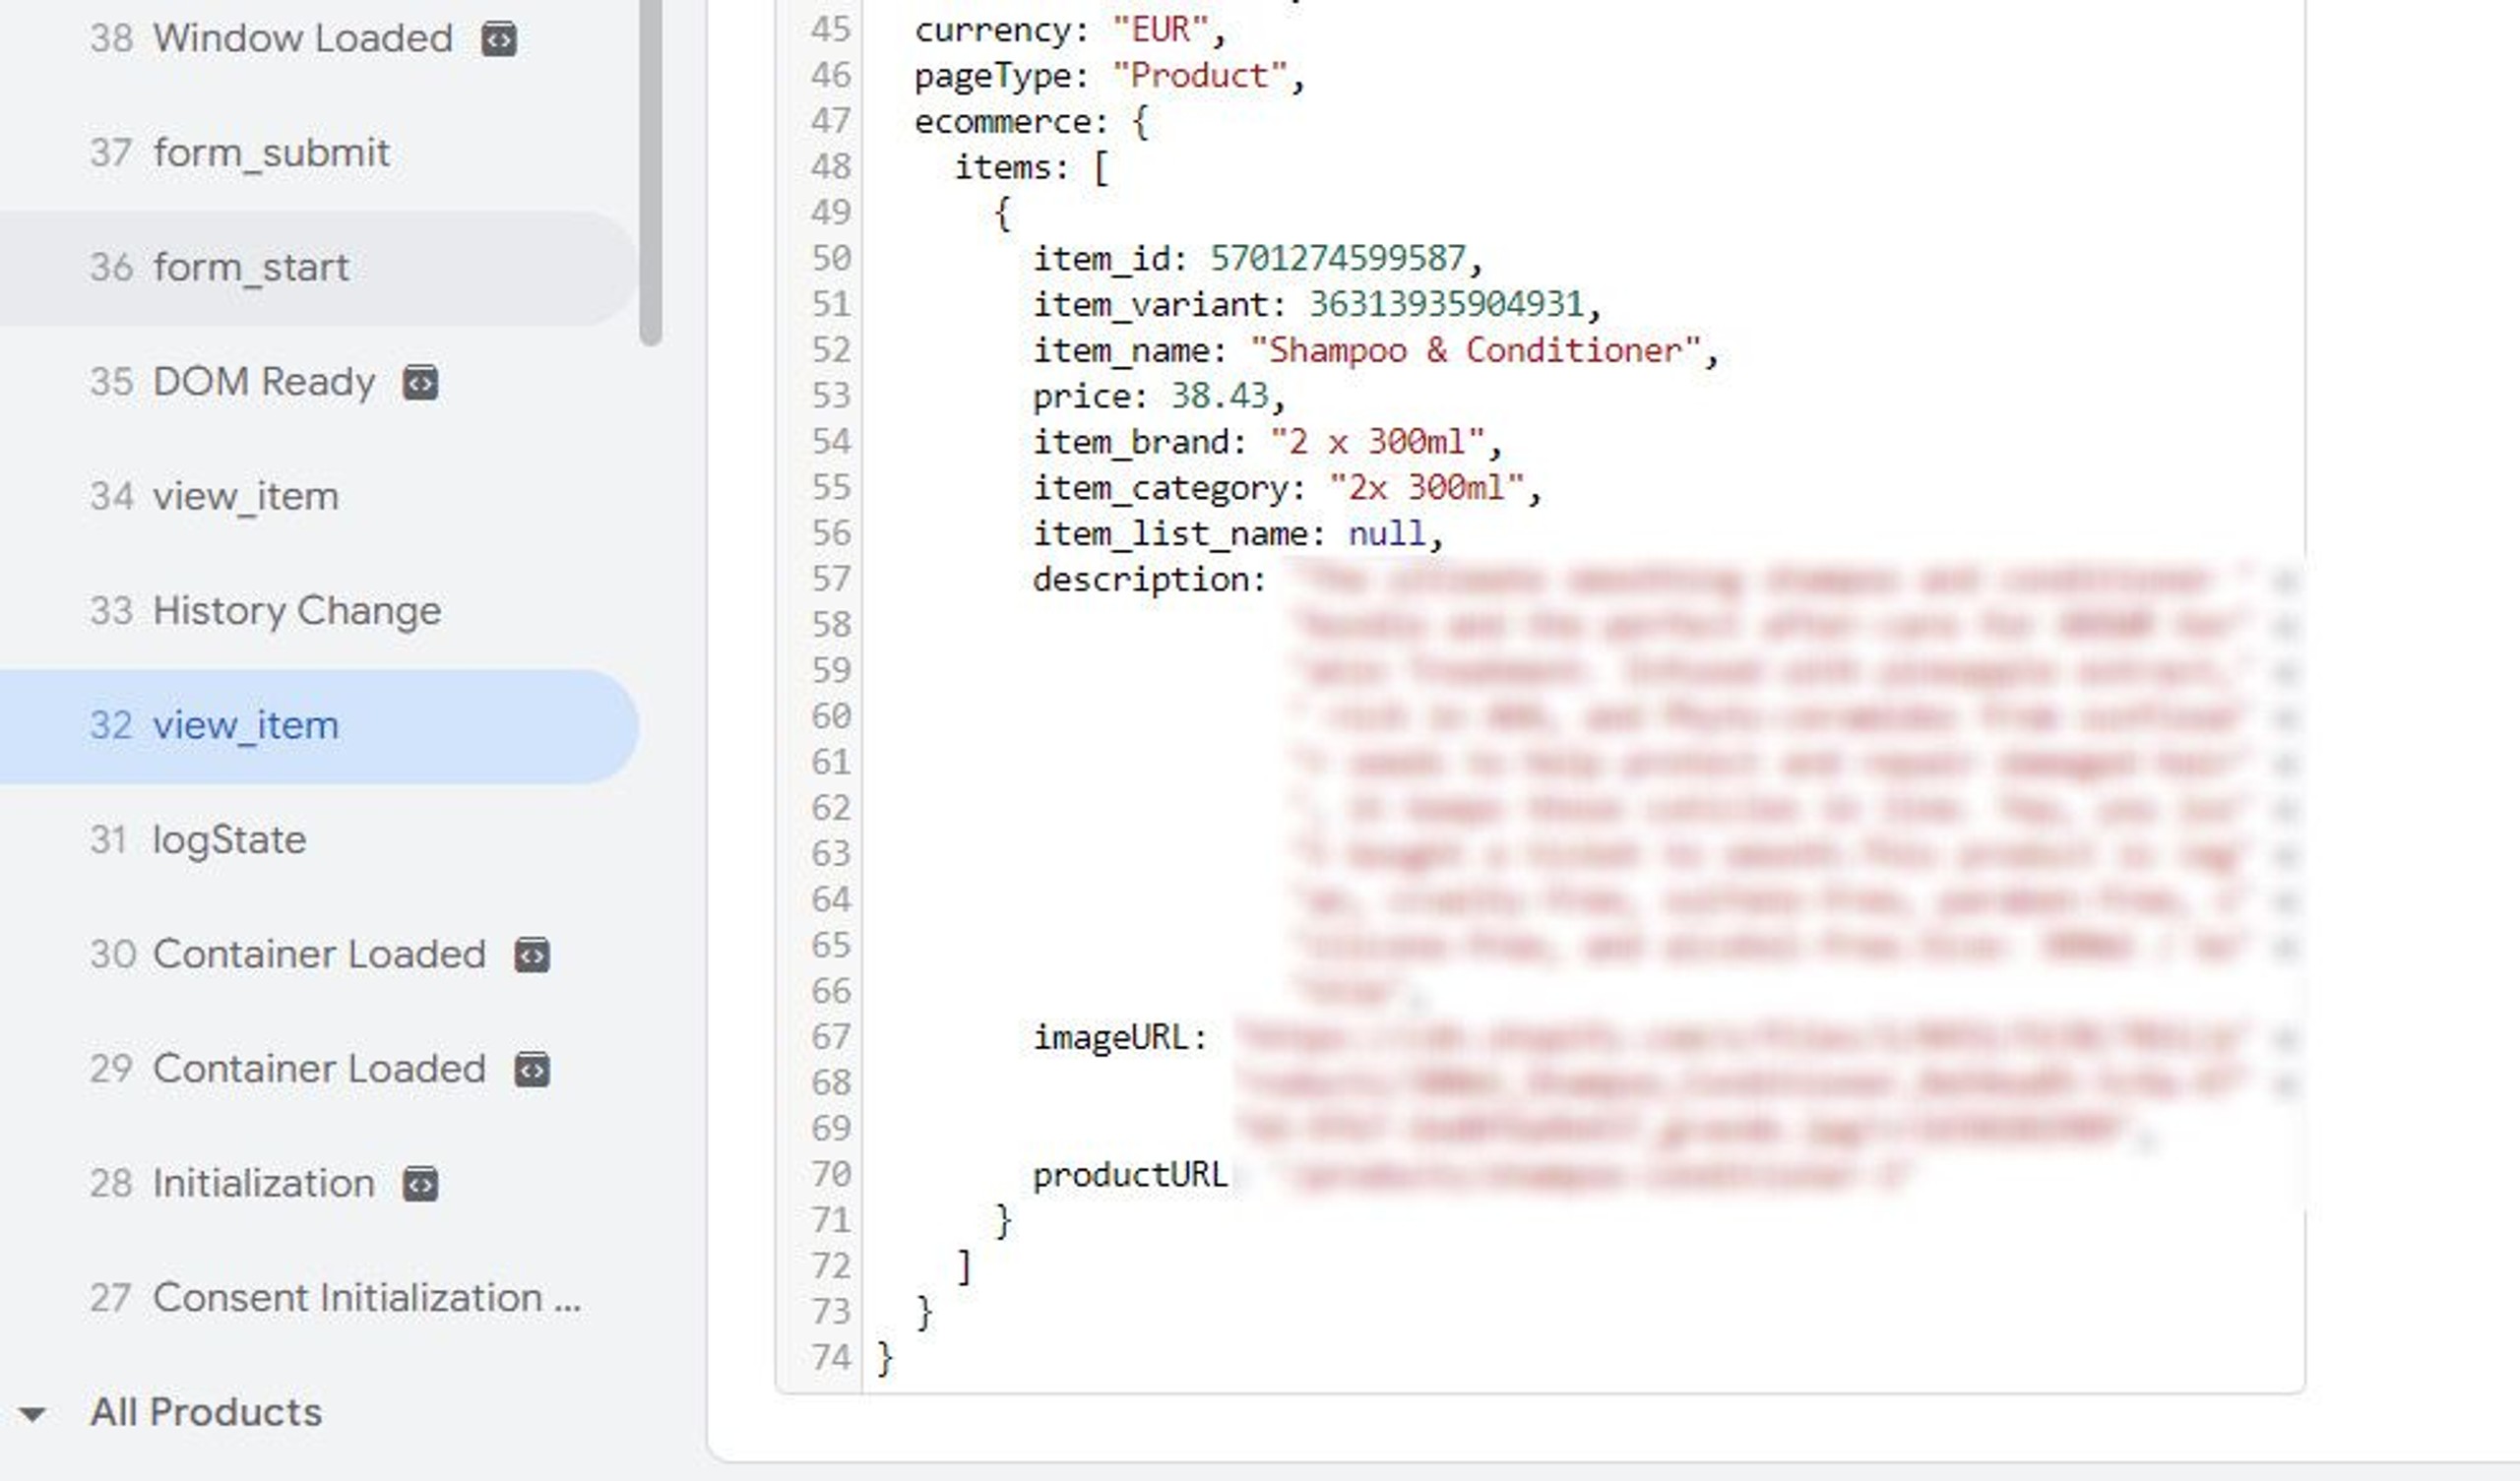
This means that the Data Layer receives all information provided by your Shopify store. And then it should pass it to GA4 through configured GTM tags.
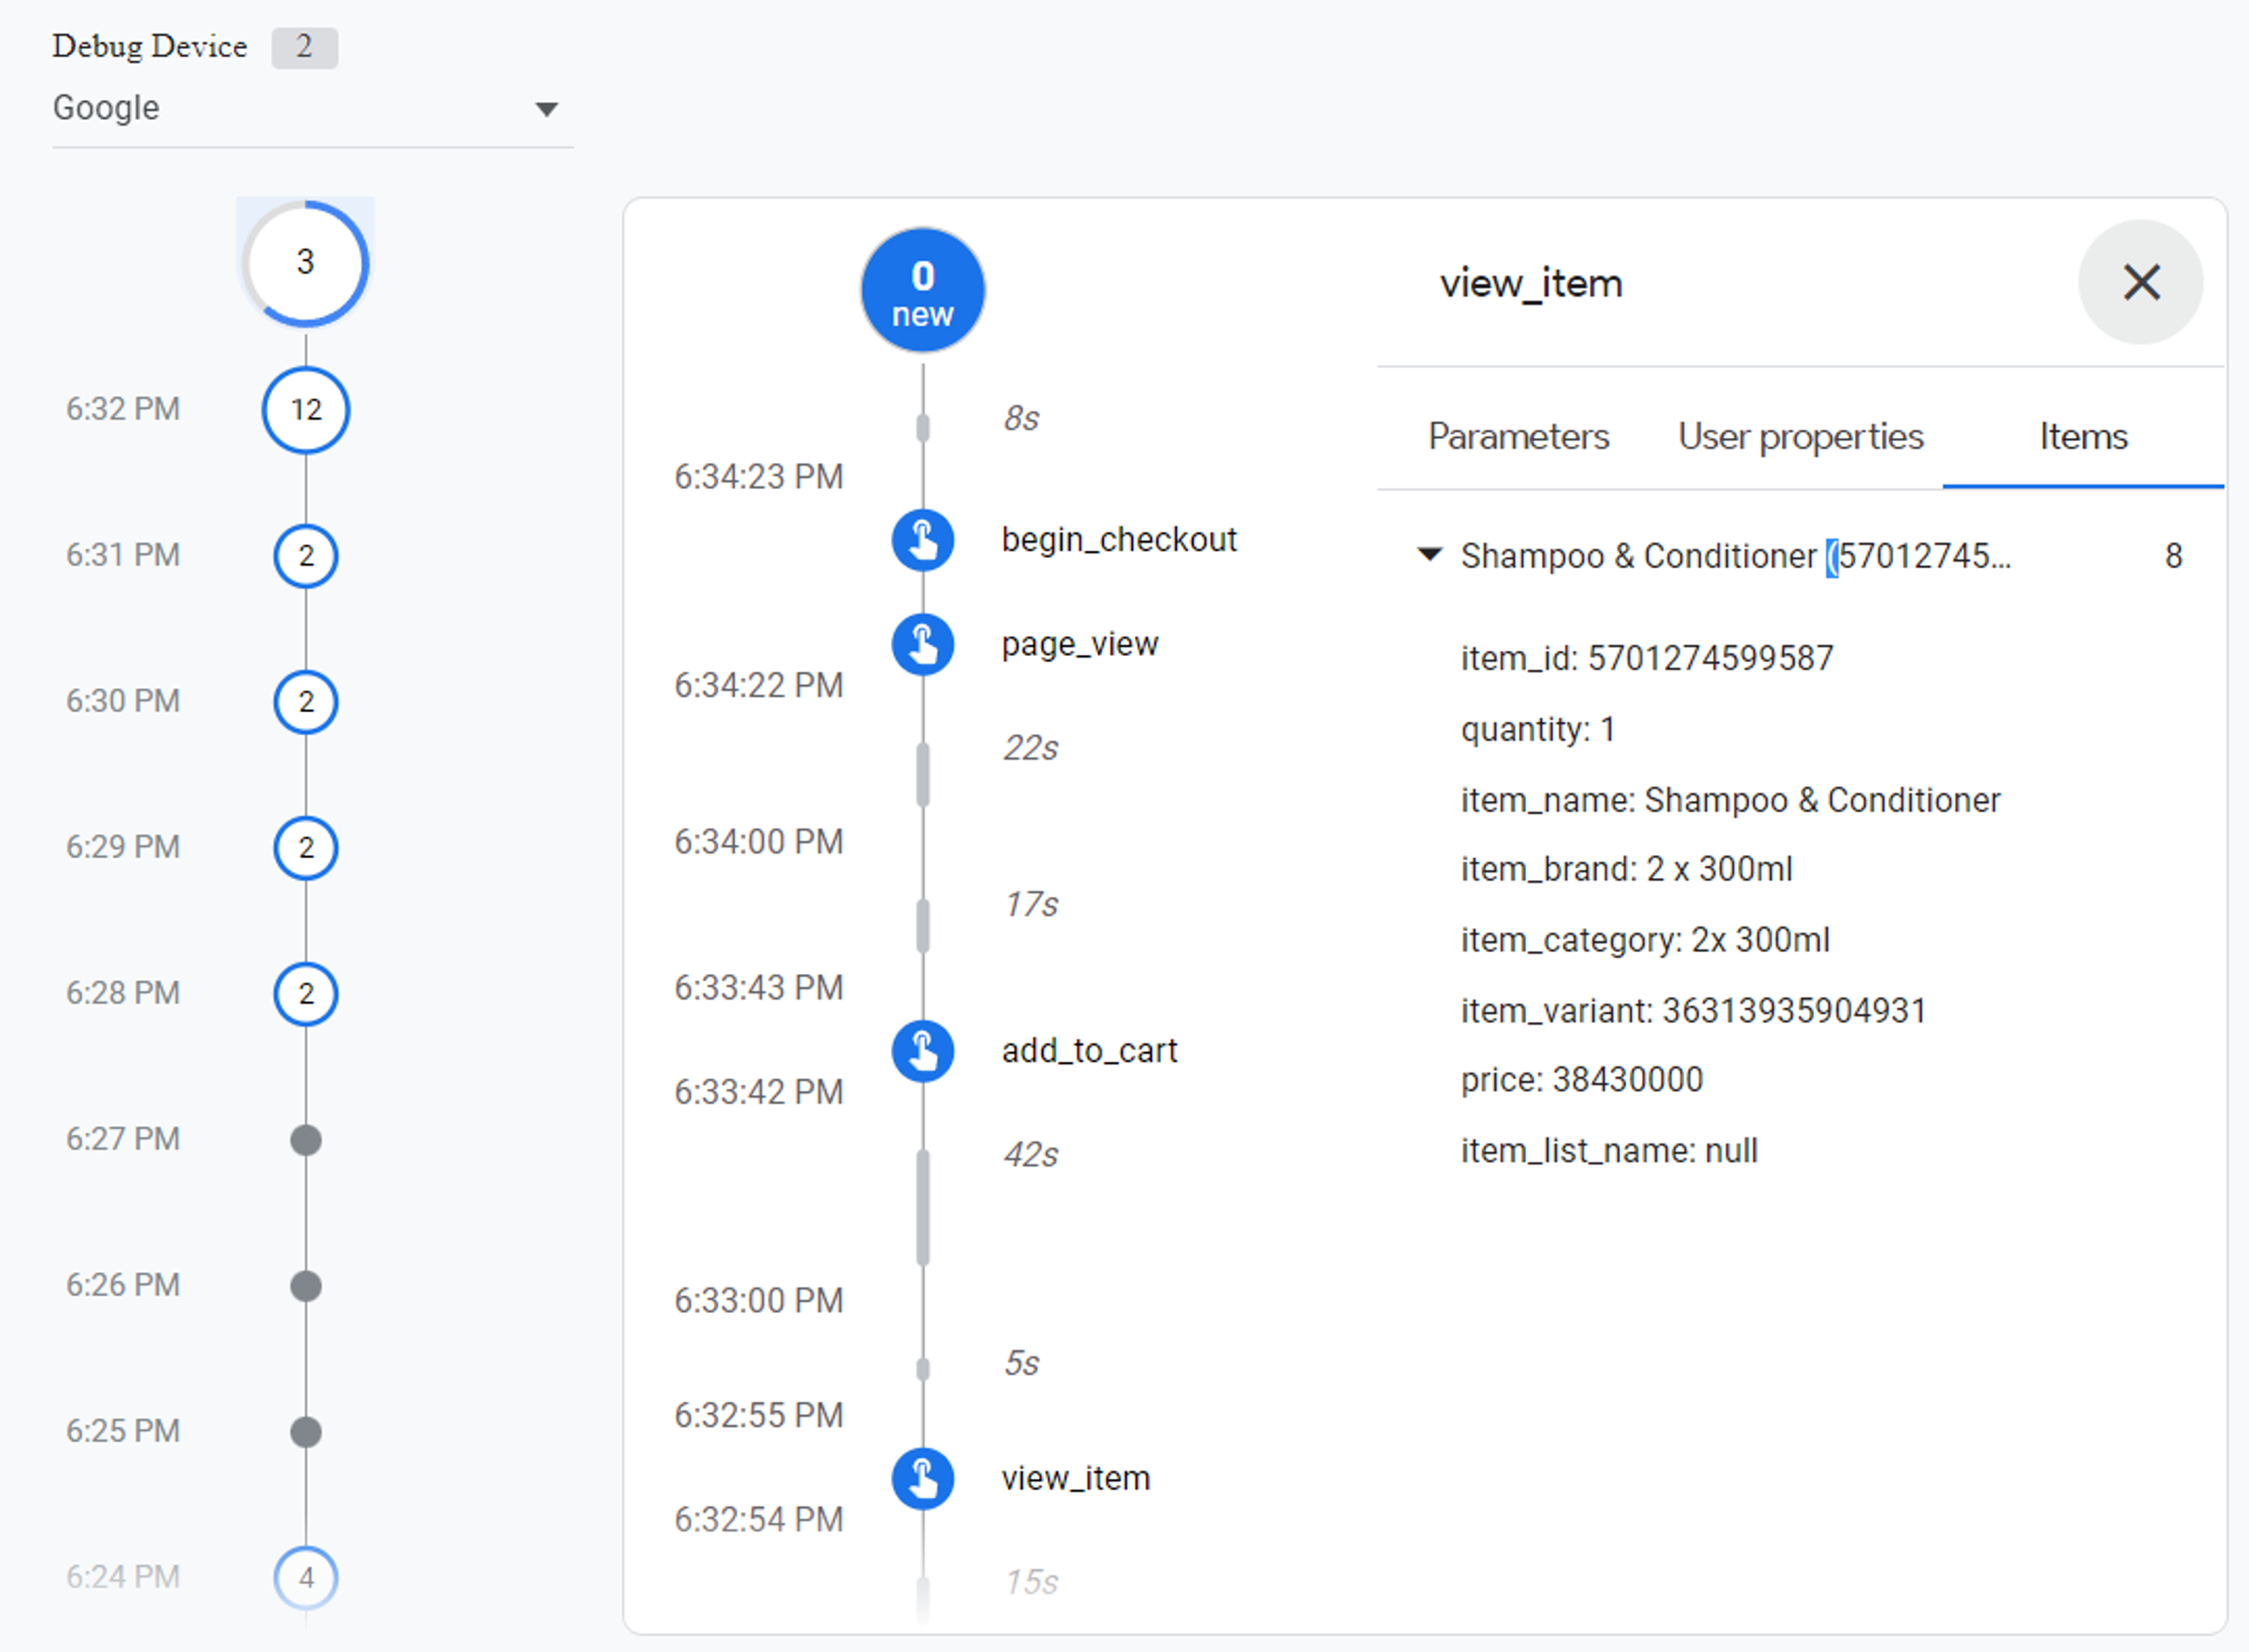
By opening DebugView in the Configure section of your GA4 property you can debug all events that appear in GA4. In our case:
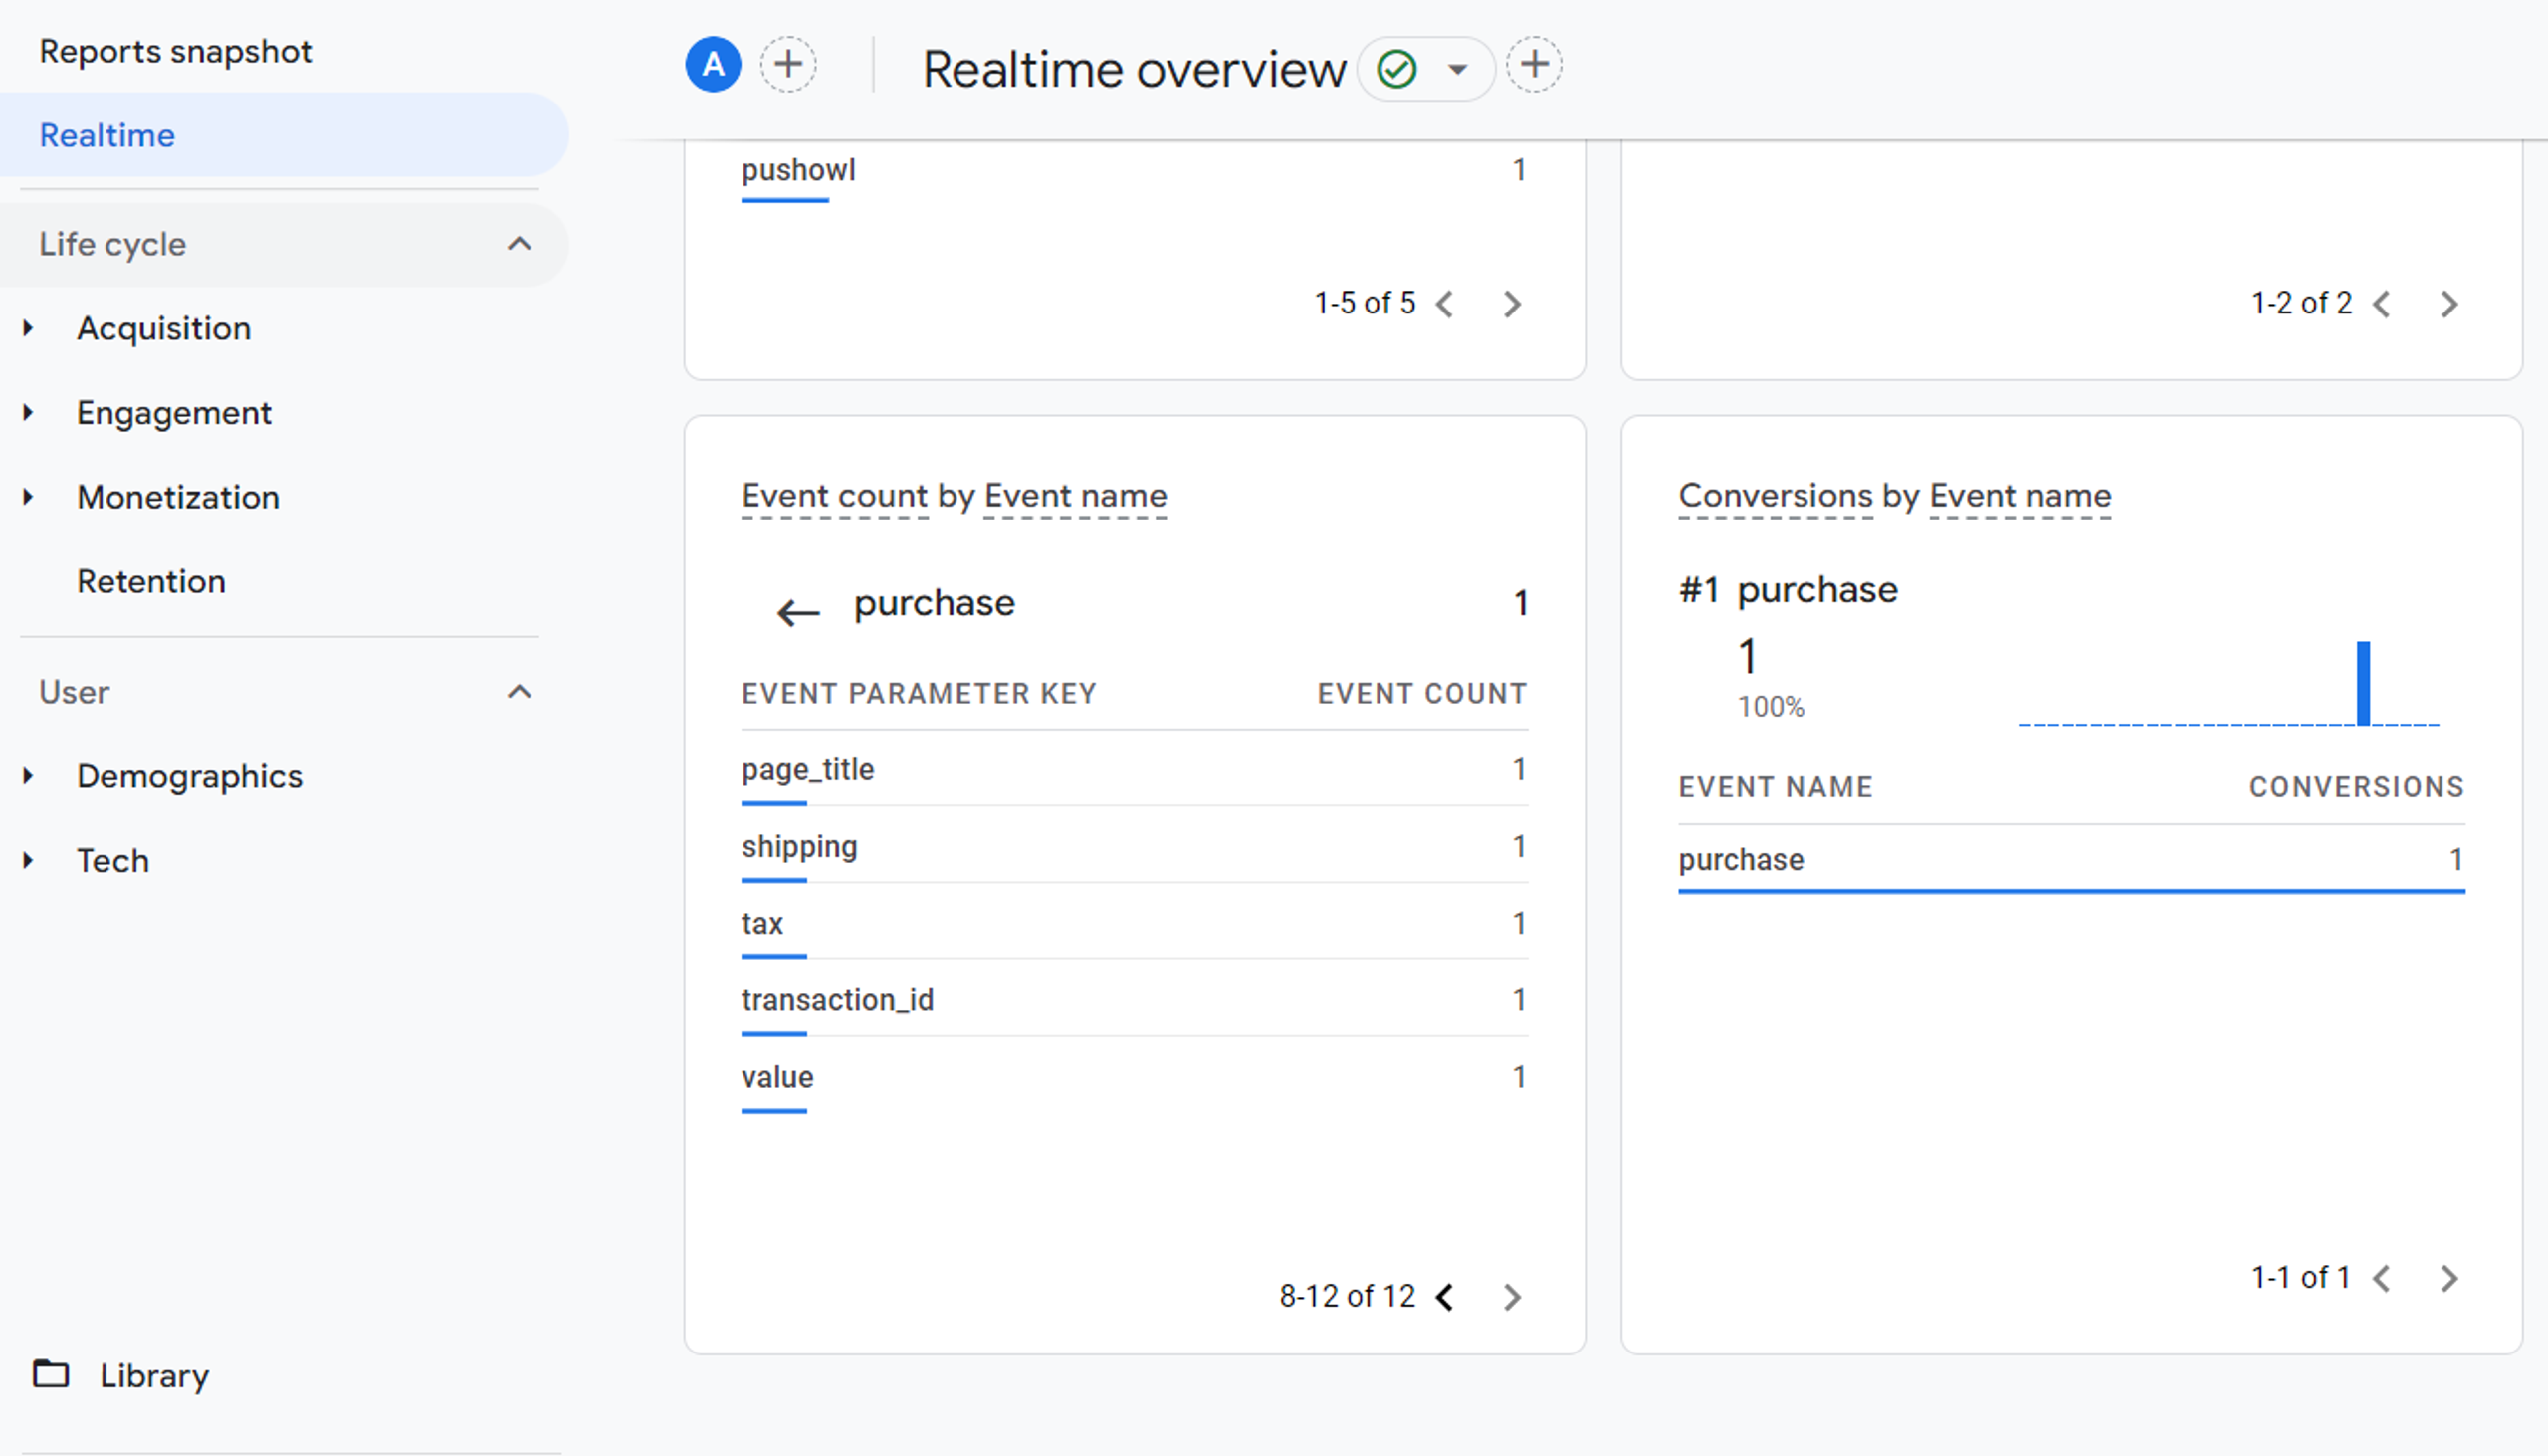
And when you make a test purchase in the Realtime section of standard reports as well as in DebugView, you’ll be able to observe the purchase event with the list of event parameters you configured in tag manager:
Useful tips
As an implementation of GA4, ecommerce tracking for your Shopify website is authorized with sending ecommerce data about events tracking, including purchase tracking, therefore you should always avoid sending Personally Identifiable Information (PII) to Google Analytics. Keep it in mind when you create your events, especially those that are tracked on the checkout page where your customers enter their names, addresses, email – all this data is considered PII by Google. Though you can store it in the Data Layer, do not let Google Analytics grab it with GTM. Otherwise your Google Analytics account can be blocked.
Be careful when you edit code of your store. Make sure you have saved backup of your live theme code. If you are not confident with installing some additional scripts or snippets just contact your developer or person who has experience in this question. Because you can break your store when adding even GTM code to the wrong place.
Test, test, test.
Always test your configuration, it would be perfect if you test it on each stage. Added configuration tag but there are no page views? Maybe you have added the wrong measurement ID of your GA4 Data Stream. Check and test it.
Event is passed to GA4 and you see it but there are no event parameters with it? Maybe you have entered the wrong name of the data layer variable as a value of event parameter in GTM. Change it and test it.
There are no values in the Data Layer? Maybe you have made a mistake with the names of the Shopify liquid objects and their properties in your Data Layer code. Ask your developer, Shopify community or check the official Shopify Cheat Sheet. Then fix it and test again.
Conclusion
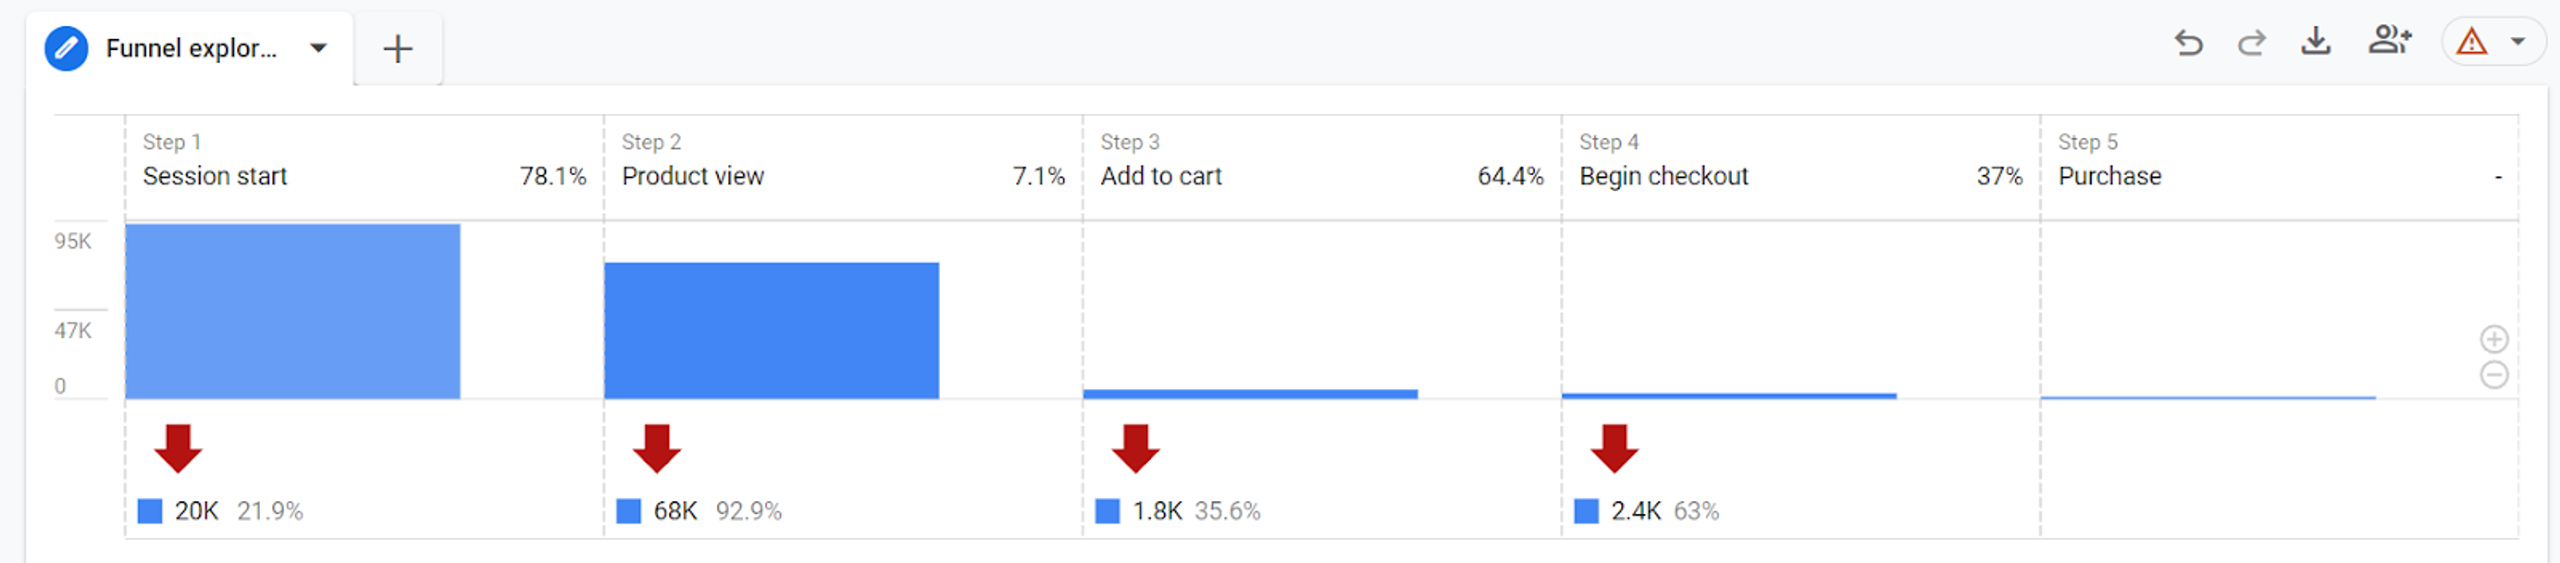
GA4 ecommerce tracking gives you great opportunities for analyzing your Shopify sales across different traffic sources. It allows you to build a funnel exploration report so that you can measure conversion rate between different stages of the purchase funnel (view_item, add_to_cart etc.).
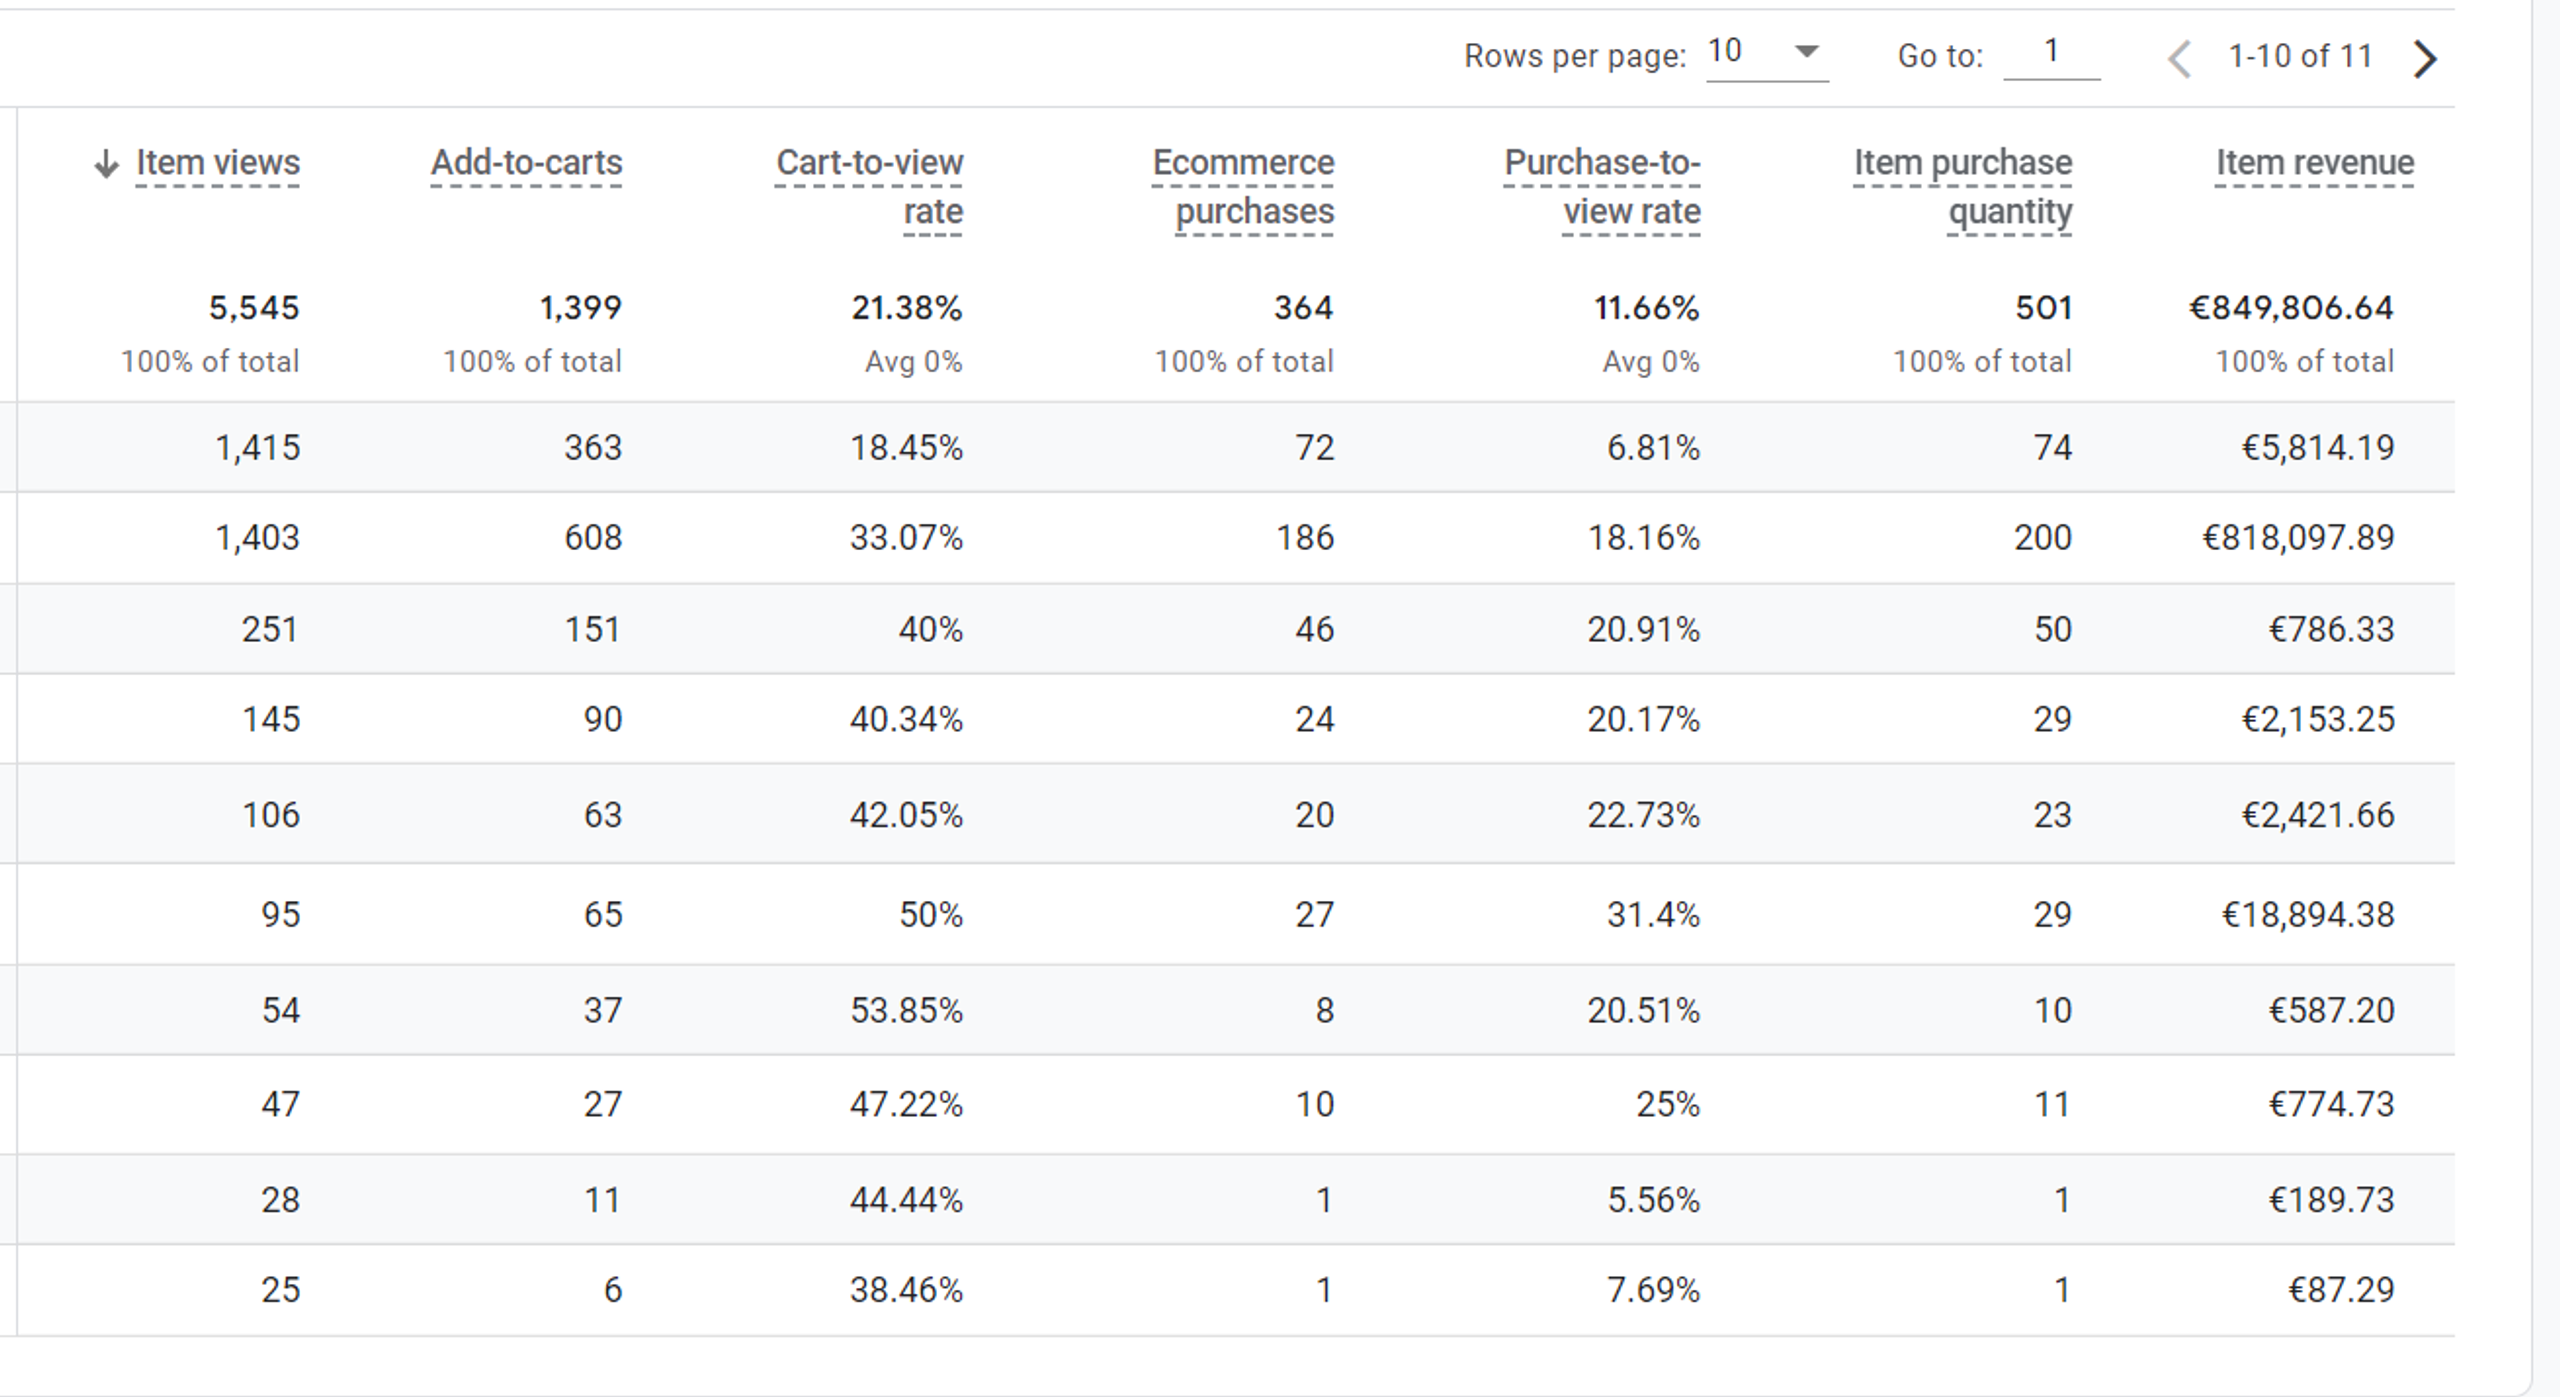
Moreover you will be able to see the number of your eCommerce purchases, total revenue, which items were purchased, viewed, added or removed from cart.
In this guide we have described in detail how to implement this tracking for the Shopify stores with Plus plan. It is considered much easier to configure GA4 ecommerce tracking than for the Non-Plus as there is no access to the checkout page for the last one and you have to develop the script for the purchase data layer. If you need help with the second one feel free to contact us. We have wrote our own script to configure GA4 tracking for Non-Plus stores.