How to make Facebook Business manager your friend
Posted on 10/30/2023
Reviewed by Arnt Eriksen updated at 11/24/2023
Introduction
Management. Marketing. Facebook. Complicated things that we constantly write about. But what if there was a way to make all three a little easier? Meet Facebook Business manager, recently renamed Meta Business manager - your newest assistant.
Navigating between multiple ad accounts on Facebook and Instagram can get confusing. The more people on your team, the worse it gets.
You can try using team management software like Basecamp, Trello or Slack to organize your work and make it easier to monitor which member of your team is managing which account. It certainly beats managing them the old-fashioned way of walking around the office. But those solutions don't have integrated tools to manage ad accounts and gather data. Meta Business Manager does.
So why settle for half-measures if Meta already has everything you need?
What is Meta Business manager?
It has tools to help you manage your ads on Facebook and Instagram. It has tools for managing multiple Facebook and Instagram accounts. It has tools to handle product catalogs. And it has tools to assign people different roles for working with other tools.
In other words, Meta Business Manager is a pre-built digital hub for handling almost all of your Meta-related business needs and monitoring the business assets on this platform. If you want to make working with Meta easier for yourself, you need to learn how to use it. In this article, we will help you with that and show you how to use Facebook business manager.
Why use Meta Business Manager?
Any conventional business is an ordered structure. There are clear roles with clear hierarchies and responsibilities. There are CEOs, team leads, managers, and low level personnel, and each of them is doing their own job. A structure like that does not thrive in chaos.
Meta Business Manager helps cut down on some of that chaos. Here are some other reasons why you need it:
1. Differentiate between your personal Facebook account and your business.
Have you ever sent a personal message to the wrong person by accident? Now imagine posting something you wanted your Facebook friends to see under your business account.
Business Manager helps you draw a line between your personal Facebook profile and the accounts you use for work, which makes avoiding such uncomfortable situations easier.
2. Keep your ad accounts and pages in one place.
Typically, the larger your business gets, the more pages and ad accounts you will need to keep track of. Business Manager keeps it from getting too chaotic. It will give you an easy way to manage your Facebook Ad accounts and Facebook pages all form one place.
3. Scale your team.
You can add new team members and partners to your Business Manager in a few clicks. Giving them access to ad accounts and pages is just as easy, and does not override their ownership. If somebody stops working for you, you can revoke their employee access as well.
4. Managing custom audiences.
You can create and assign custom audiences to different ad campaigns, all from one hub.
How to create a Meta Business manager account?
This part is simple. You will only need to follow these steps:
1. Go here.
2. If you don't already have a Meta Business manager account, you will see something like this.
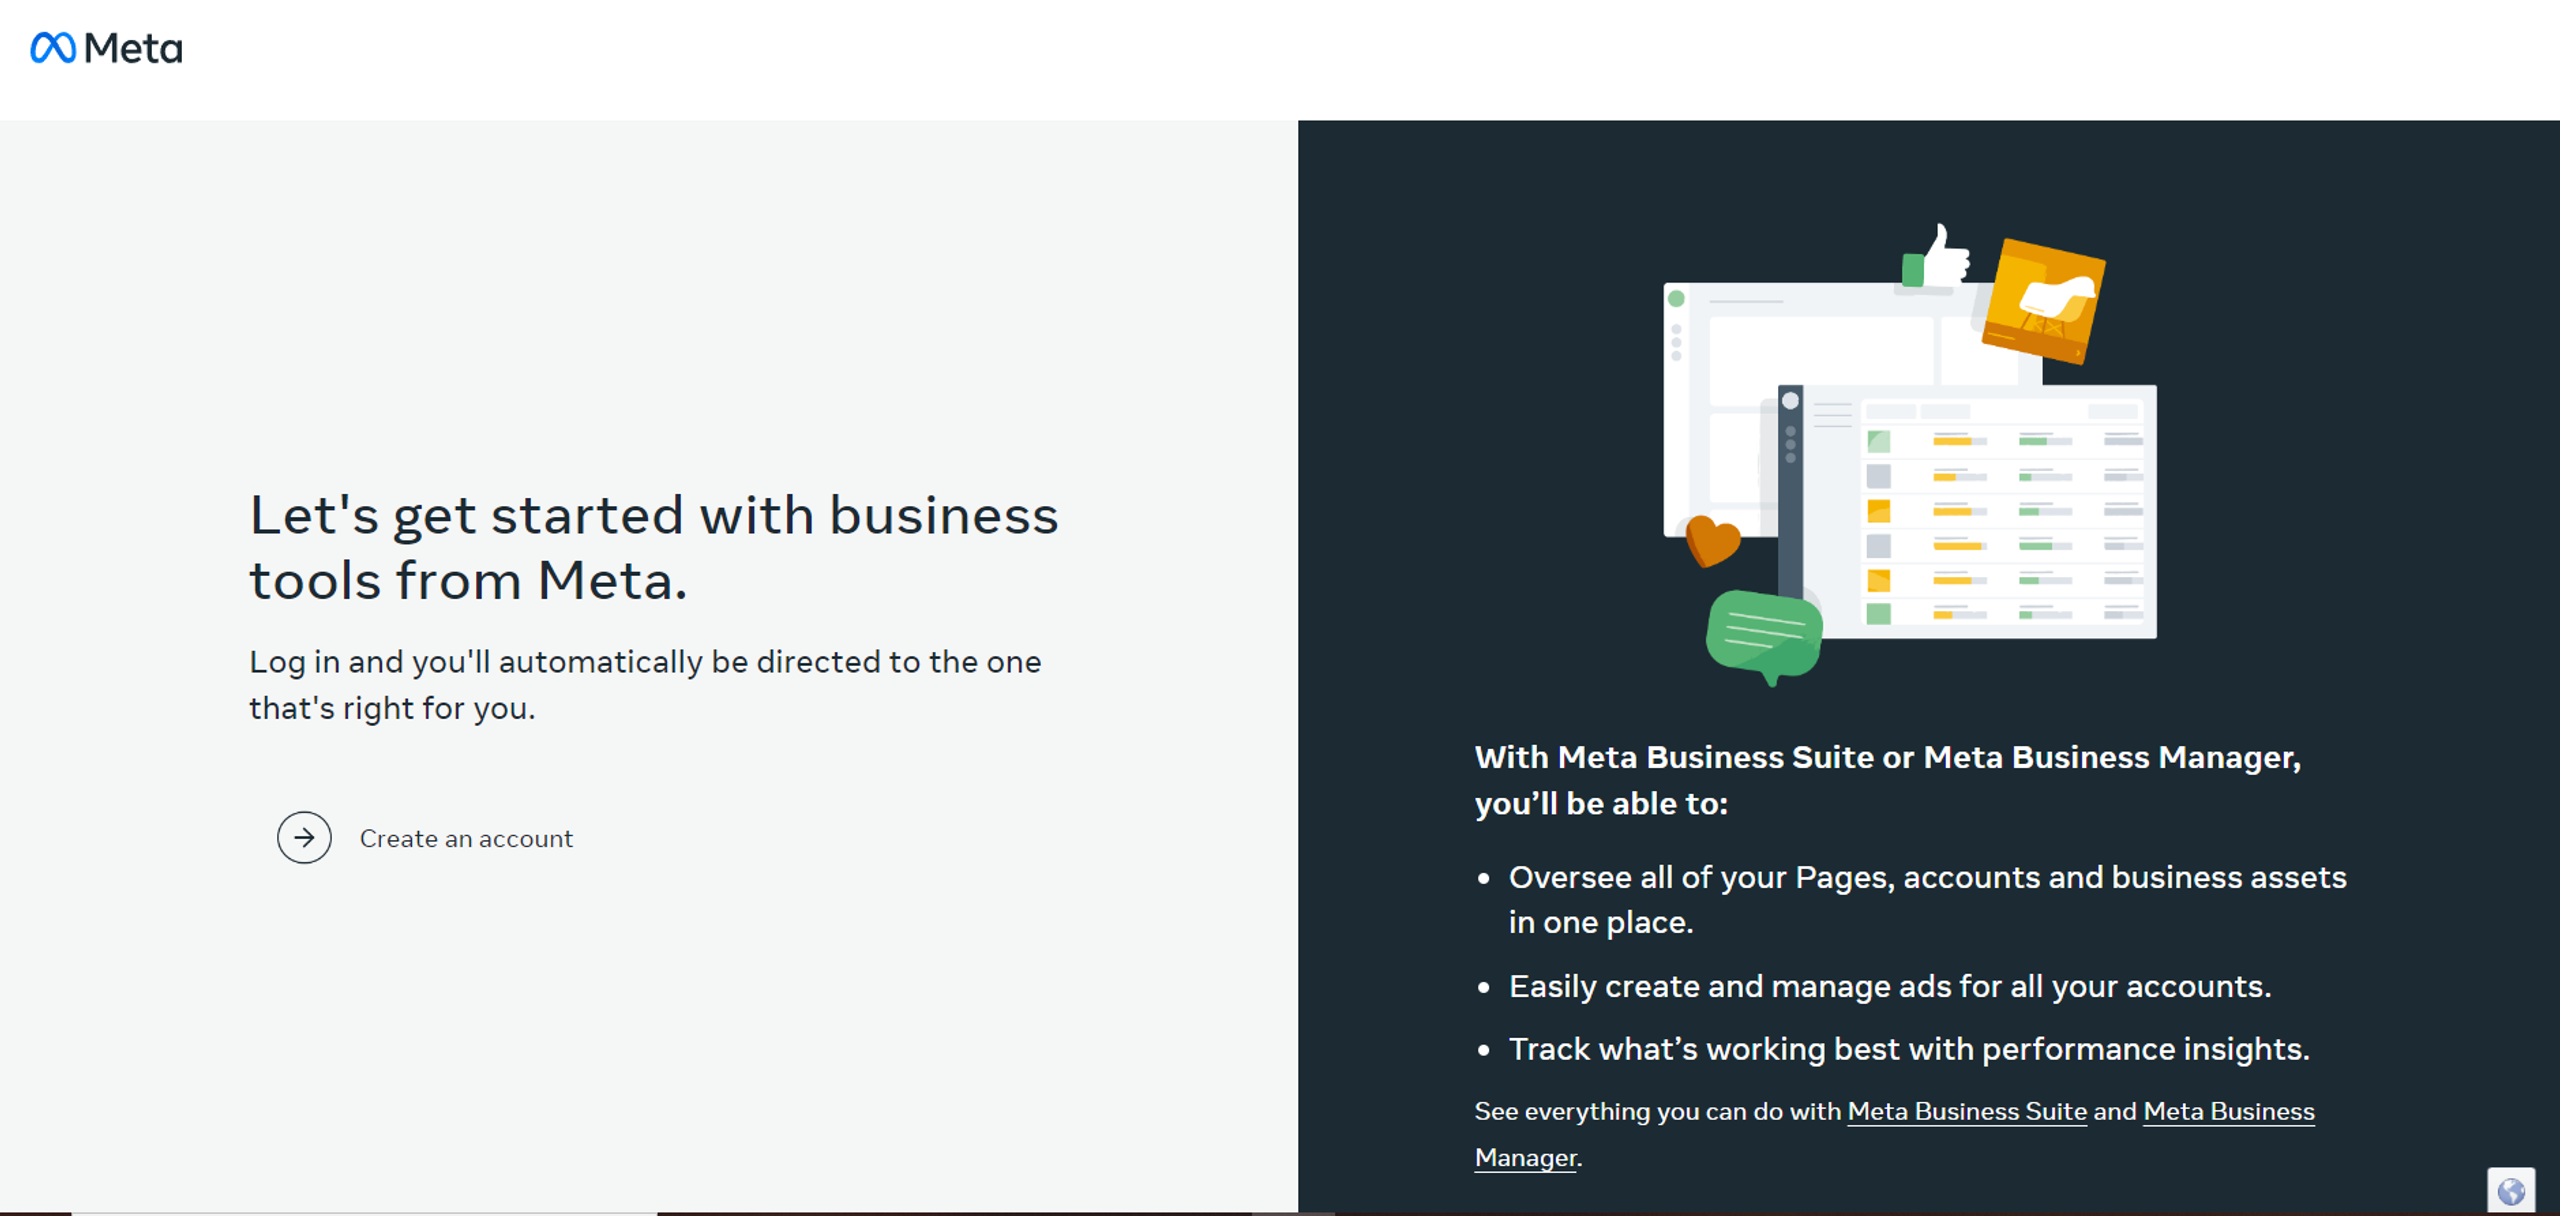
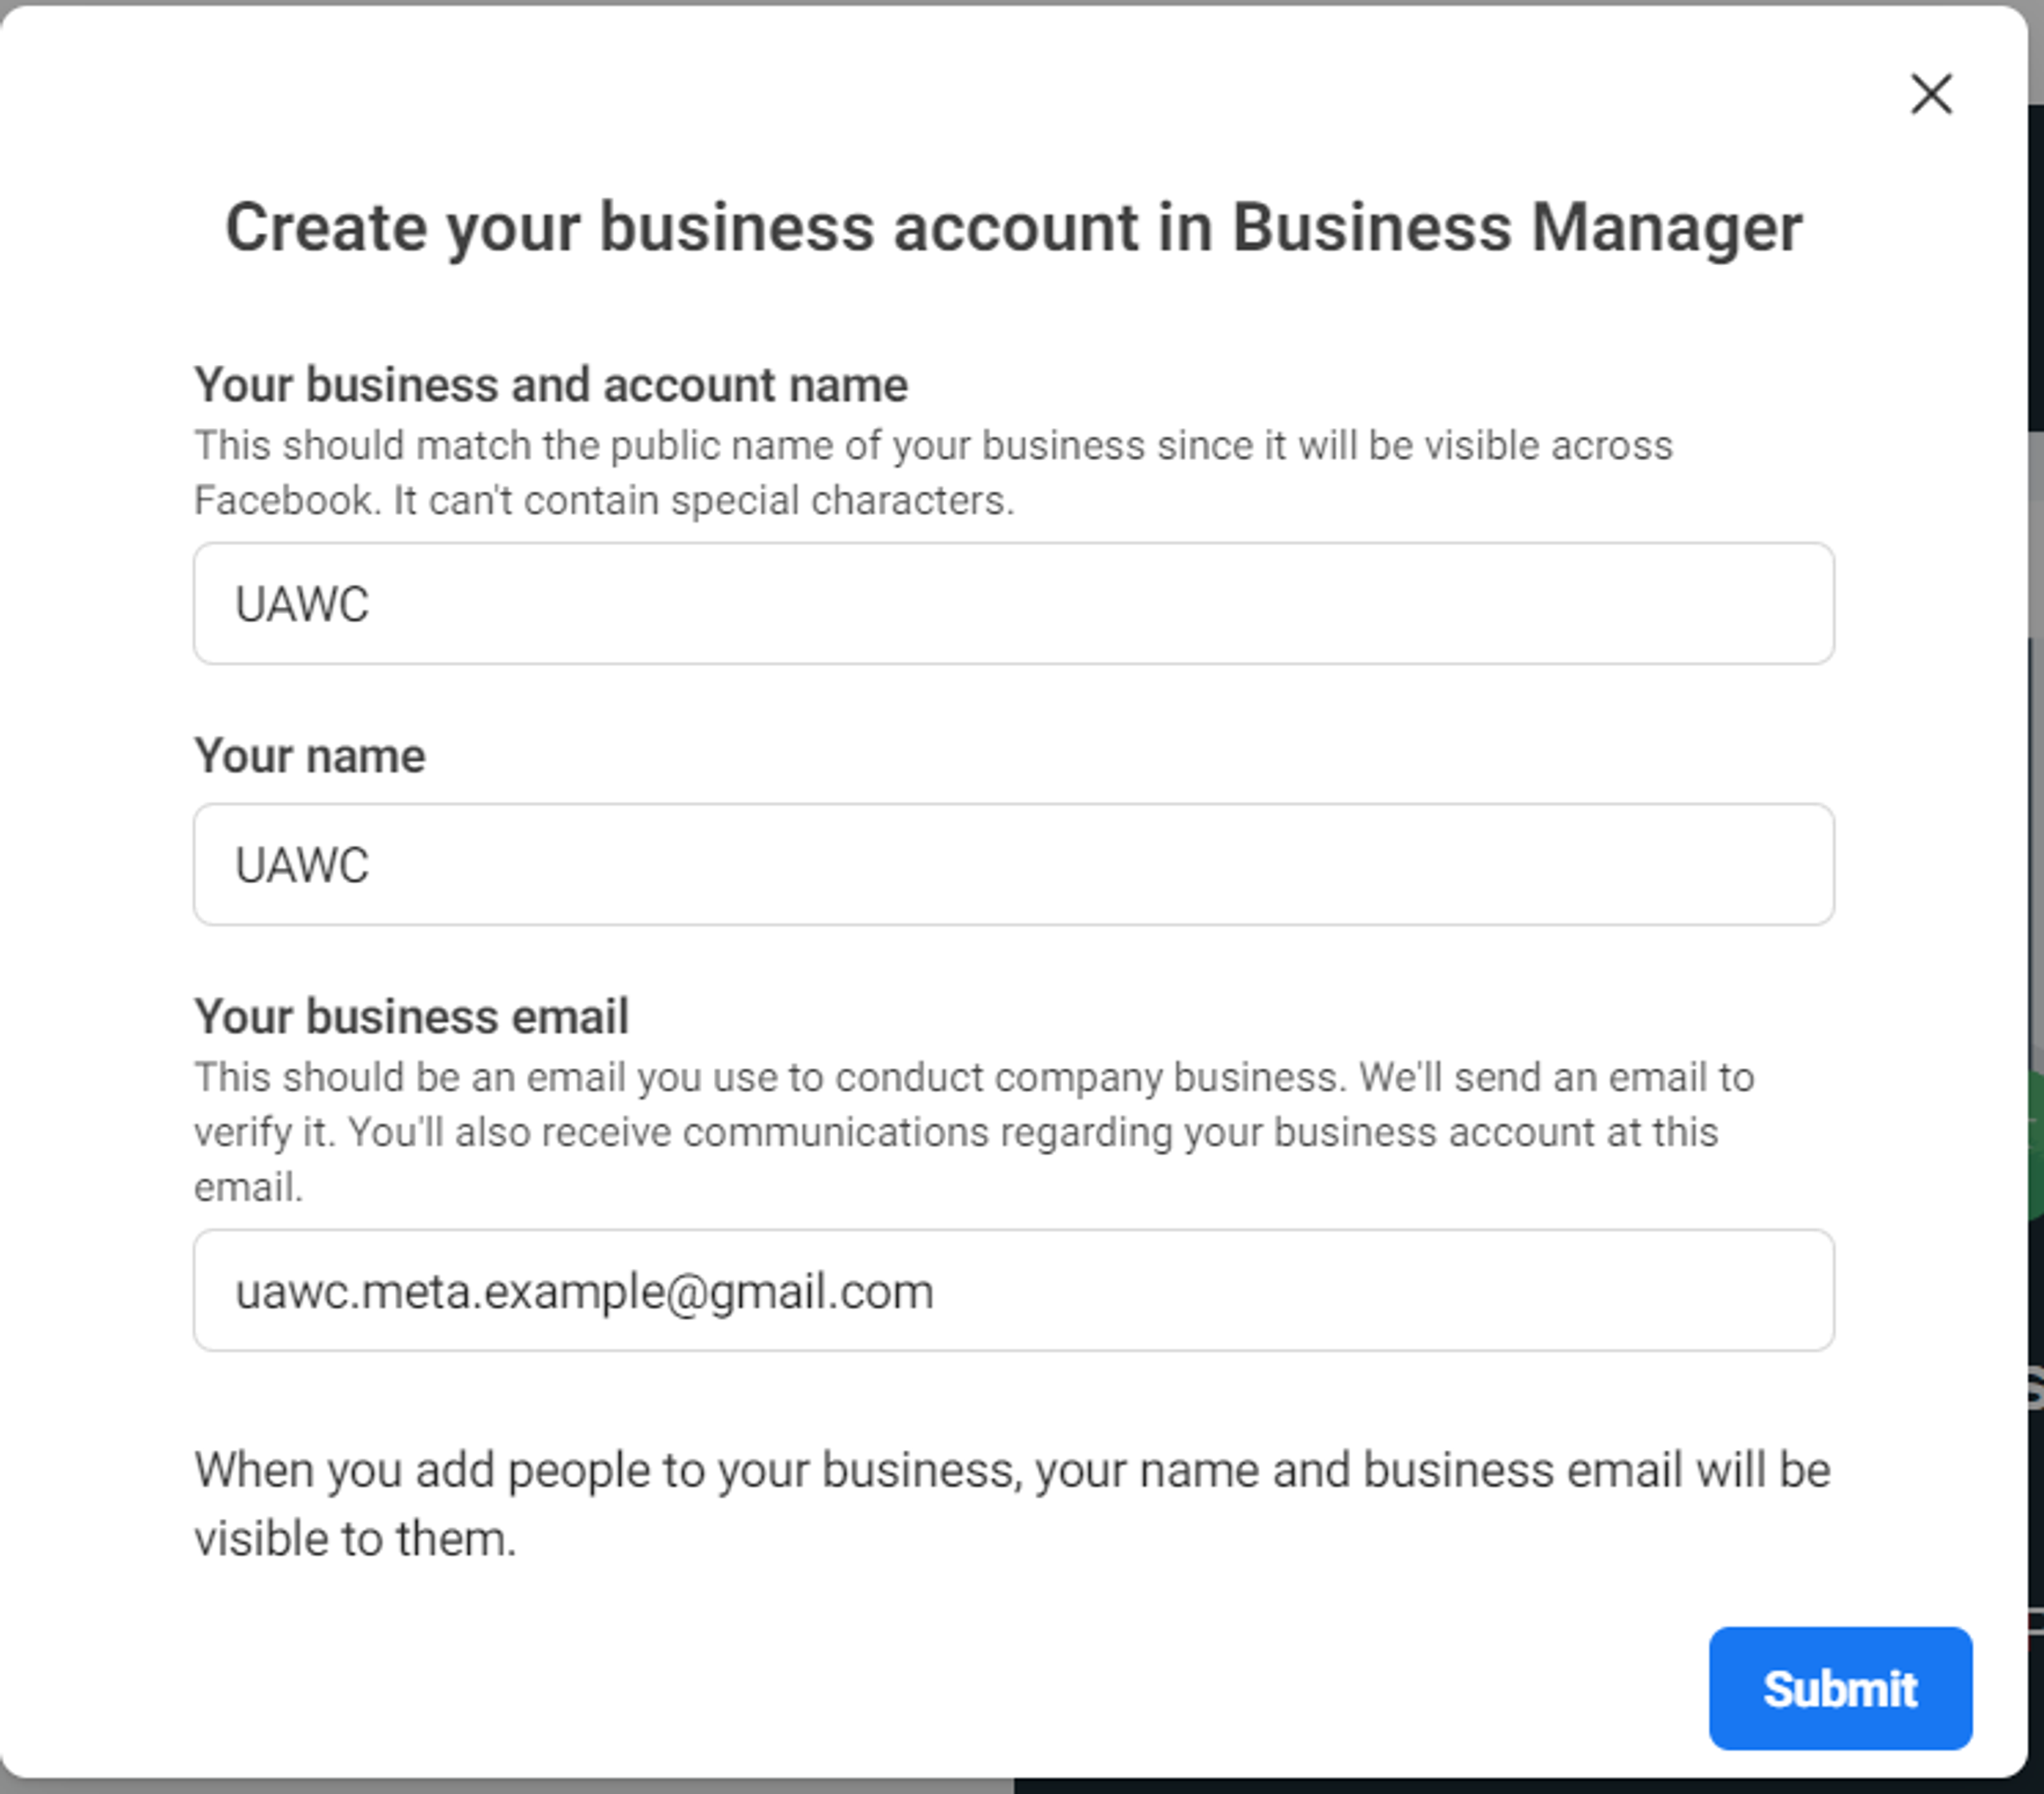
3. Click on the Create an account button, enter your business's name and email, and click on Submit.
4. Check the inbox of an email you entered. Unless Facebook is having some problems, you should see a confirmation email there. Open it and click on the link you find inside.
5. The link should take you straight to your Business Settings dashboard.
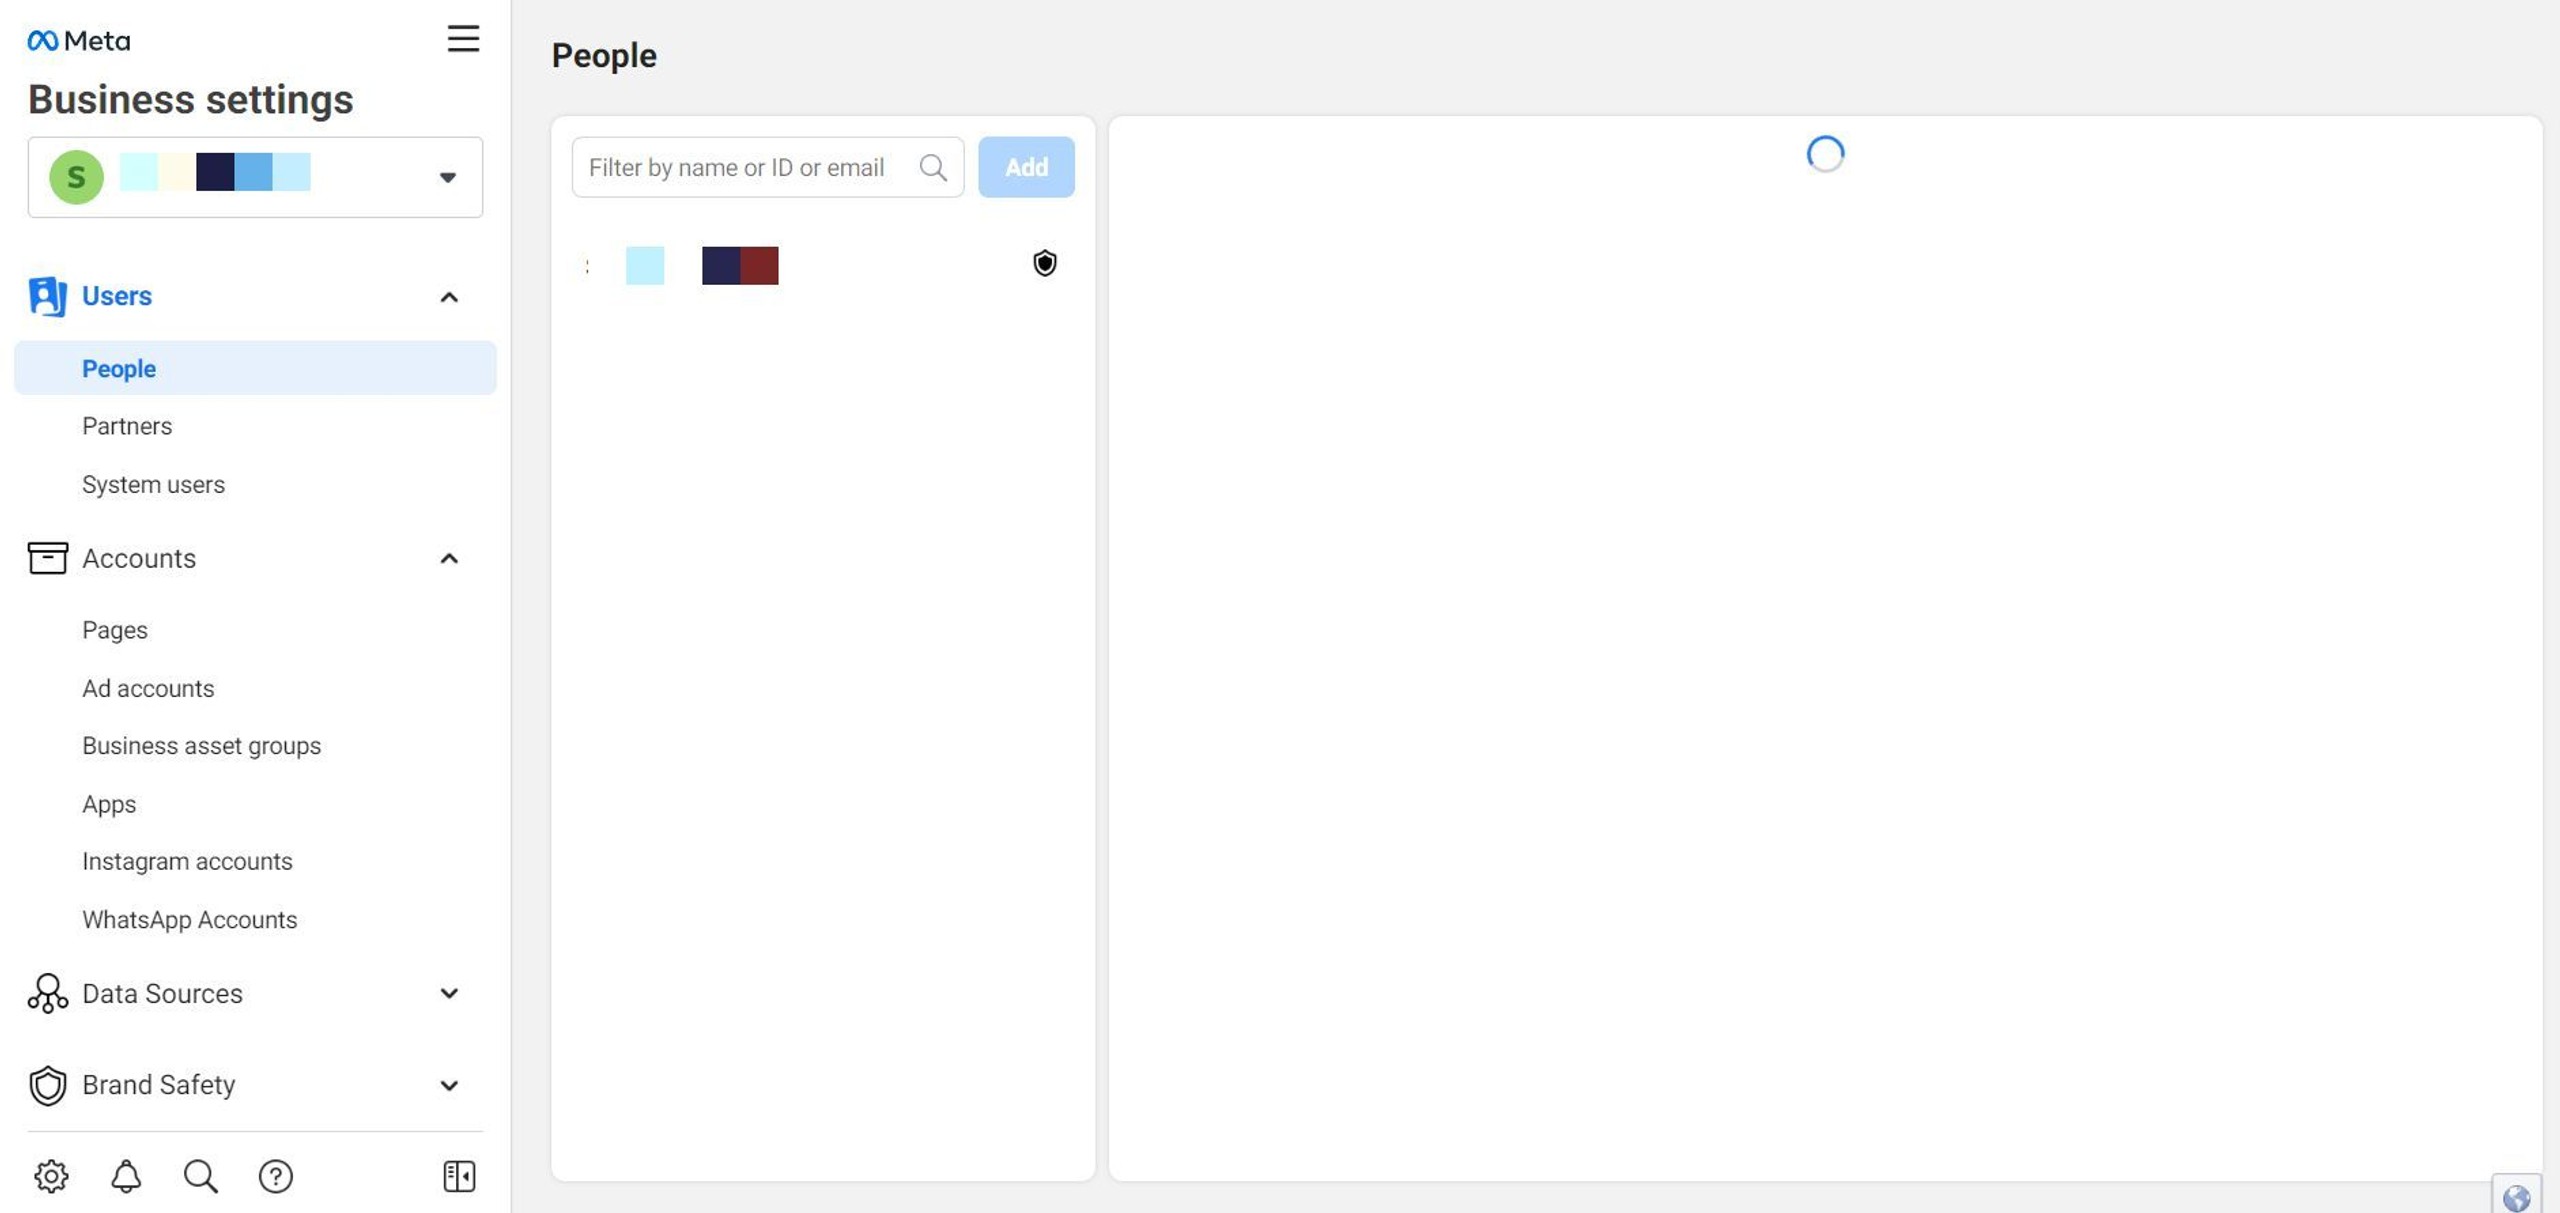
Looks a little lonely for now, but we are about to change that.
Keep in mind that if you are doing this with a fresh email and associated Facebook account, most of the Business Manager's functions will be locked until you confirm your identity. For that, keep your ID at hand - you will be asked to upload its photo.
How to add Facebook pages to your Meta Business Manager account?
To use the Business Manager's managing tools, you first need to choose what you want to manage. To do that, you will need to add your, or your client's Facebook pages. Here is how you can do it:
1. In the left part of your screen, expand the Accounts tab and click on Pages under it.
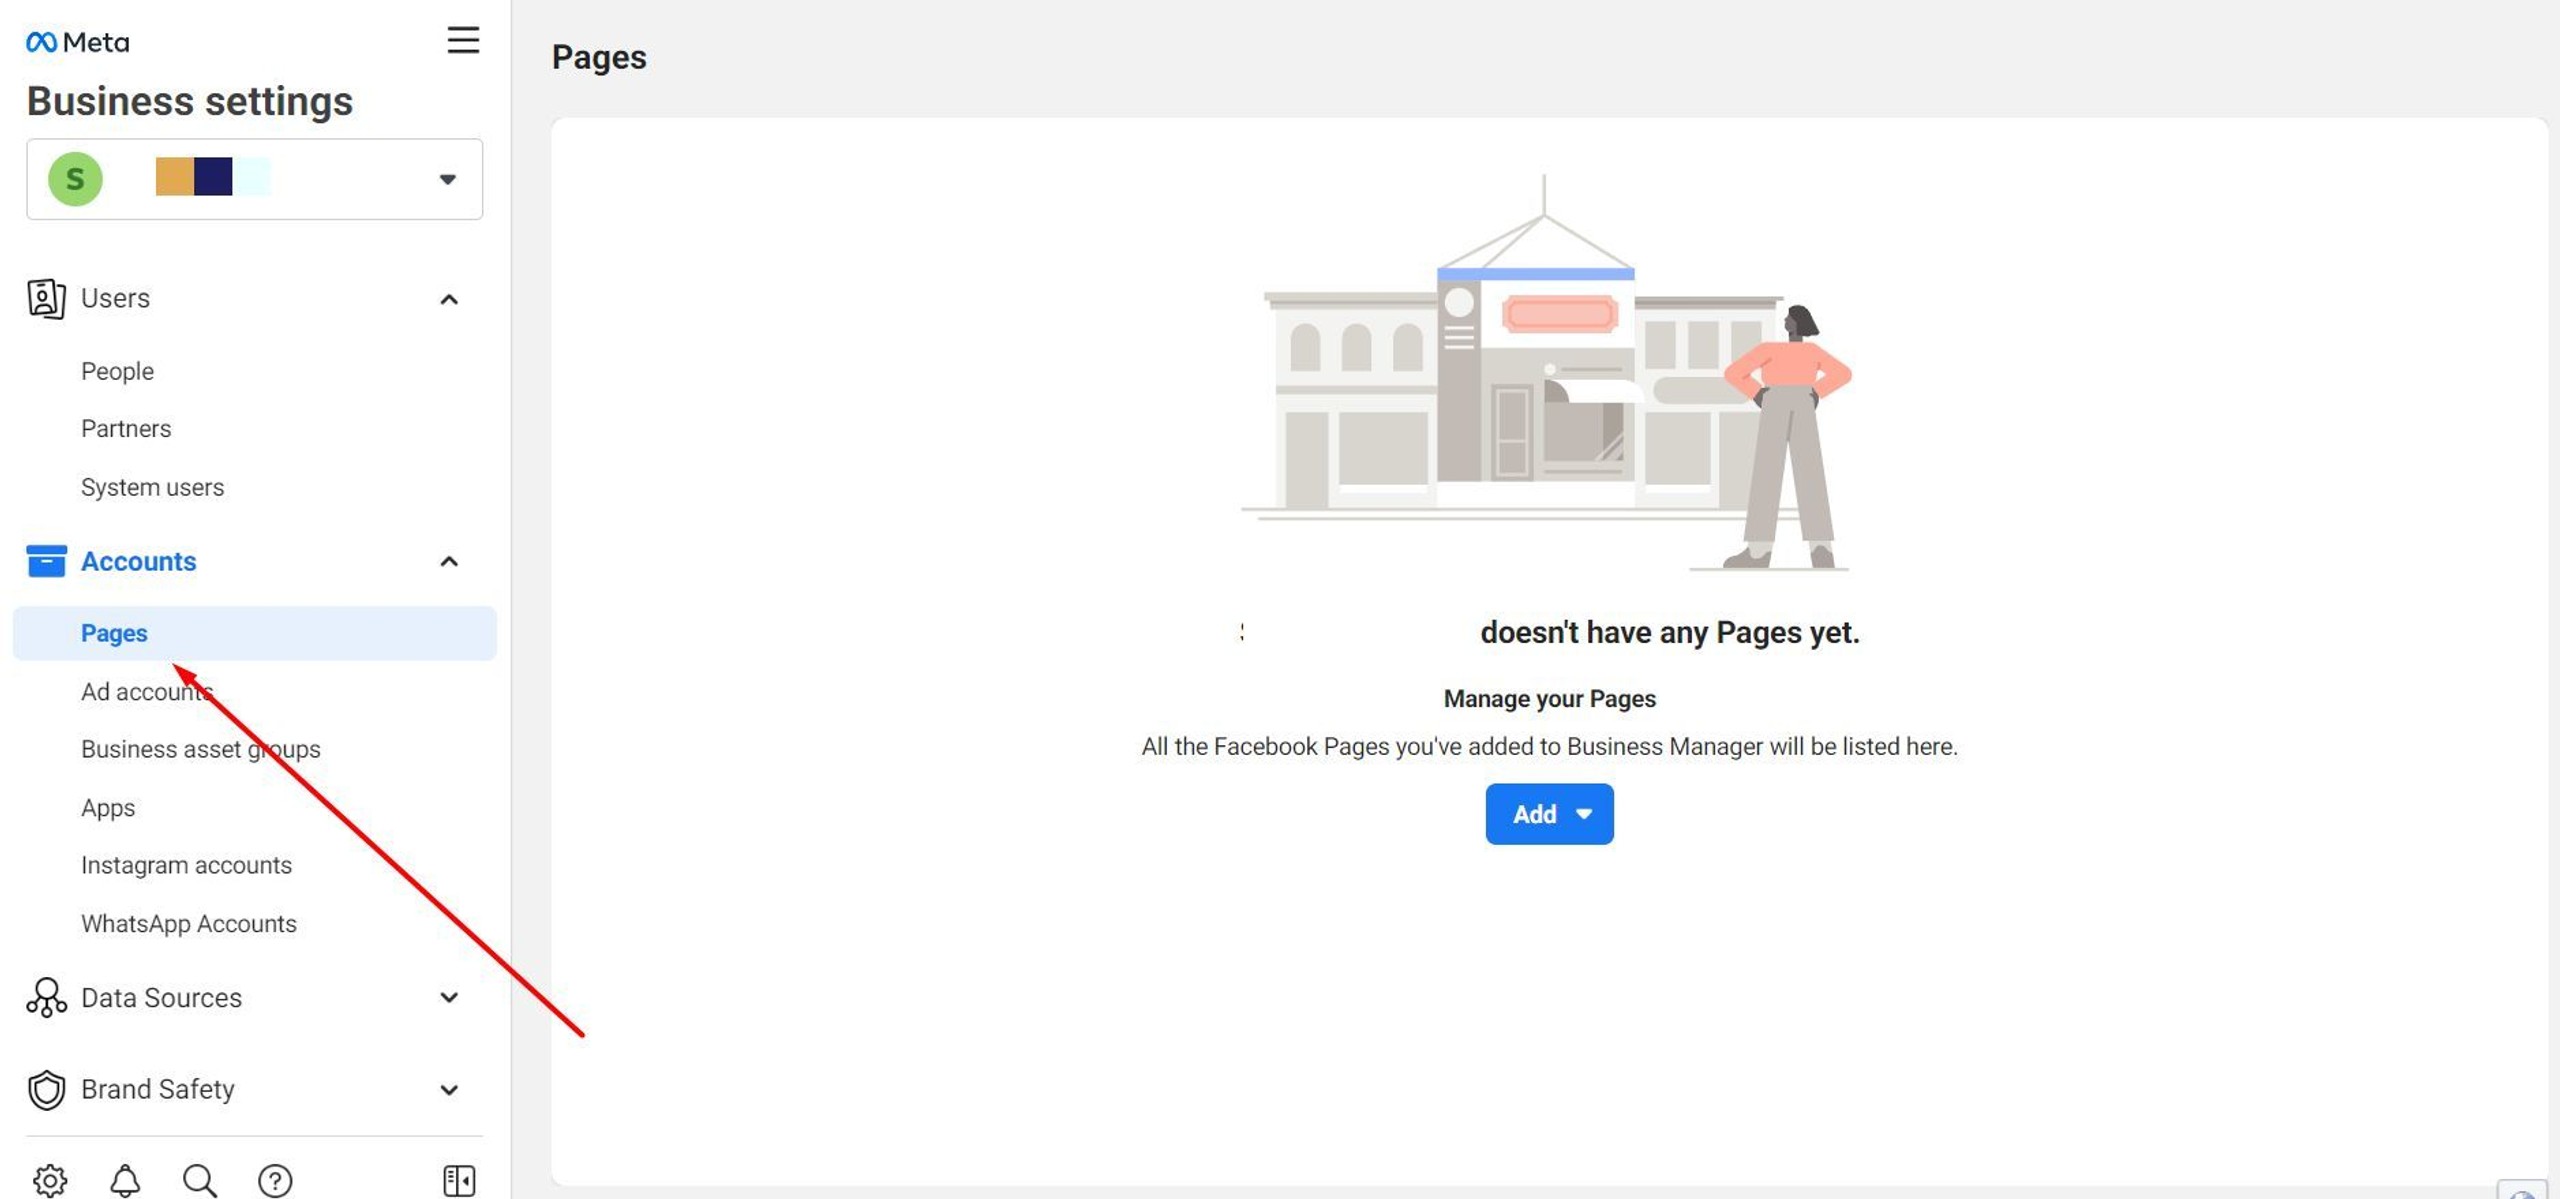
2. Click the blue Add button and select how you want to add your Facebook page.
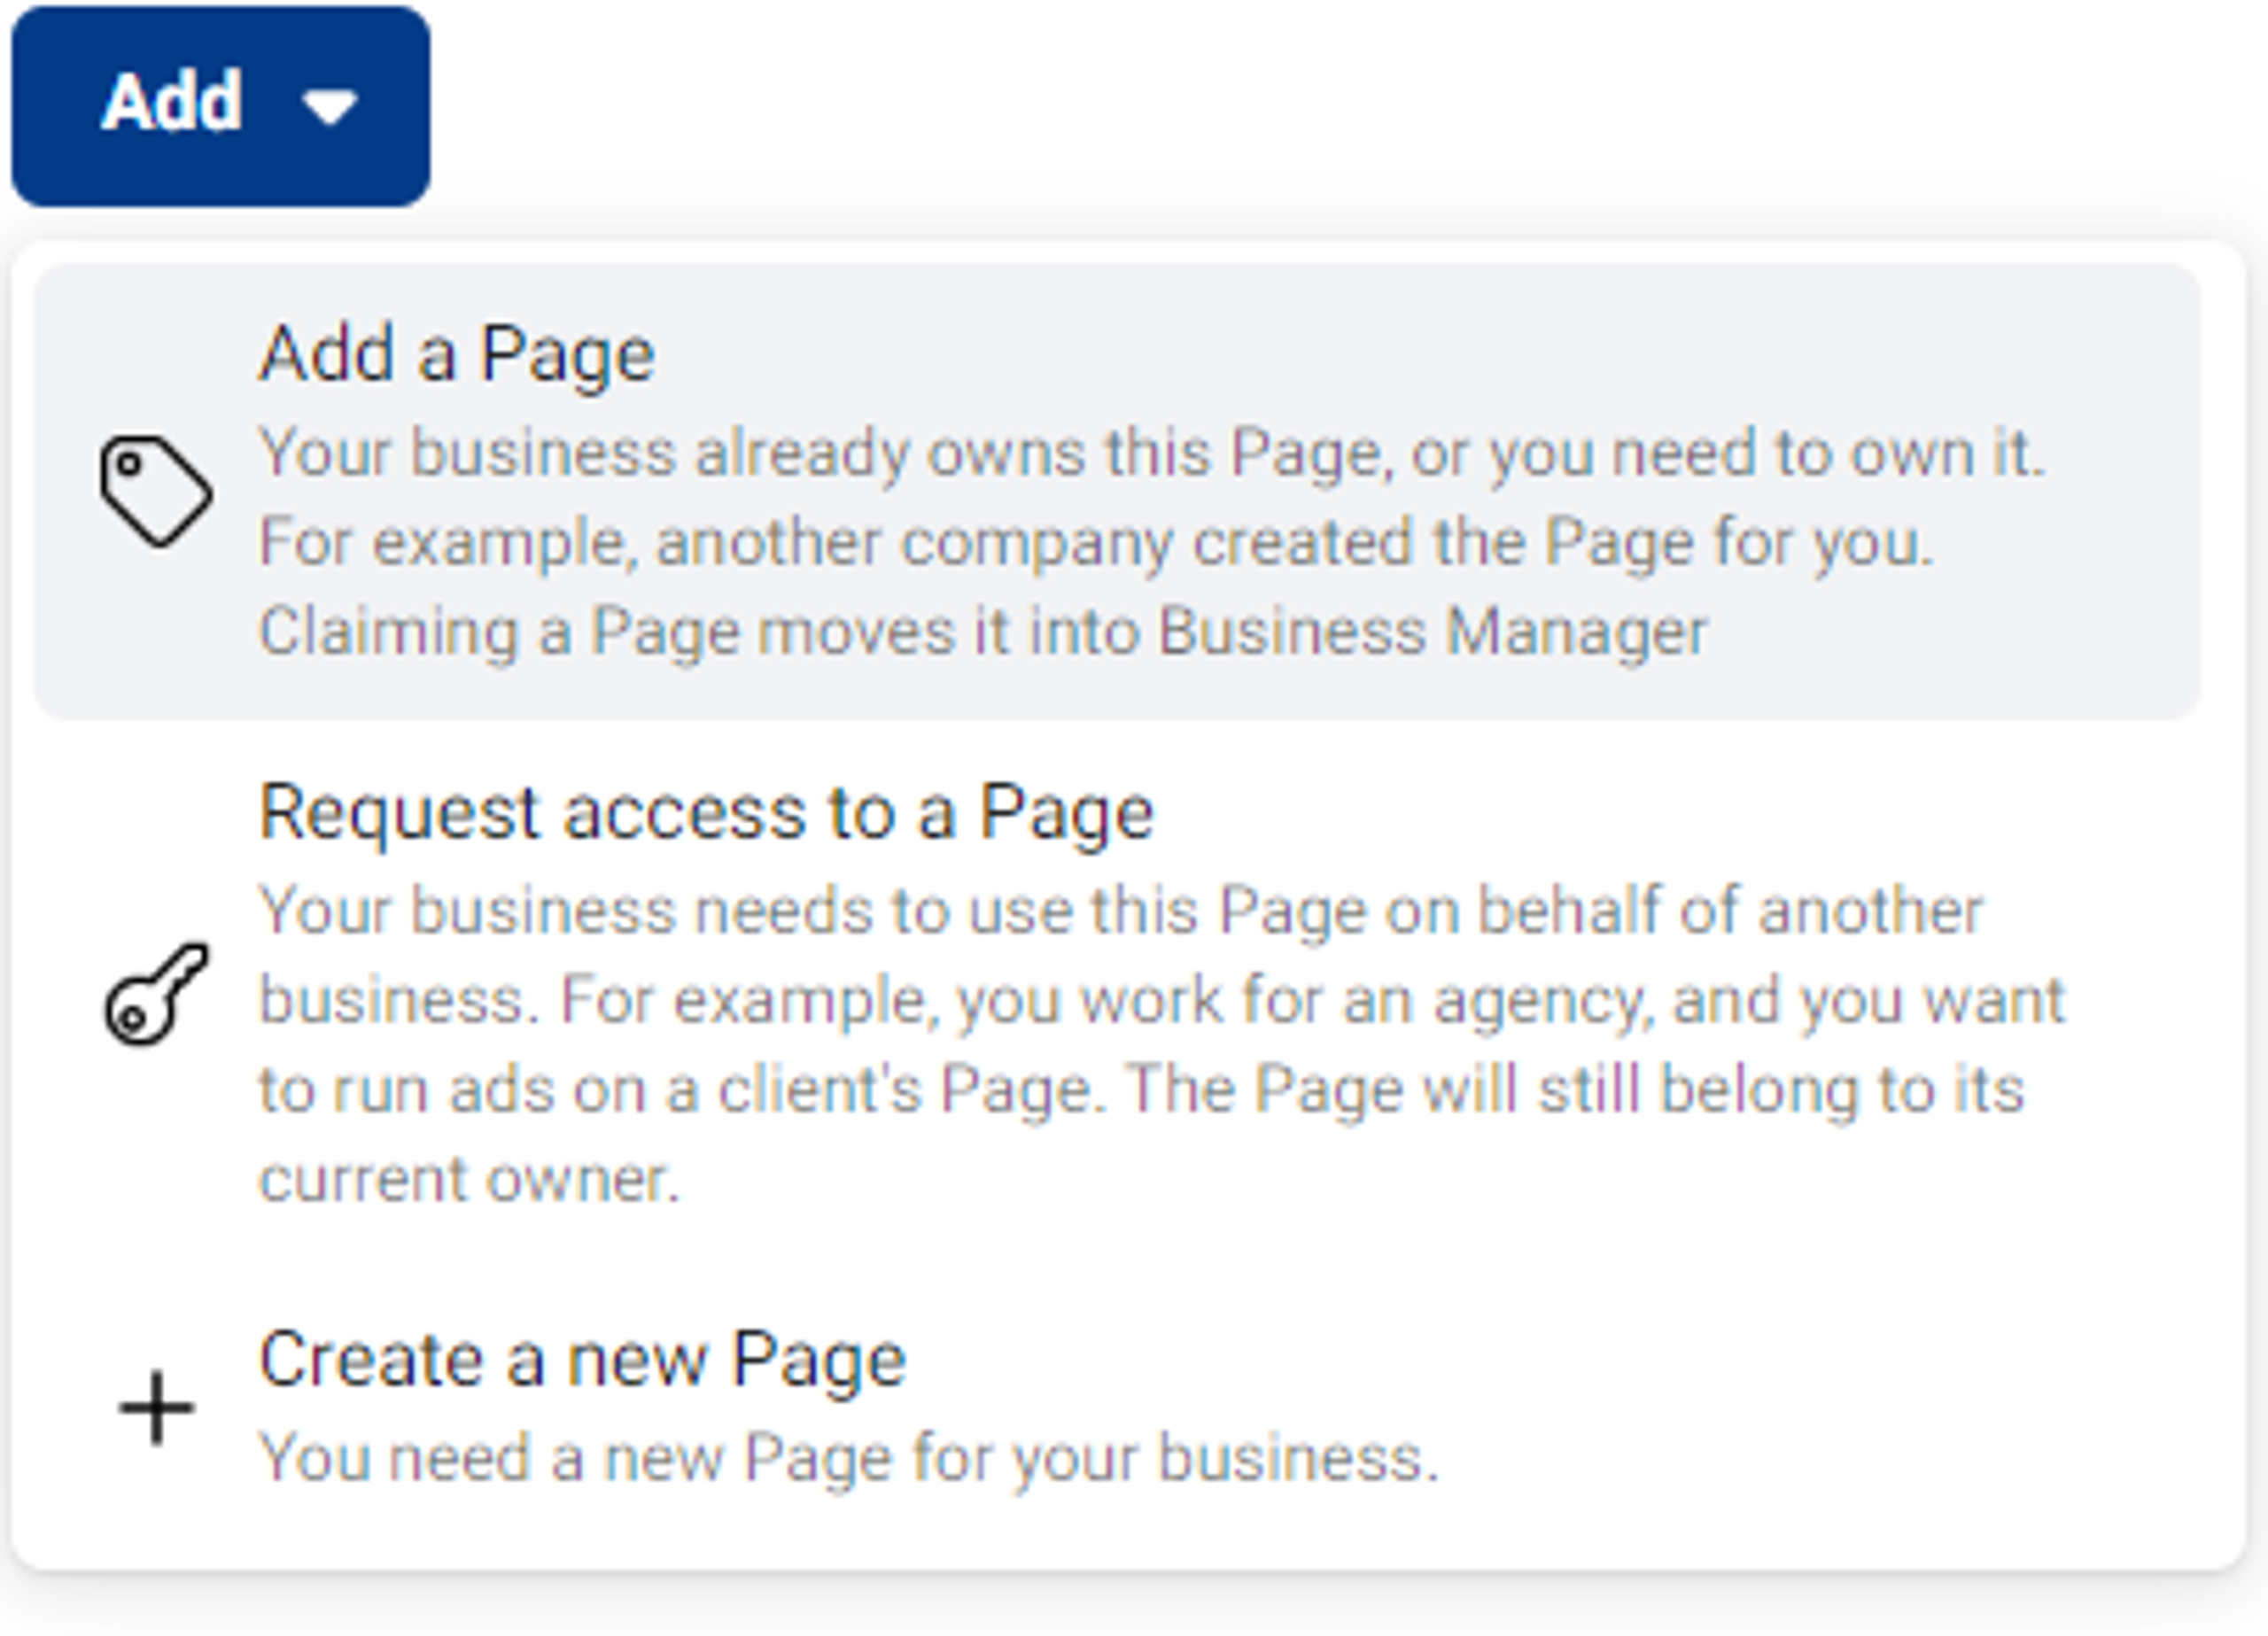
Keep in mind that adding an existing Facebook business page and creating a new page permanently binds them to your Manager account. If you are about to start working on a client's page, or have another reason to avoid long-term commitment to a Facebook page, request access instead.
We will assume you already have a Facebook page and go with the Add a Page option.
3. Enter the name of the page or paste its URL. This will only work if the page has not been claimed by another Meta Business Manager account. Also, you need to have control of it.
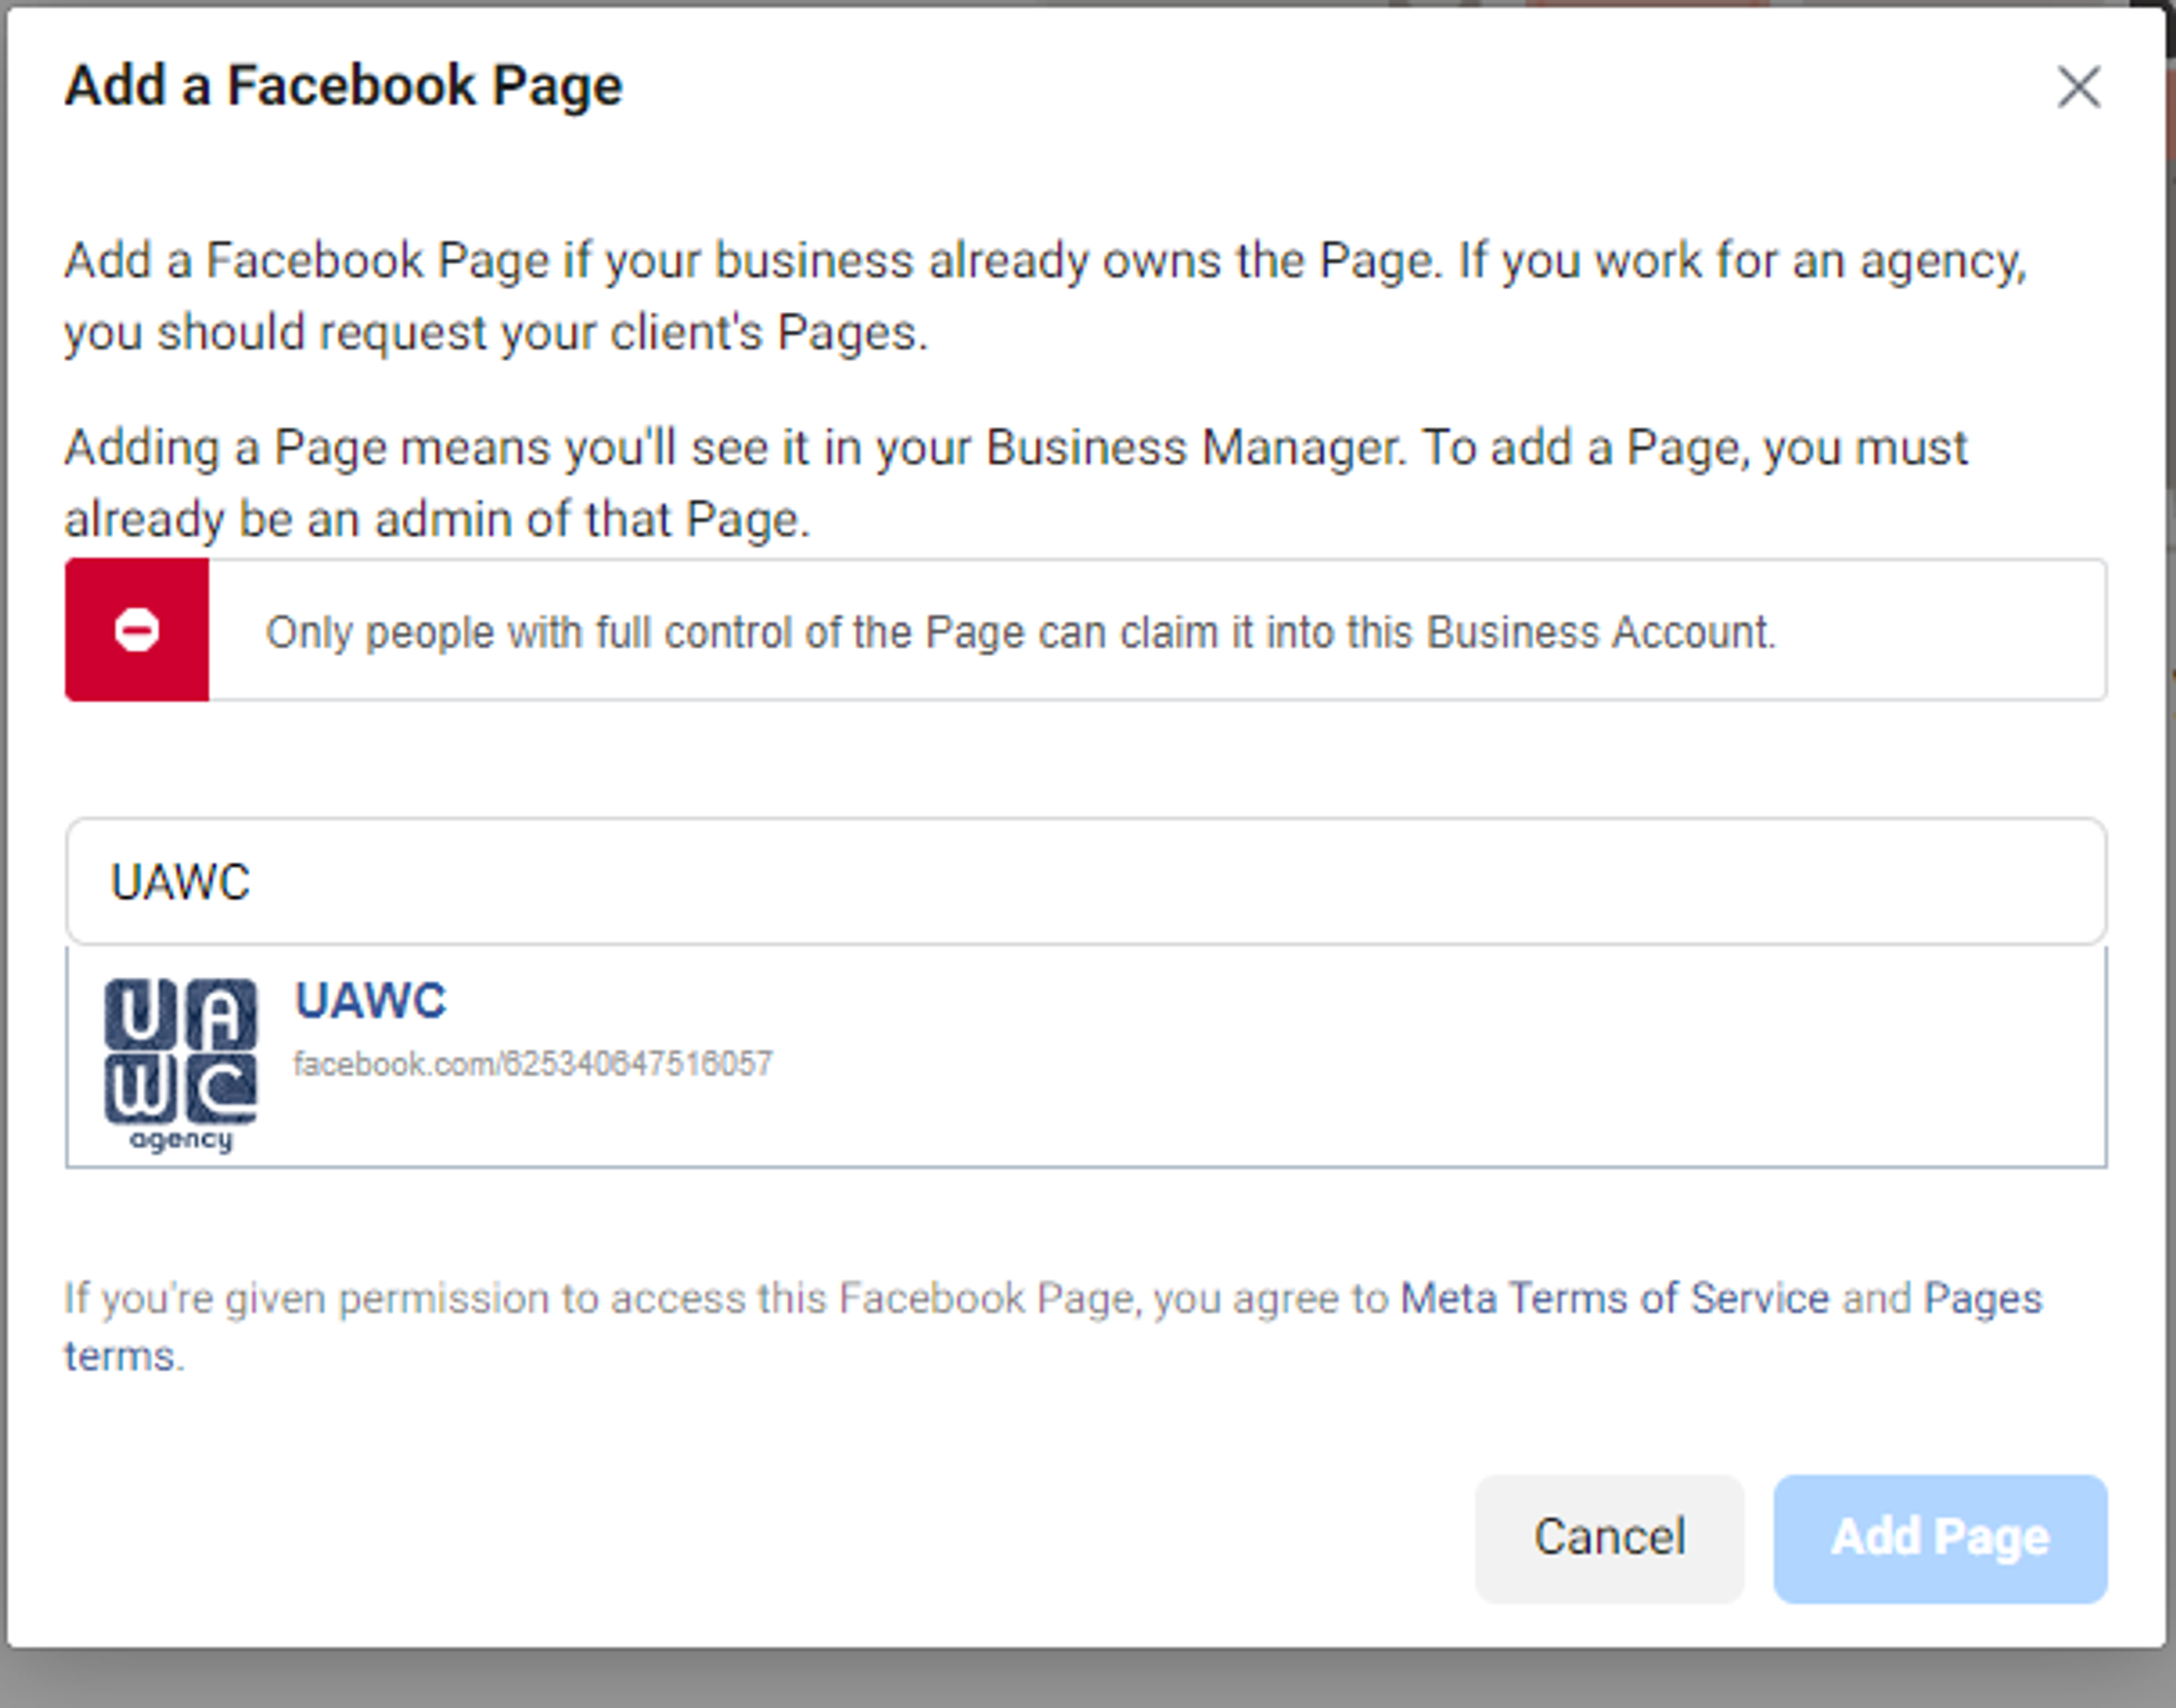
Once you are sure you are adding the Facebook page you want, click on the Add Page button.
4. If everything went well, you should see a confirmation pop-up.
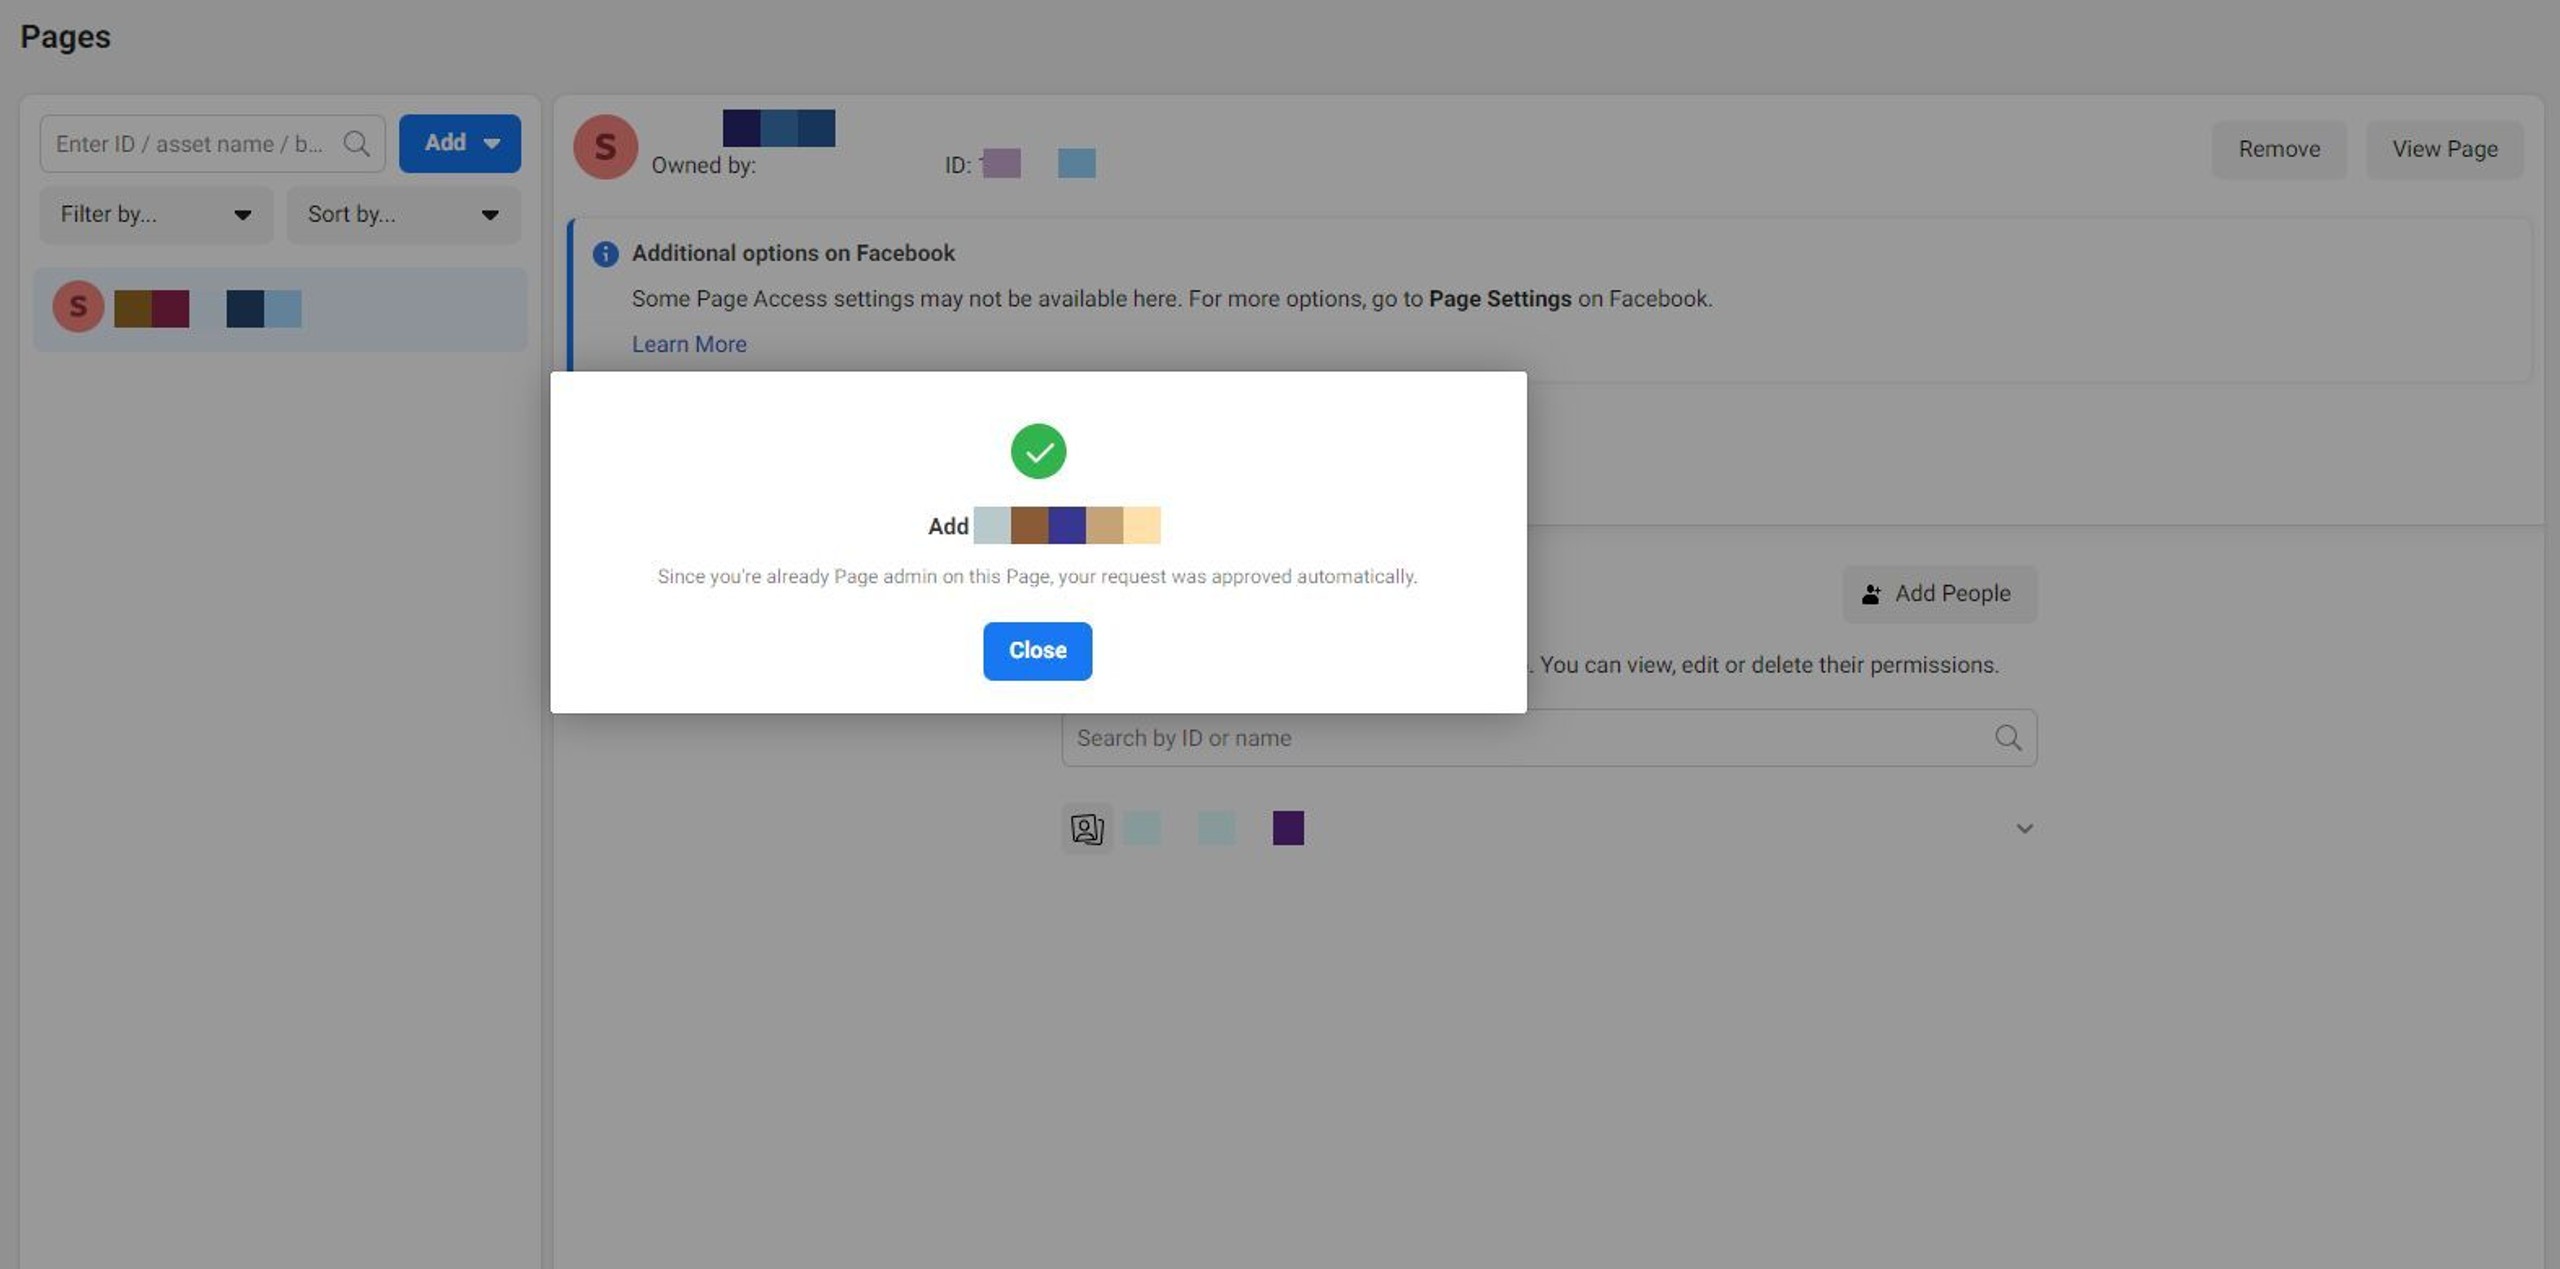
There should also be a notification from your Page's point of view.
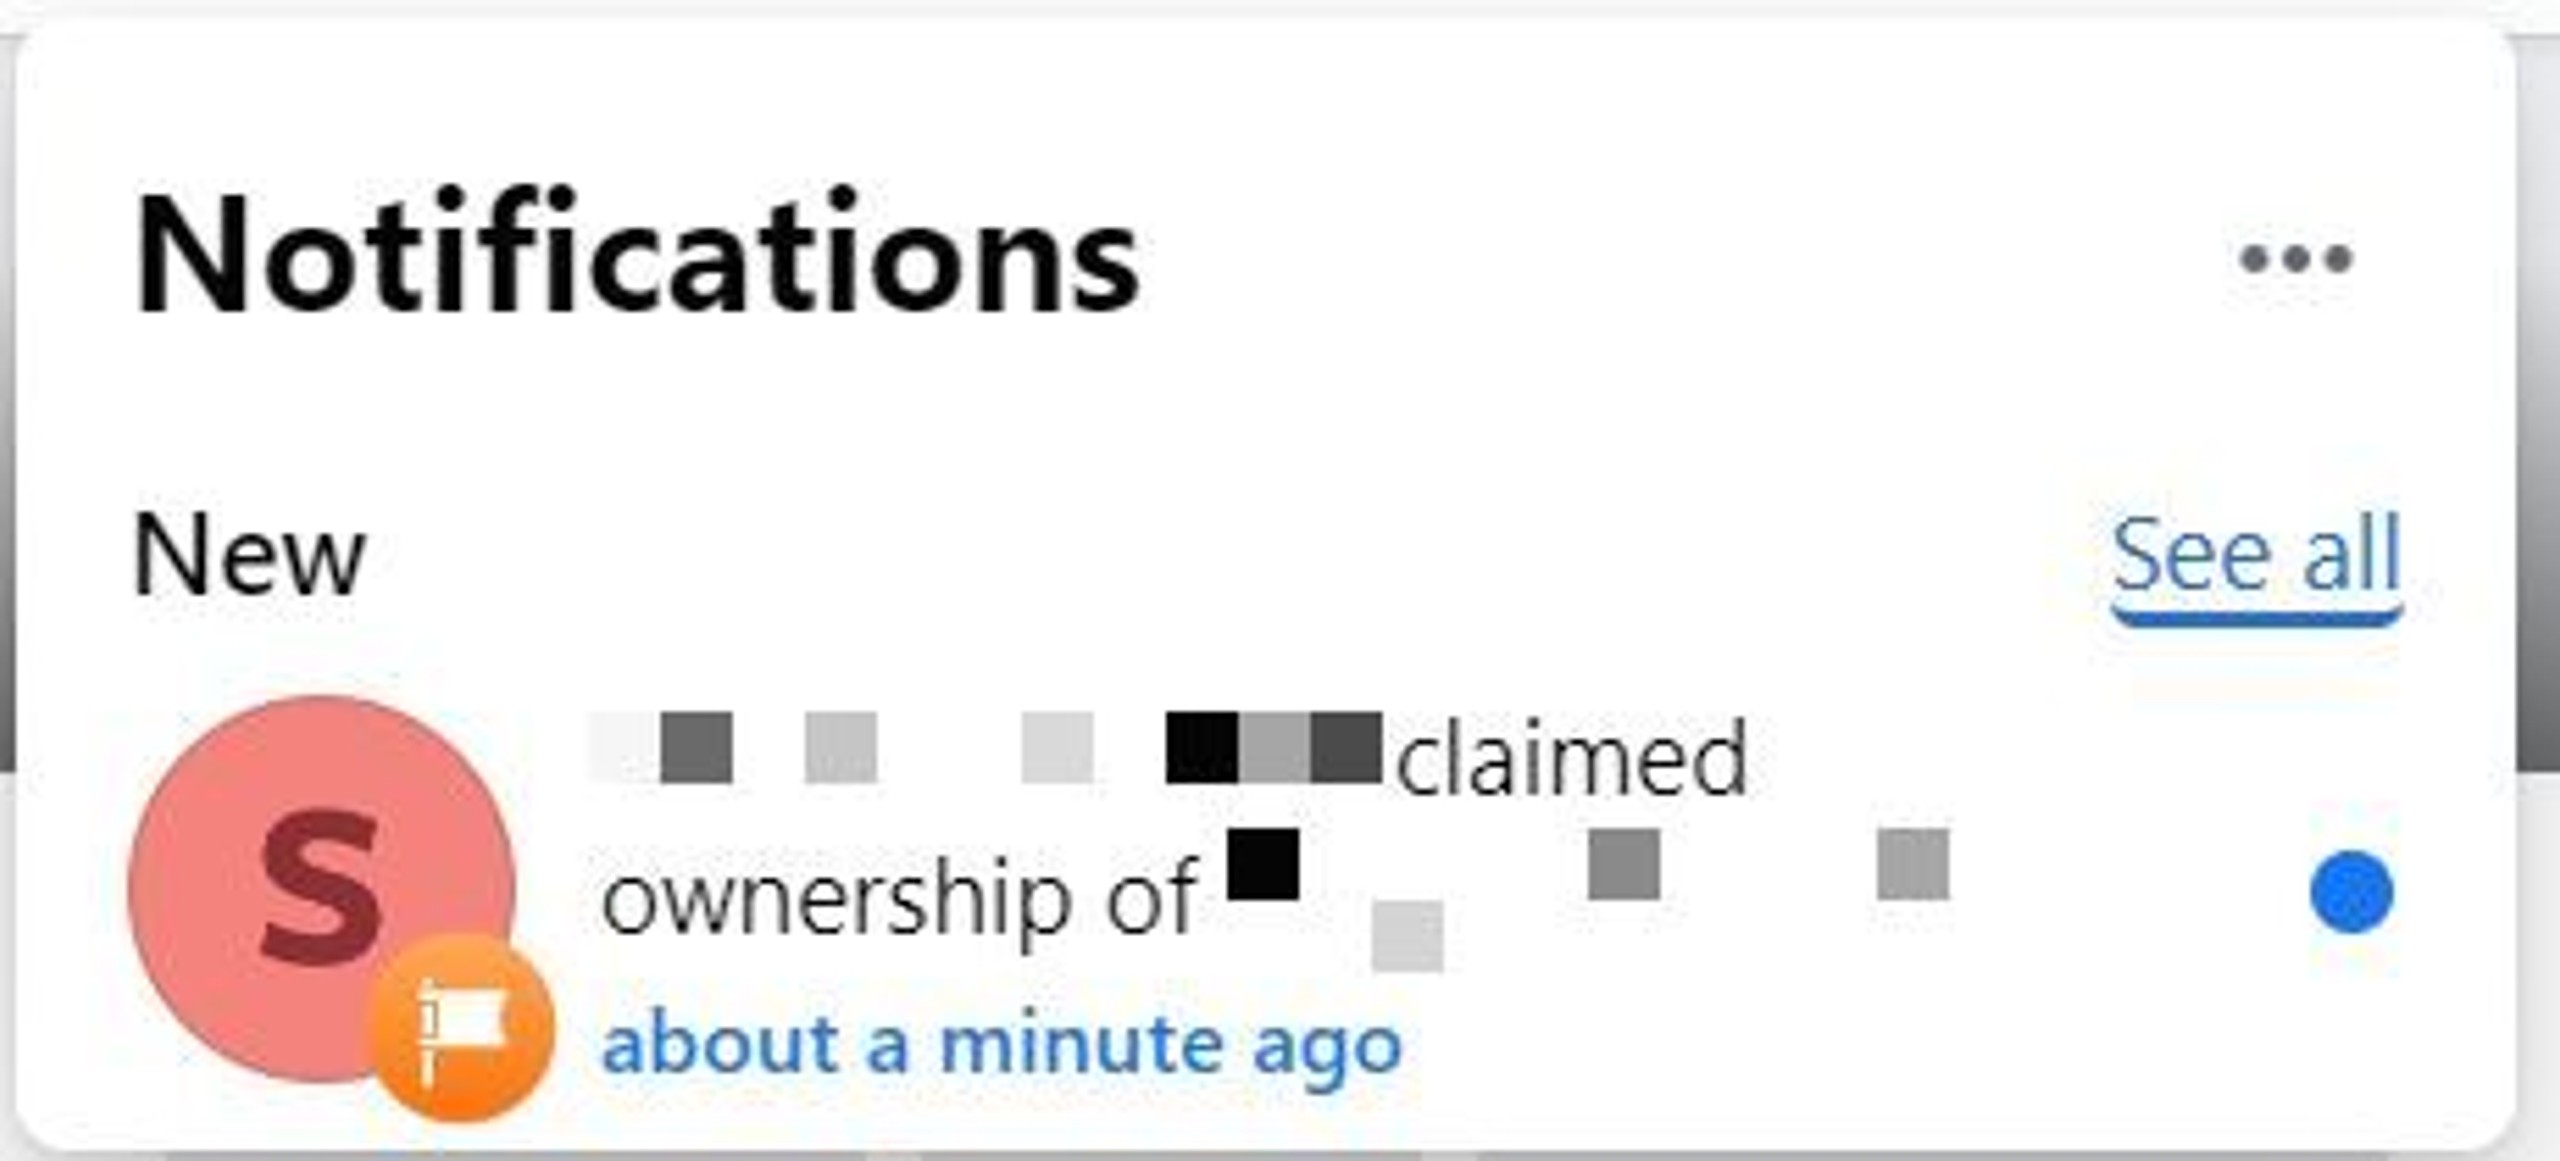
If you need to add more Pages to your Business manager, repeat the process above for them.
How to add people to your Facebook Business Manager account?
Even if you are currently working solo, you might still want to stay with us here, for this might change in the future. While Business Manager supports adding clients or external partners to your team, we will focus on adding your coworkers for the purposes of this guide.
Here is how you do it:
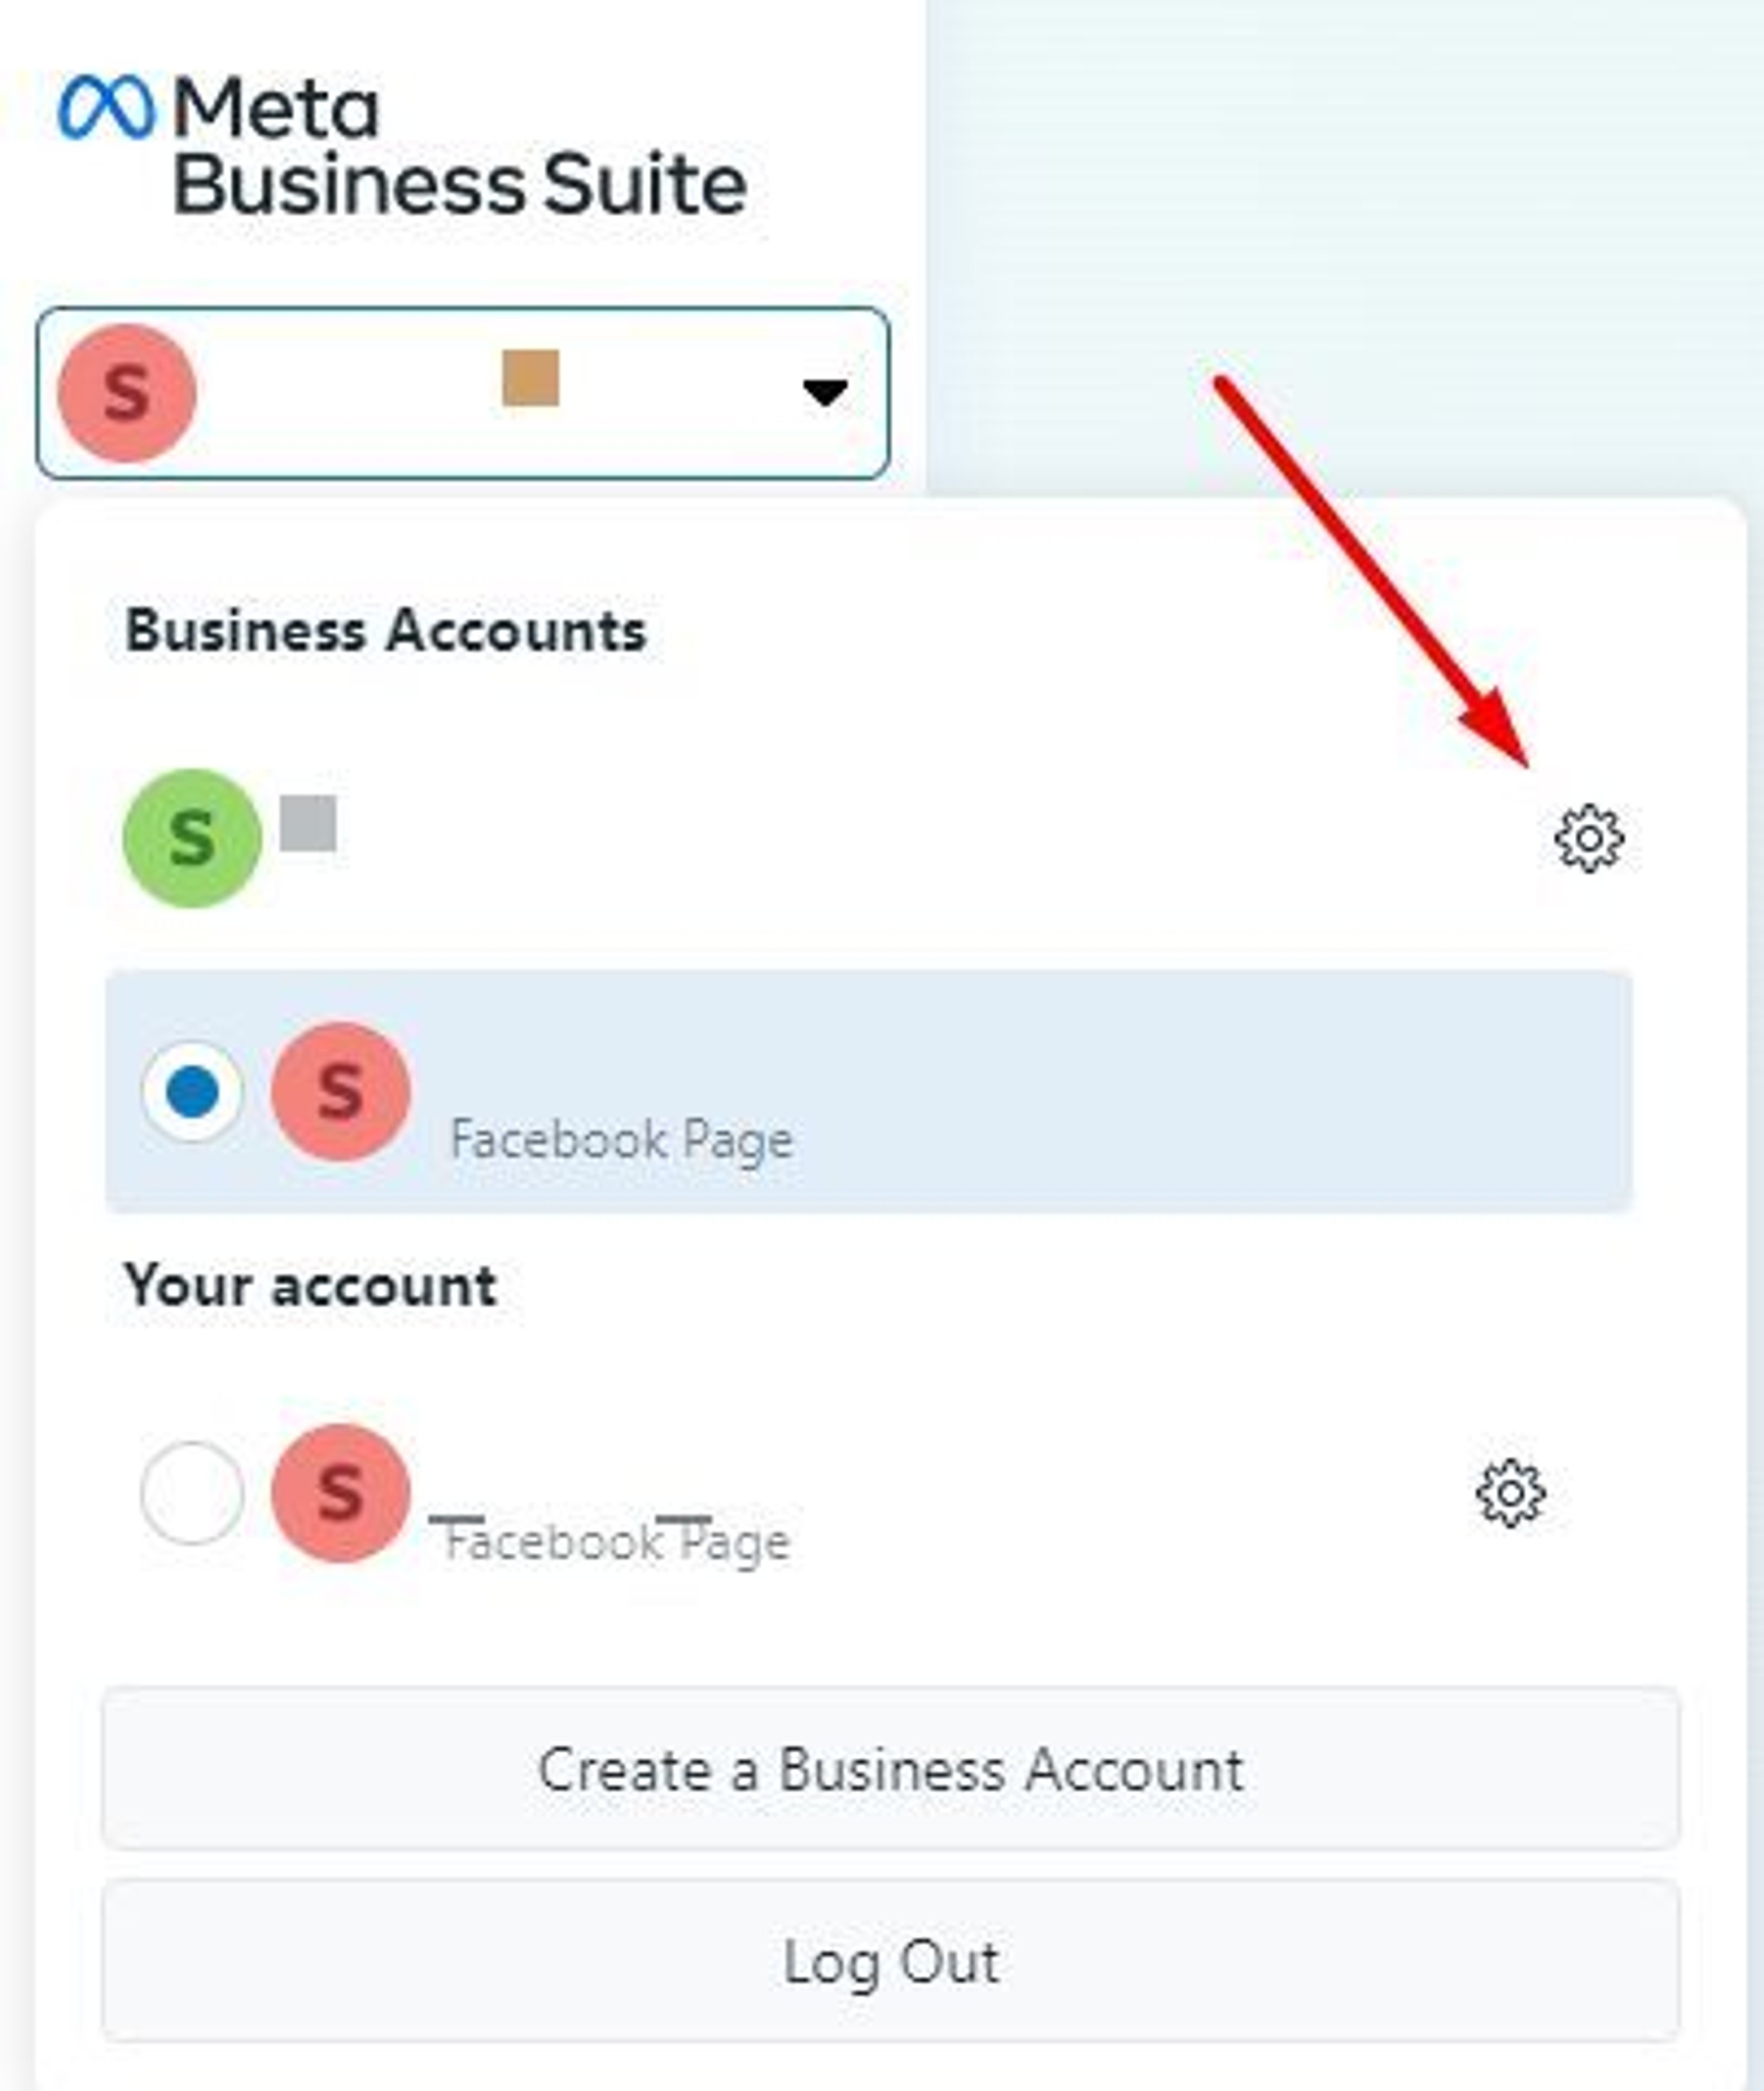
1. If you have already added a Facebook Page to your Business Manager, you will likely be redirected to its dashboard the next time you log in. To access your business settings, click on your username in the left upper corner of the screen. Next, hit the gear icon.
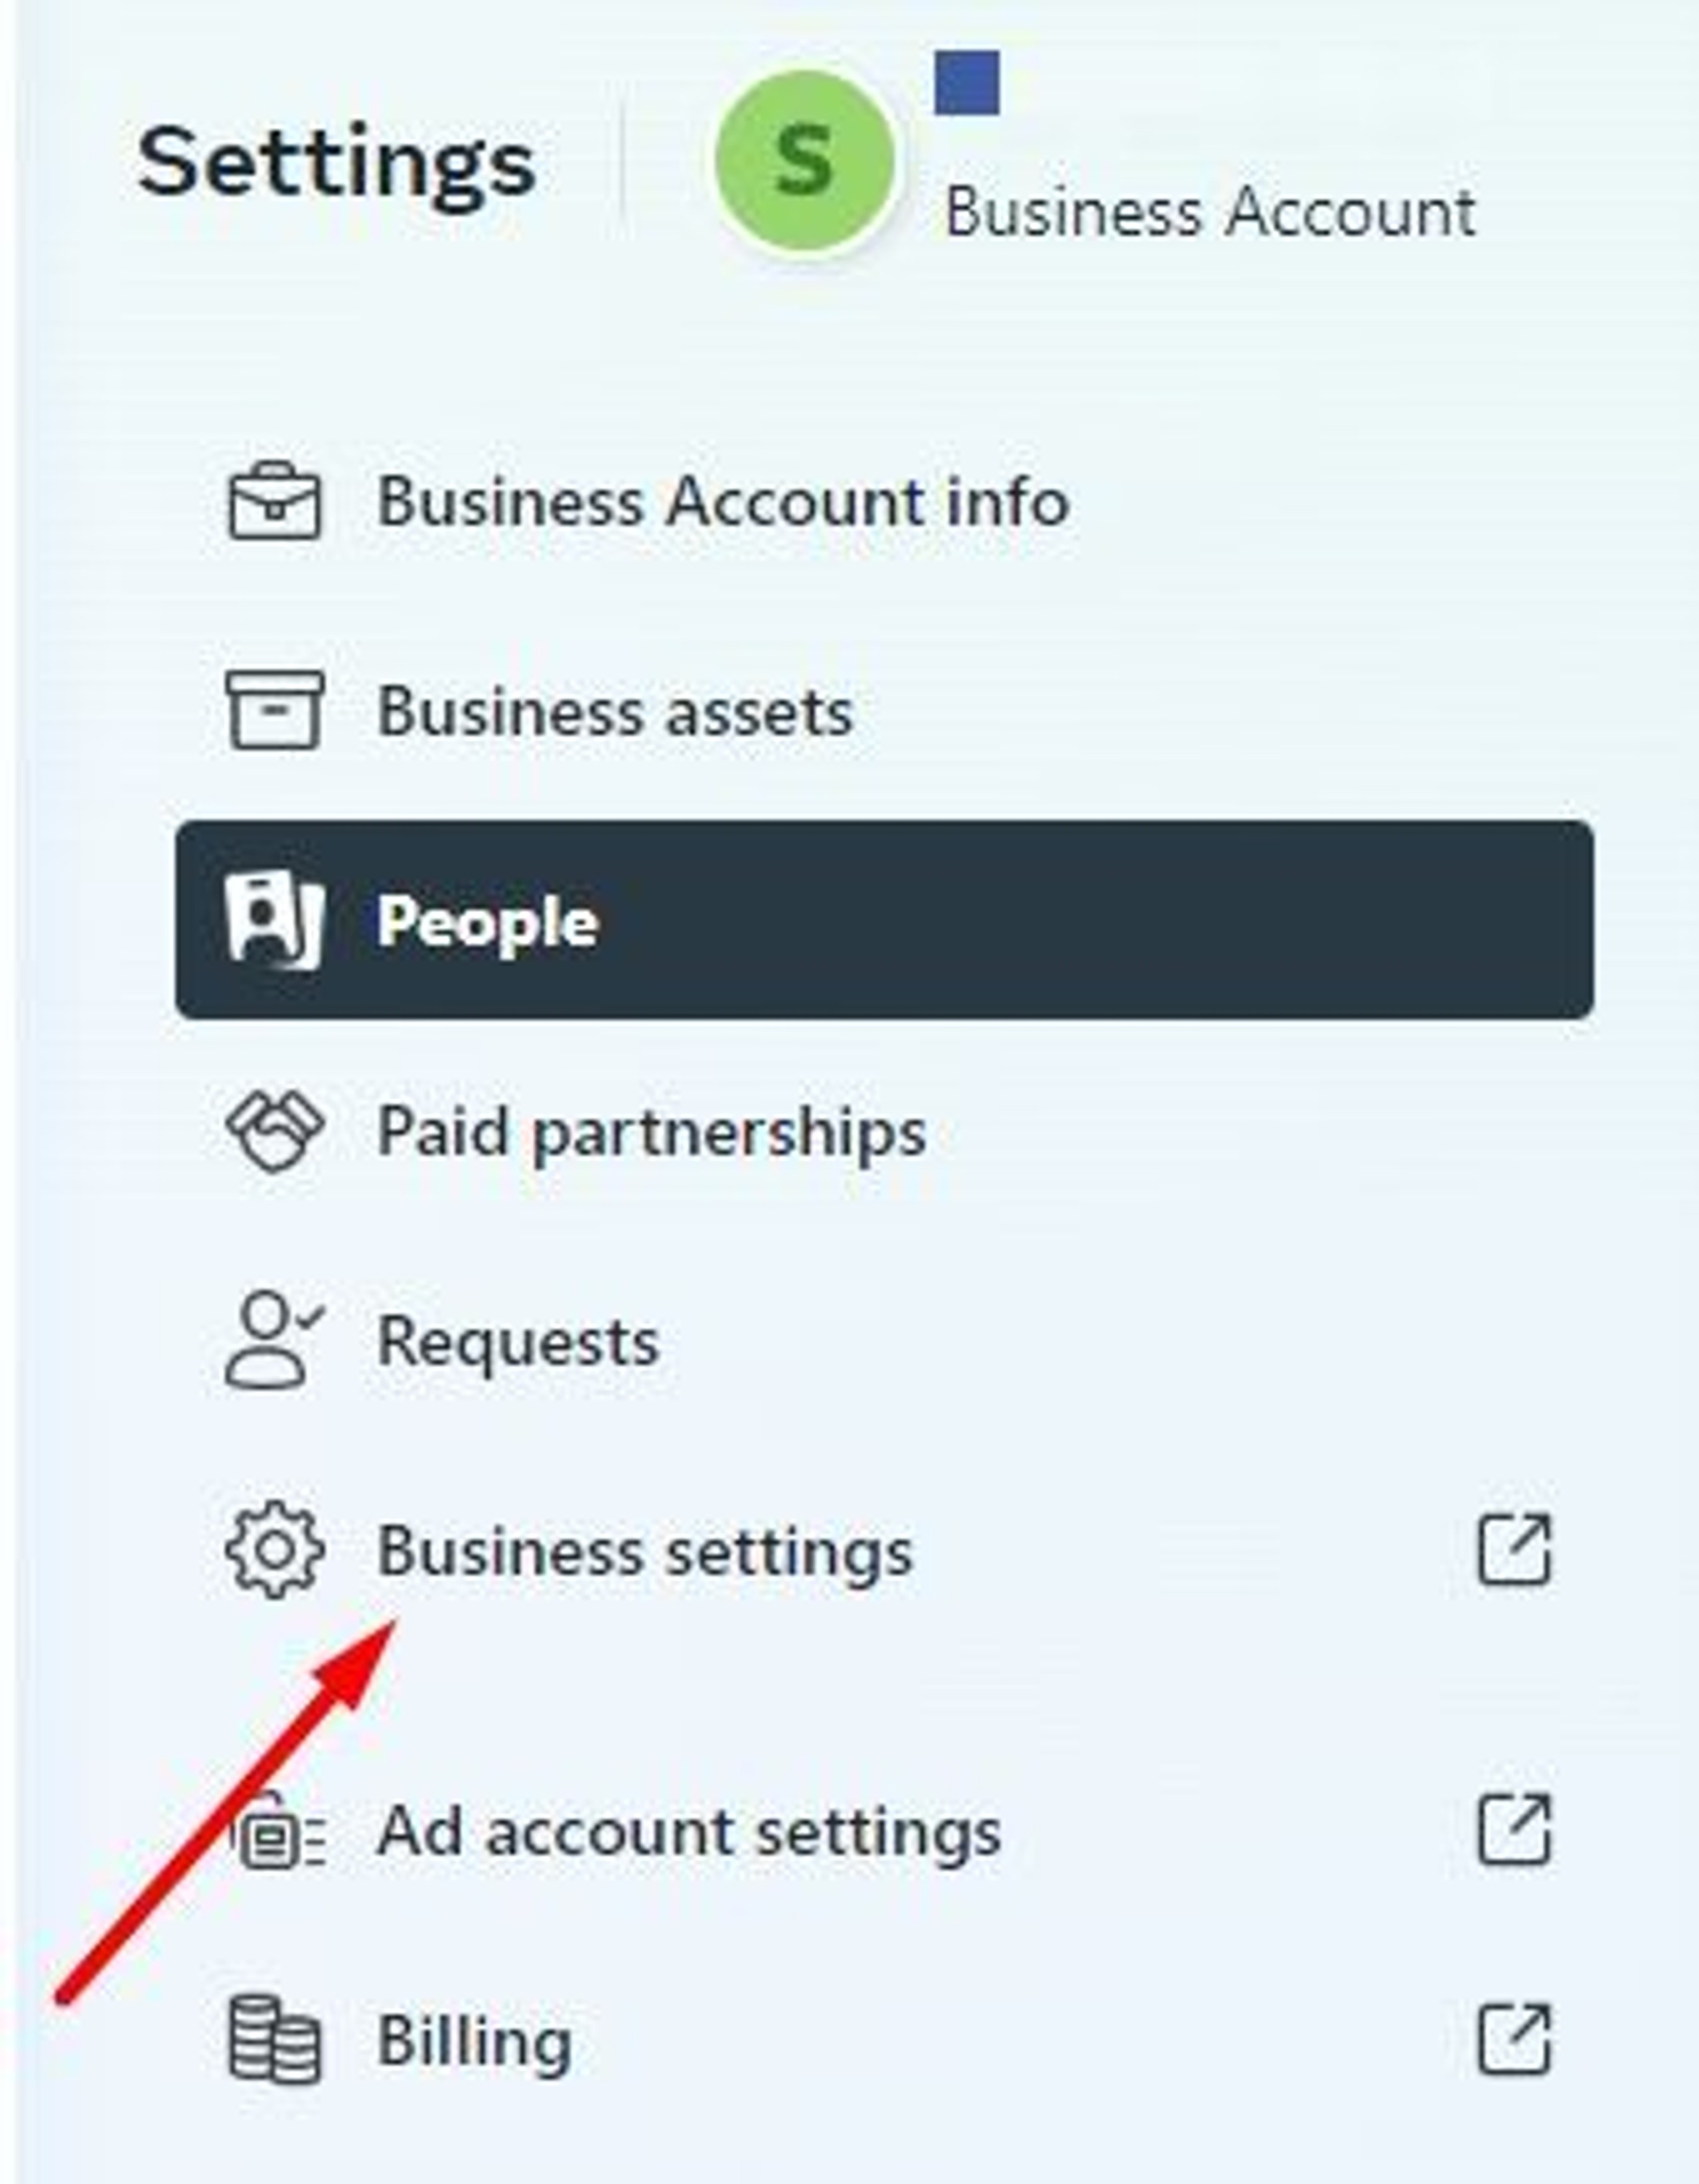
2. You will be taken to your Business dashboard. Here, you will need to click on the Business settings on the left side of the screen.
3. Now you should be back to the Business Settings dashboard we started with.
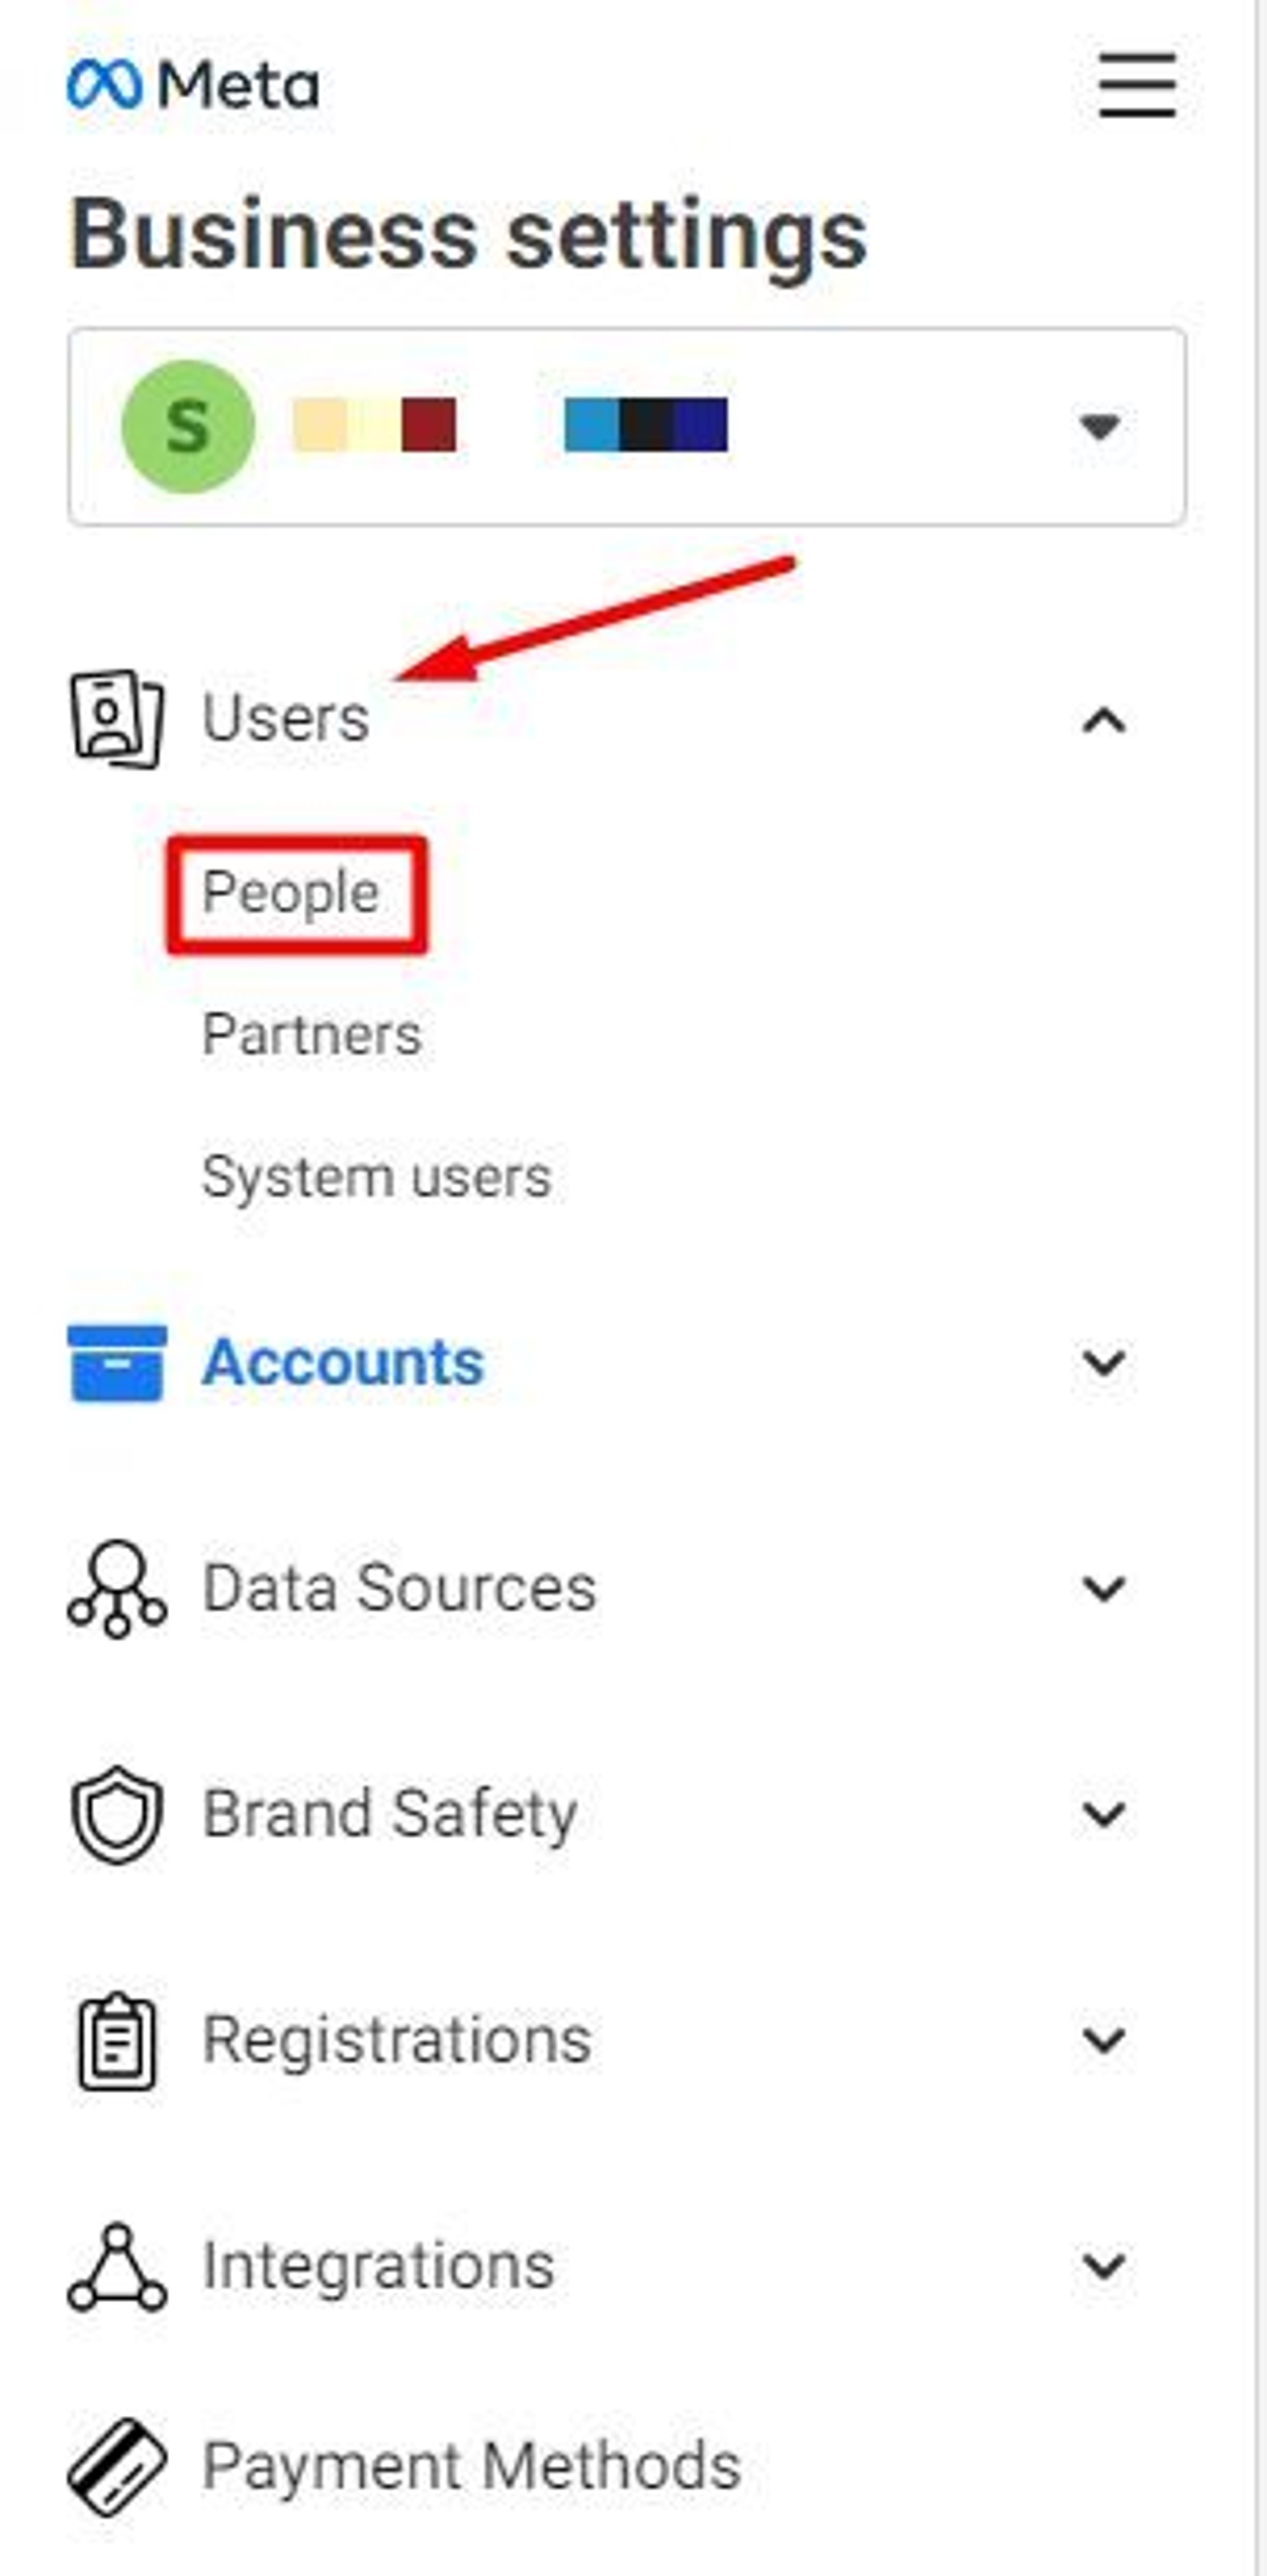
Here, you will need to click on People, under the Users drop-down menu.
4, You will be taken to a new screen that will, in the future, show all the users assigned to your Business Manager and their roles. For now, it's just you.
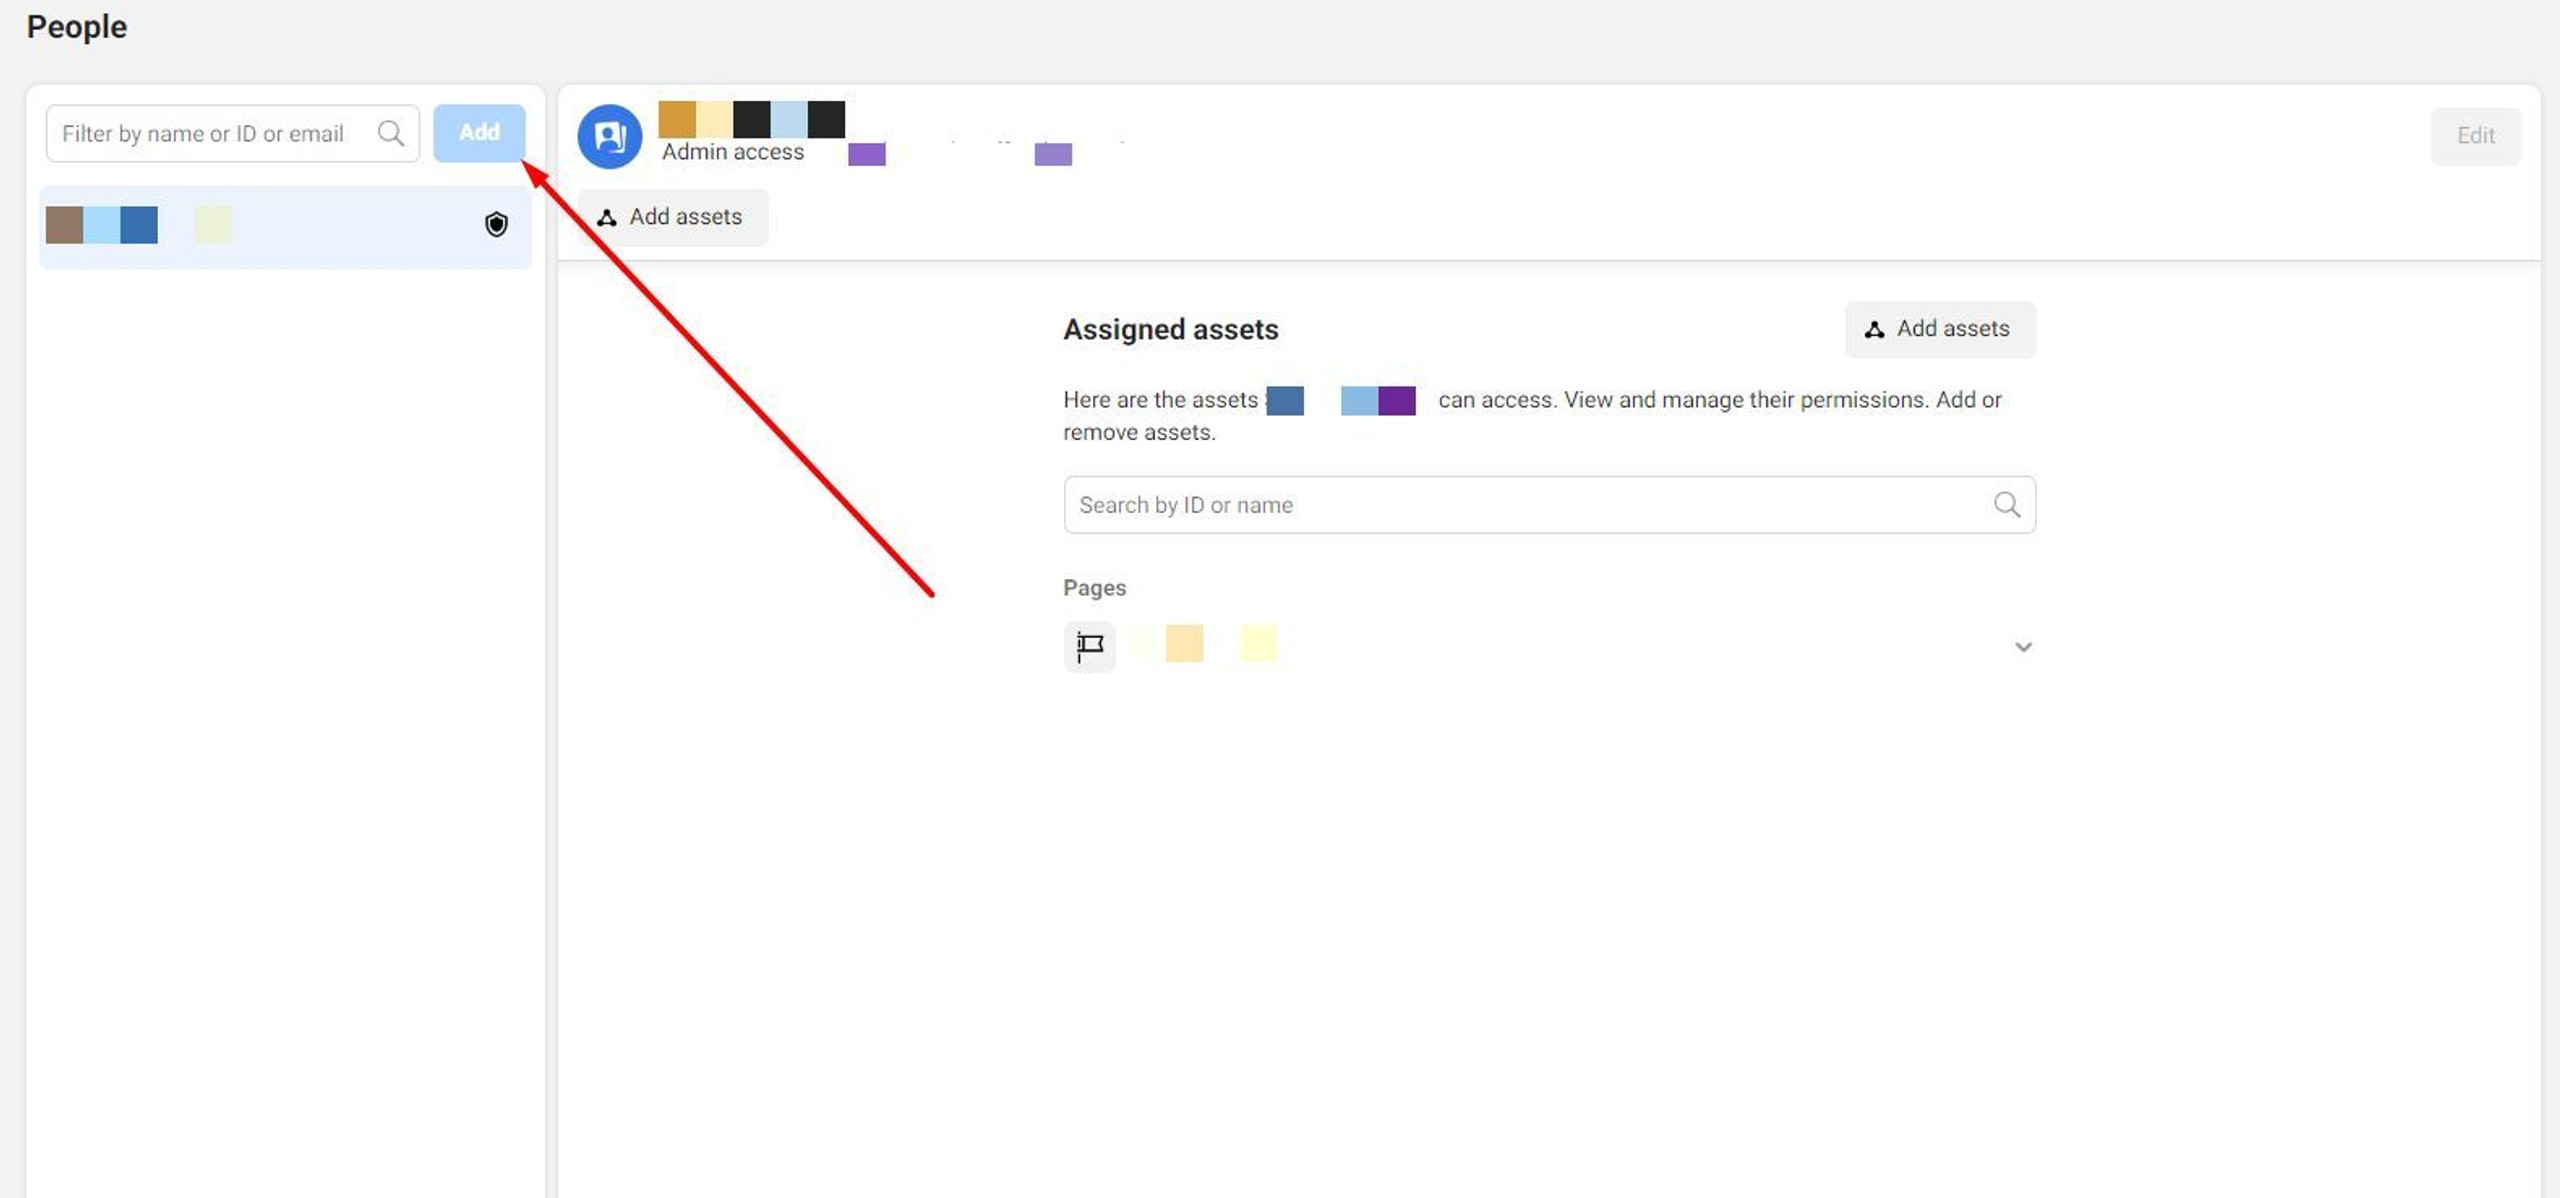
To start adding team members, press the blue Add button. Keep in mind that it will not be active if you are restricted from advertising. To get rid of the chains holding you back, confirm your identity.
5. At this point, you will need to enter their email address and set their initial access level.
Next, you will be asked to assign the employee to the assets you want them to work on.
Select the asset you need from the list on your right, then toggle the employee's responsibilities. for this asset. You can mix and match those however you want - a person given full control on one page can be limited to comments responses on another.
6. When you are done, click the blue Invite button. Your coworker will now have an invitation in their mailbox.
Adding the Ads Accounts
In line with Business Manager's tendency of making things easy for you, this process is very simple.
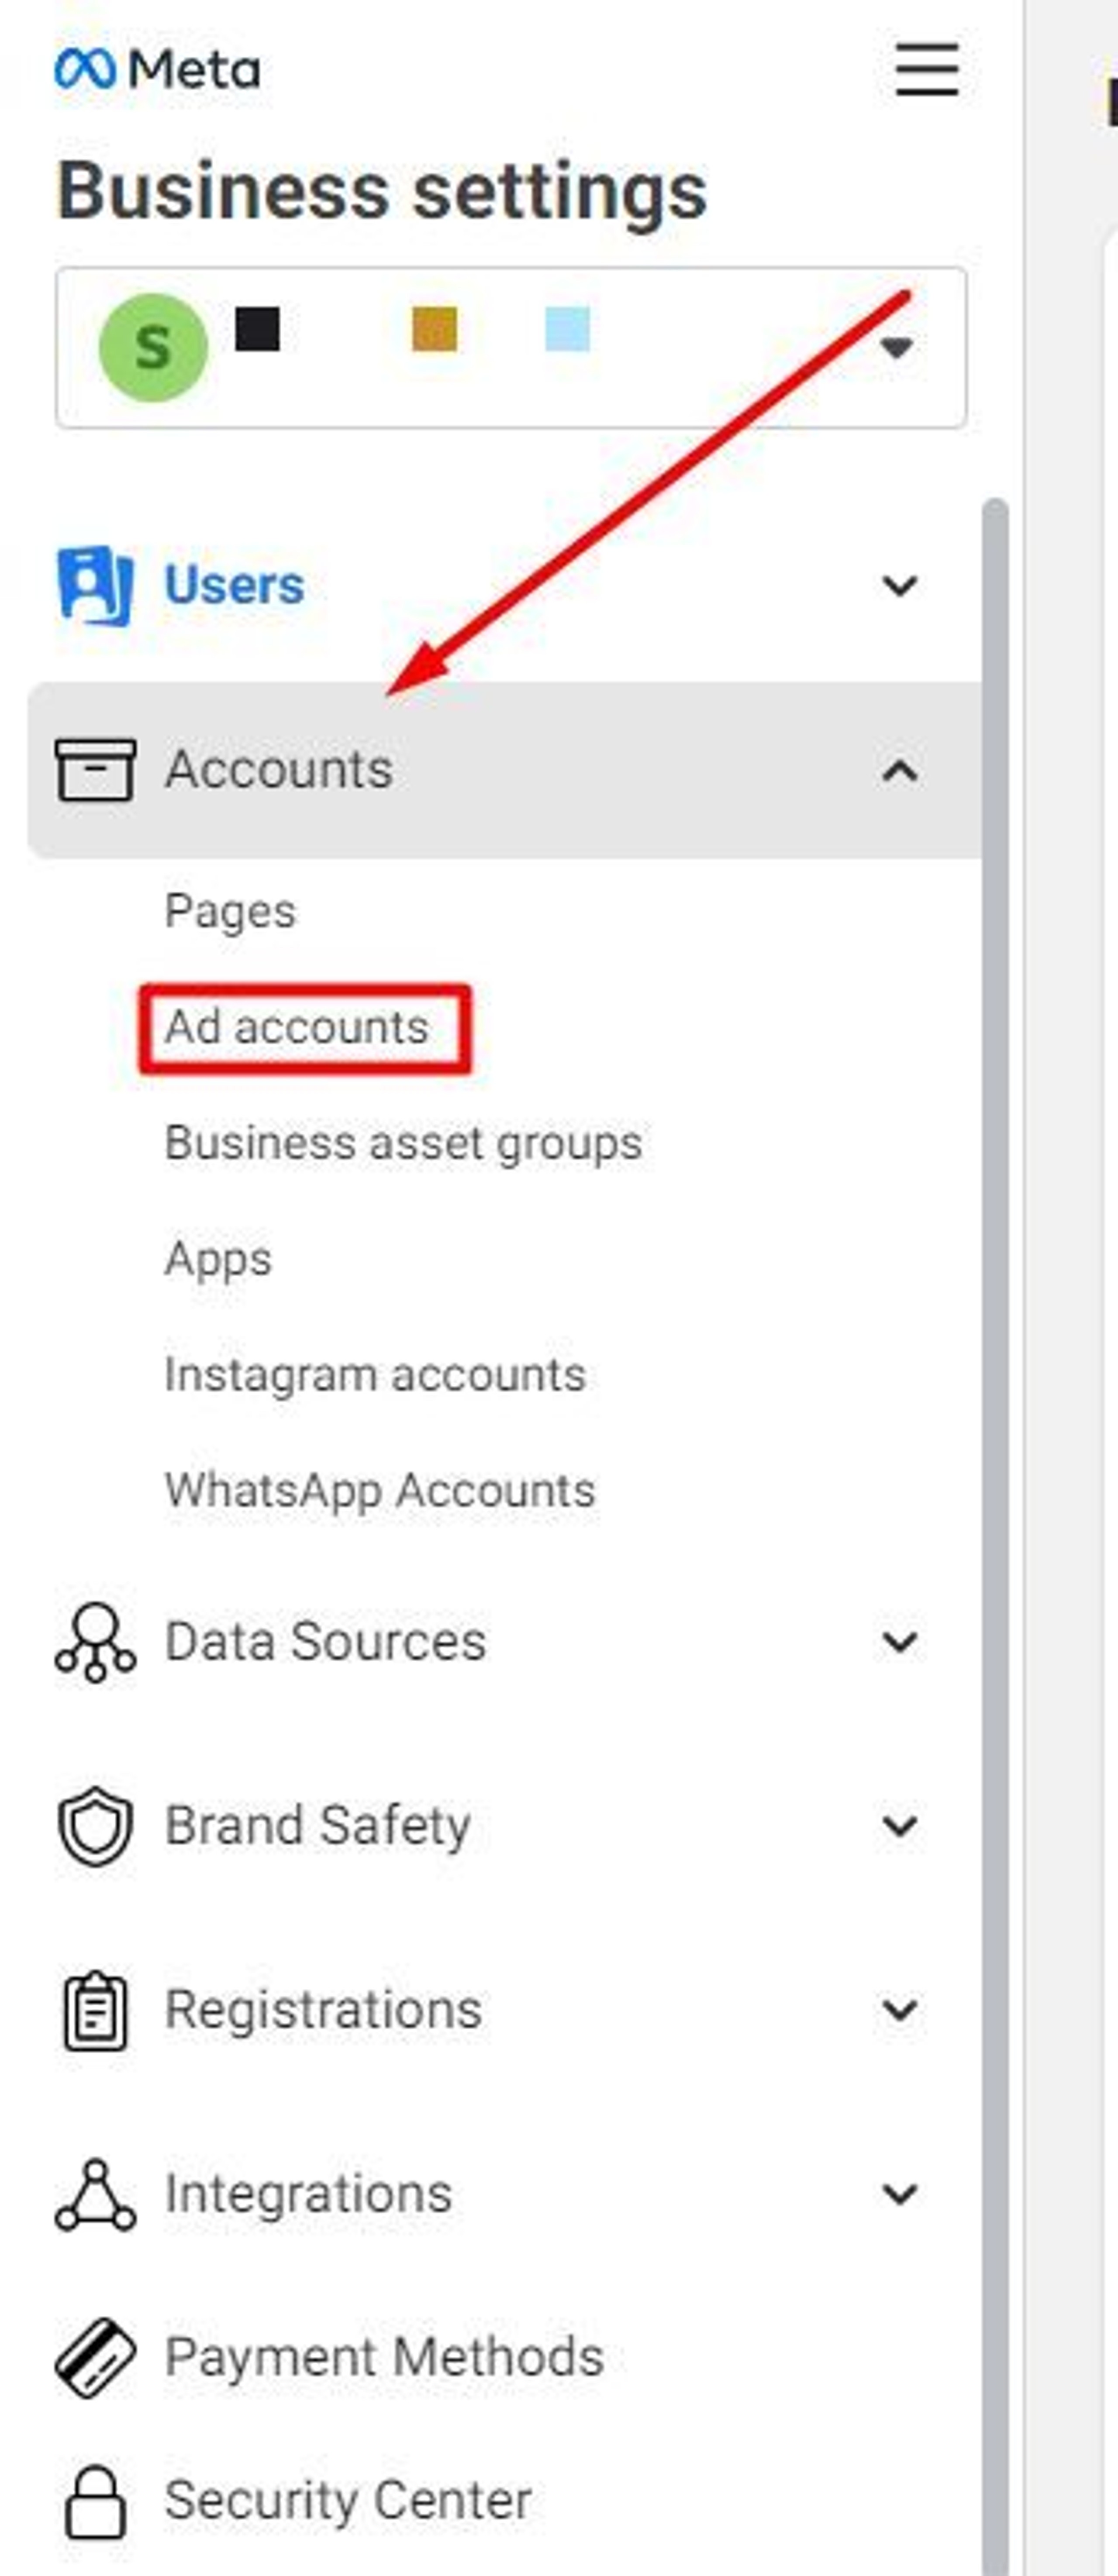
1. On your Business Settings dashboard, click on Ad accounts under the Accounts drop-down menu.
2. You will now be given three options. You can add your own Facebook Ad account, add someone else's account, or create a new one. Same as with Pages, creating or adding an existing ad account will permanently bind them to your Business Manager, so take care to pick the right option if you are working with clients.
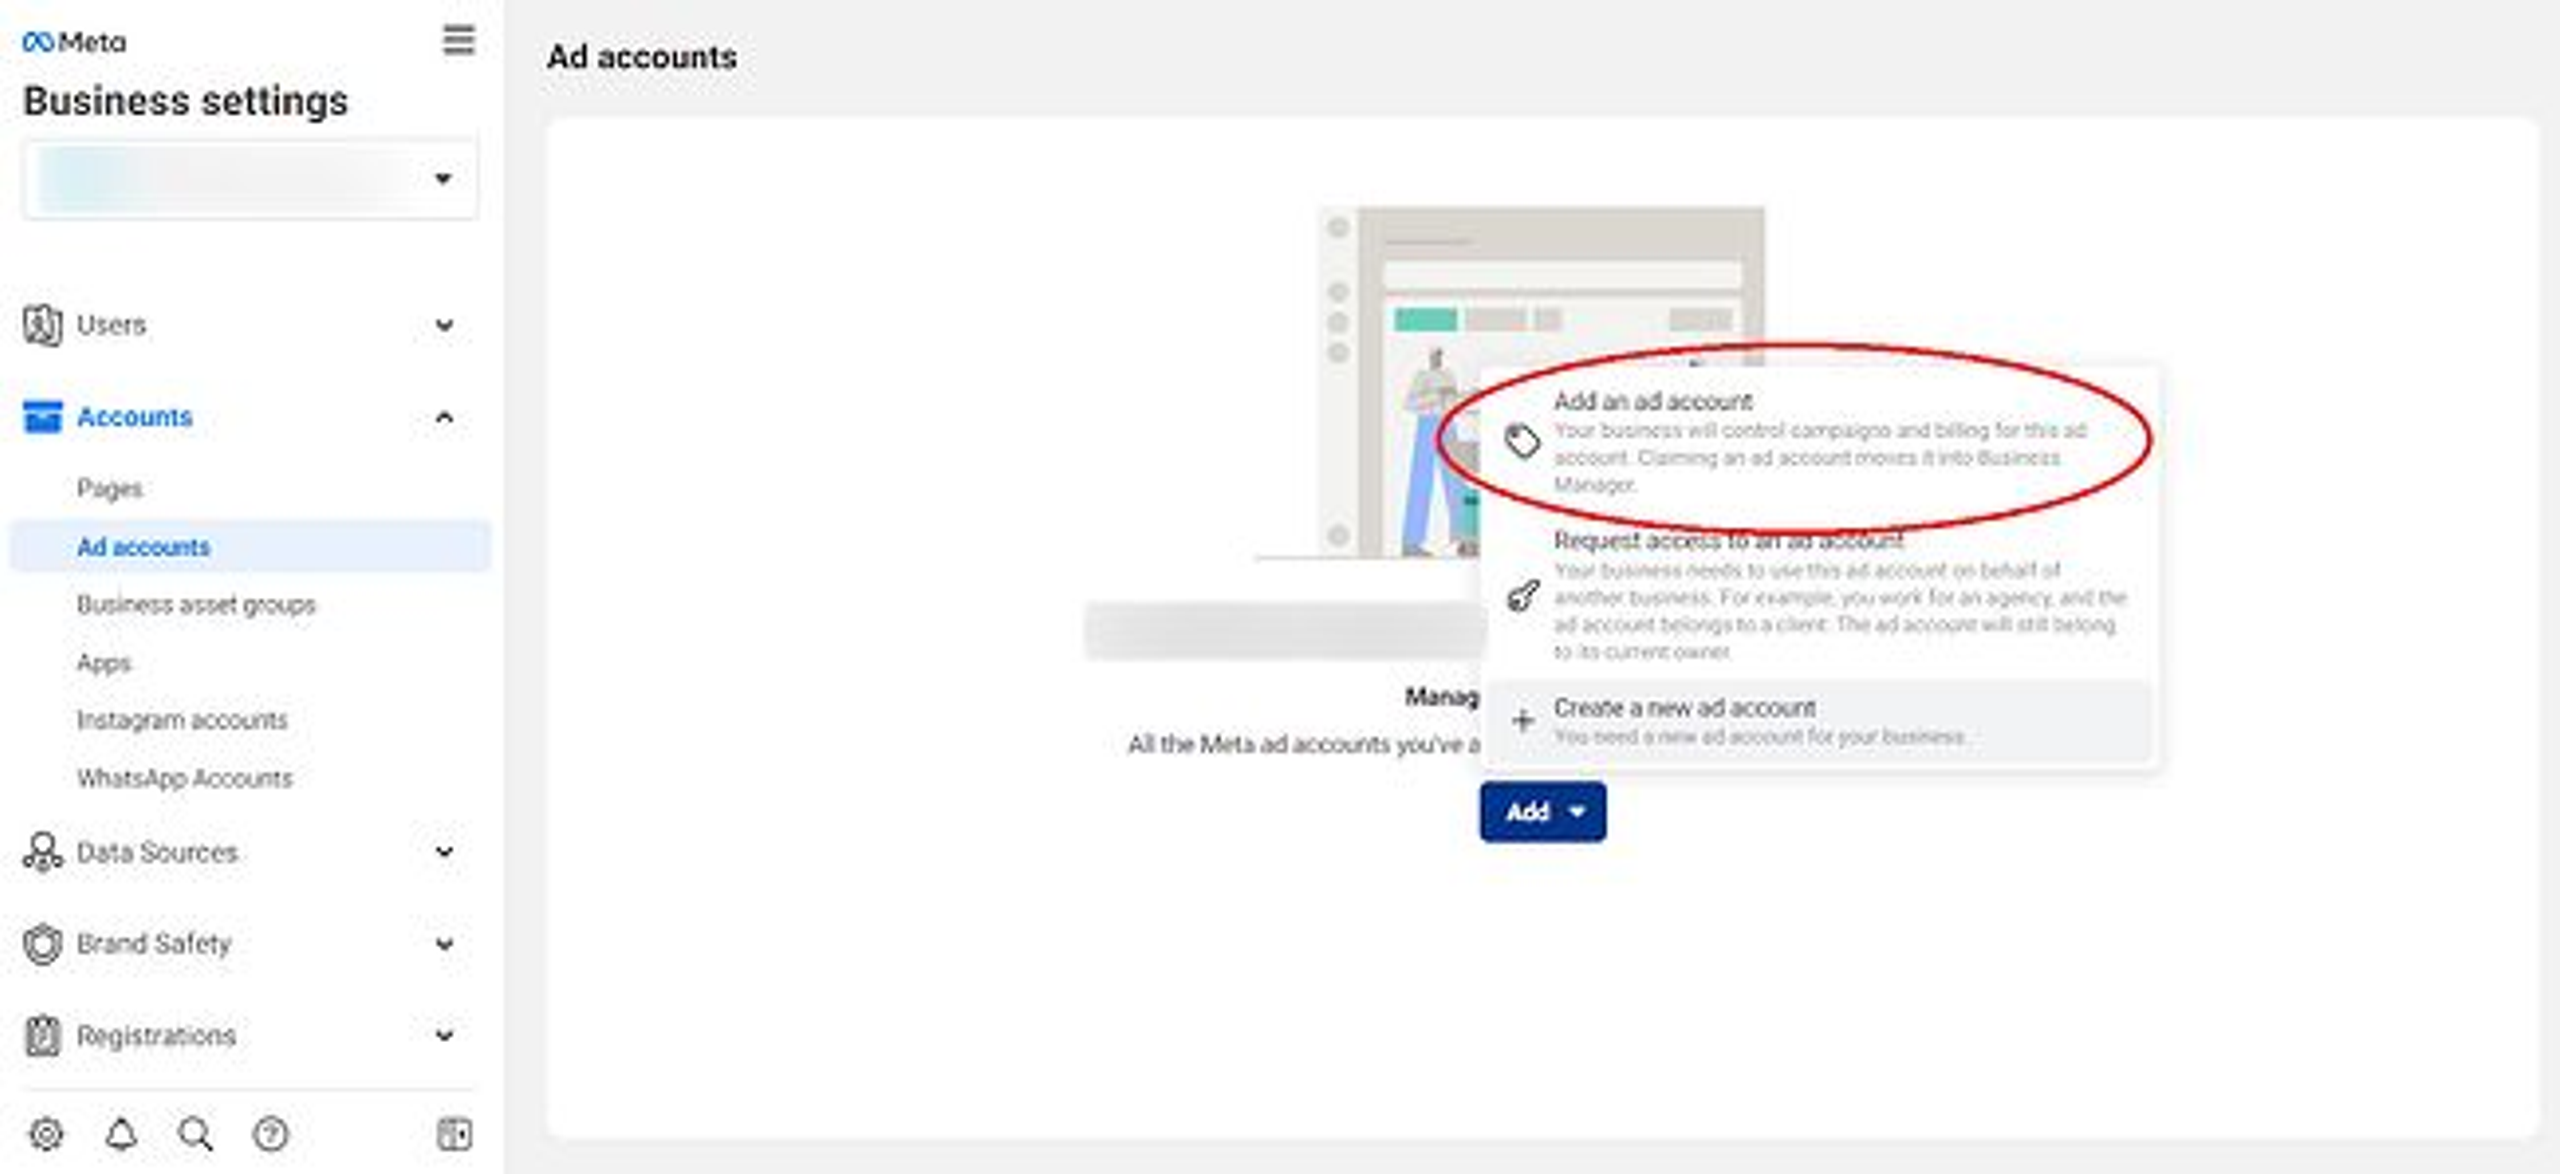
For this guide, we will be using the Add account option.
3. Next, you will need to enter your ad account ID. To find it, go to your Ads Manager and copy it from the dropdown menu in the search bar.
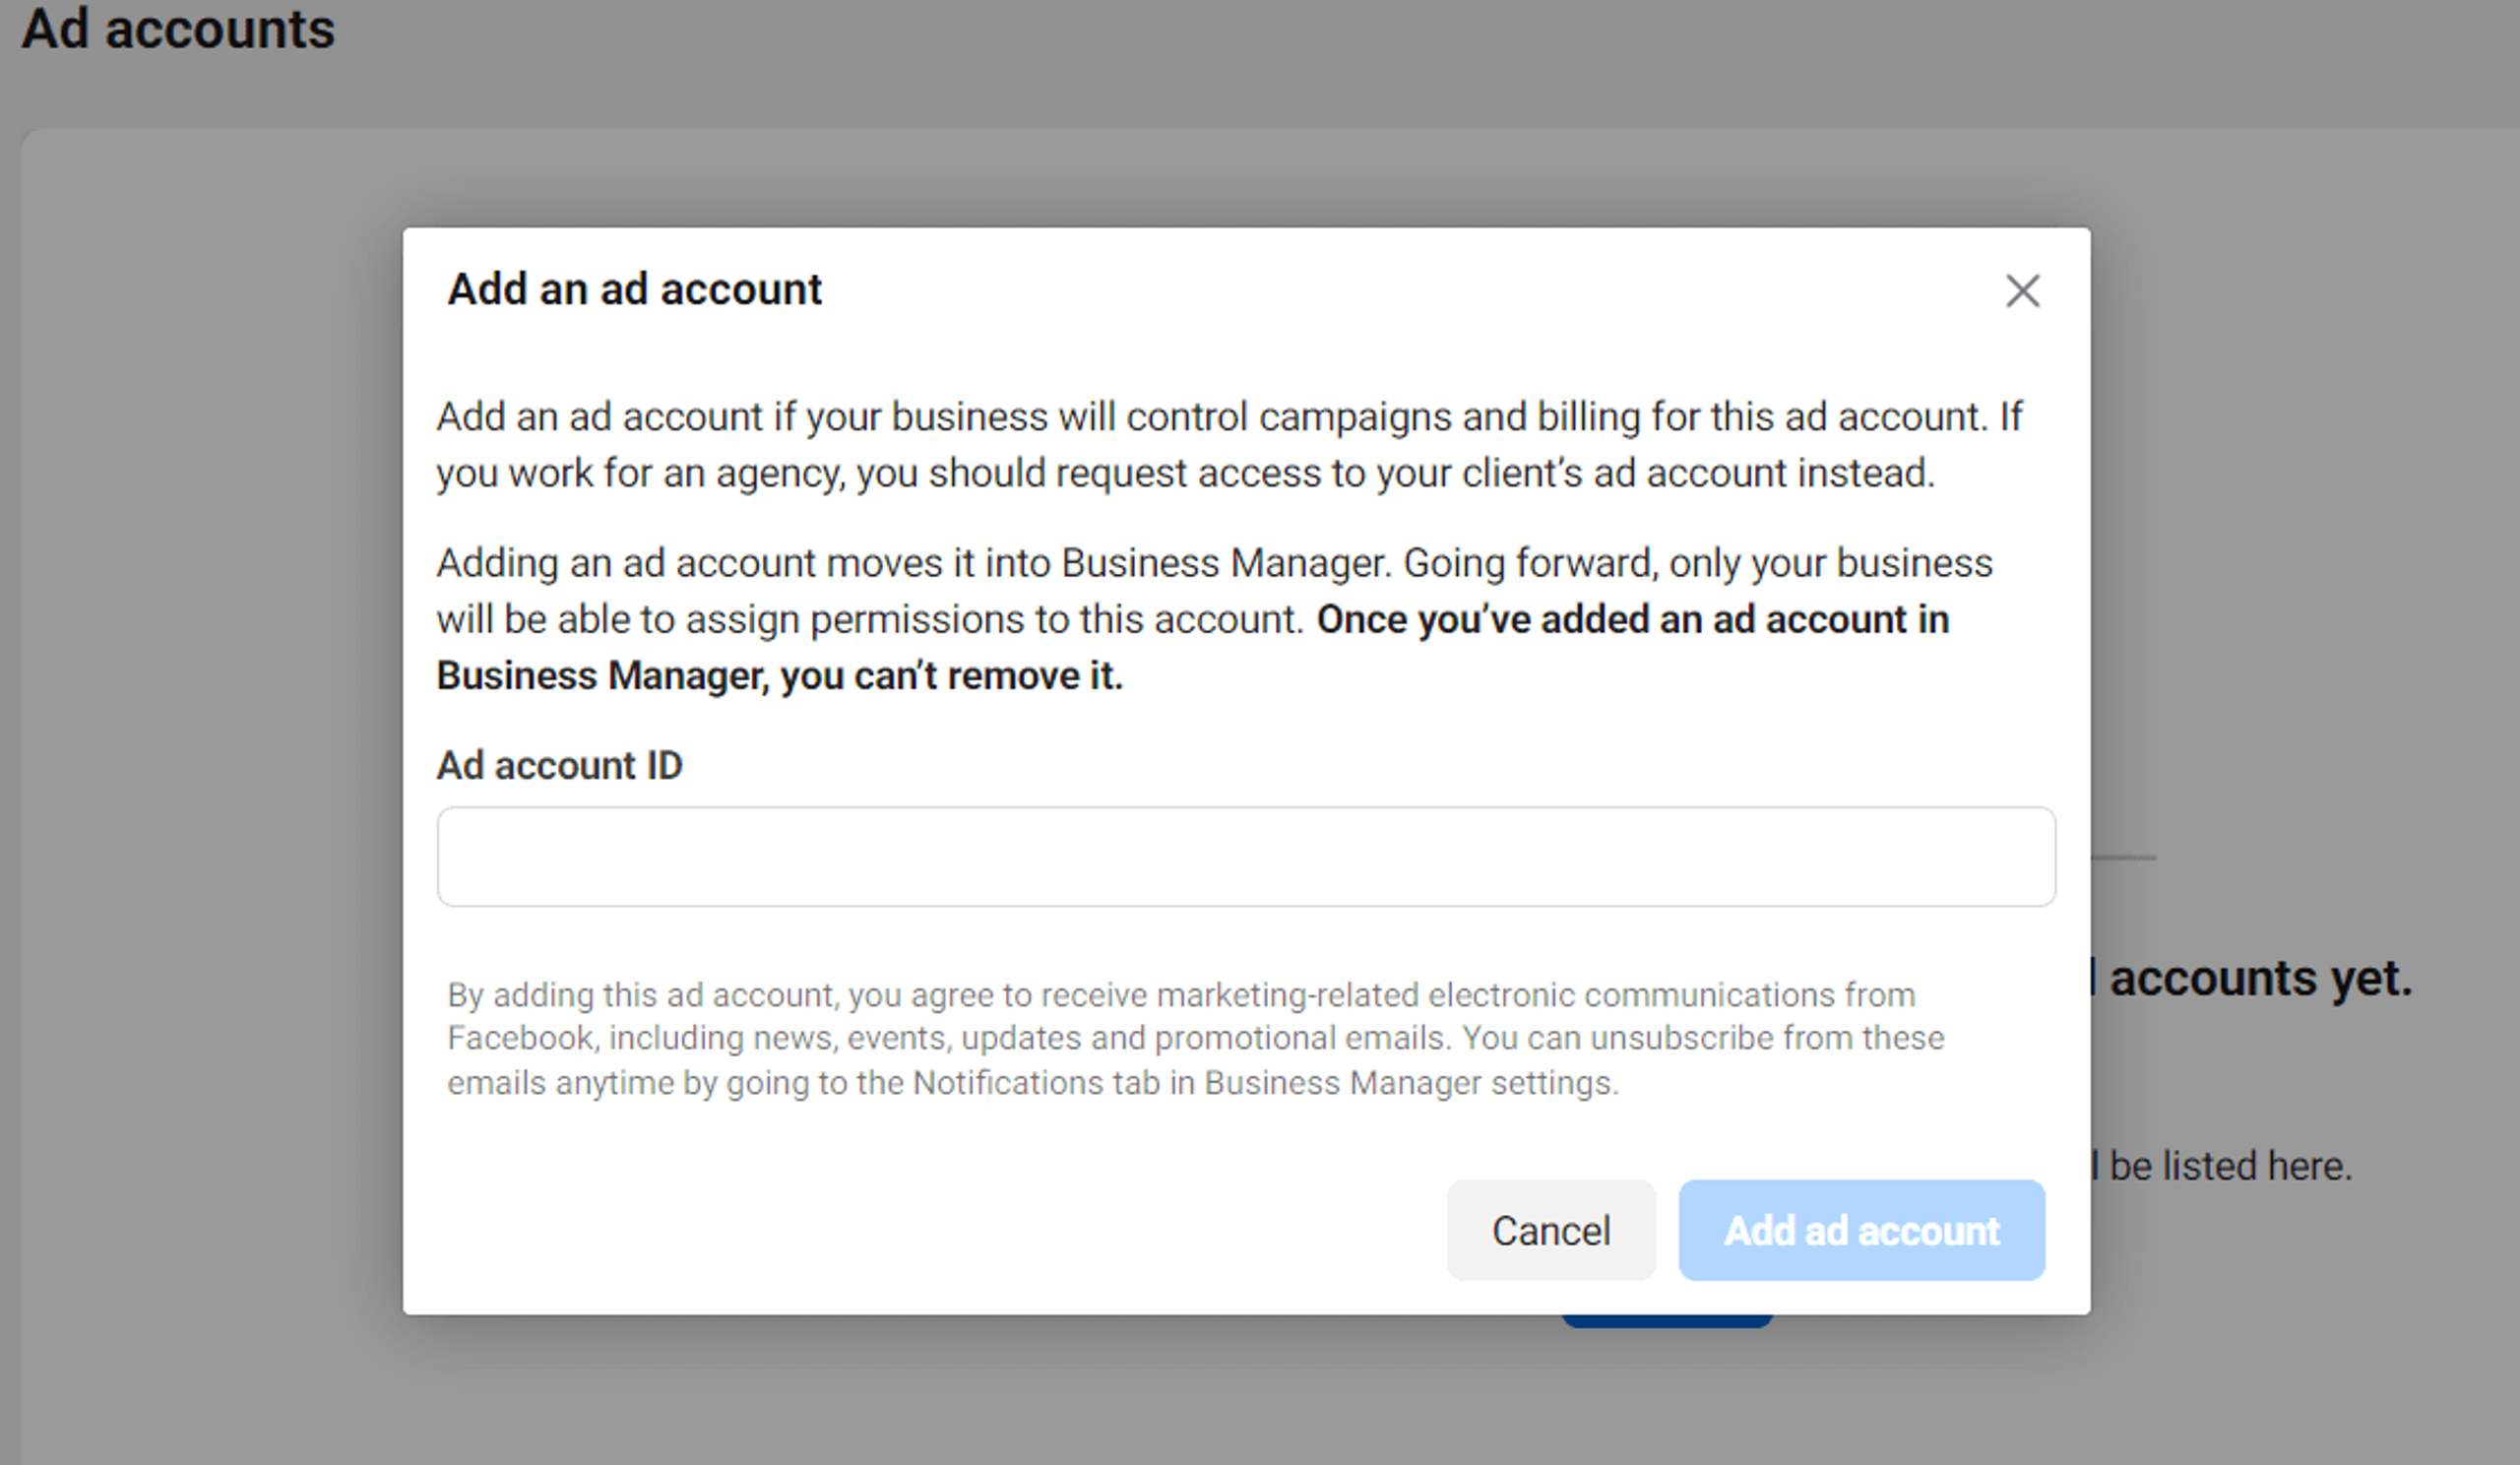
Double-check to avoid mistakes when copying it. As Facebook warns you, you won't be able to remove the ad account once you add it.
4. Click on the blue Add ad account button. Your ad account should now be connected to your Meta business manager.
Ads Manager Tools
Your pages are added, your ads accounts are connected, and all the people you need are gathered in one place. It is now time to take a look at what we can do with all that.
Set up Pixels
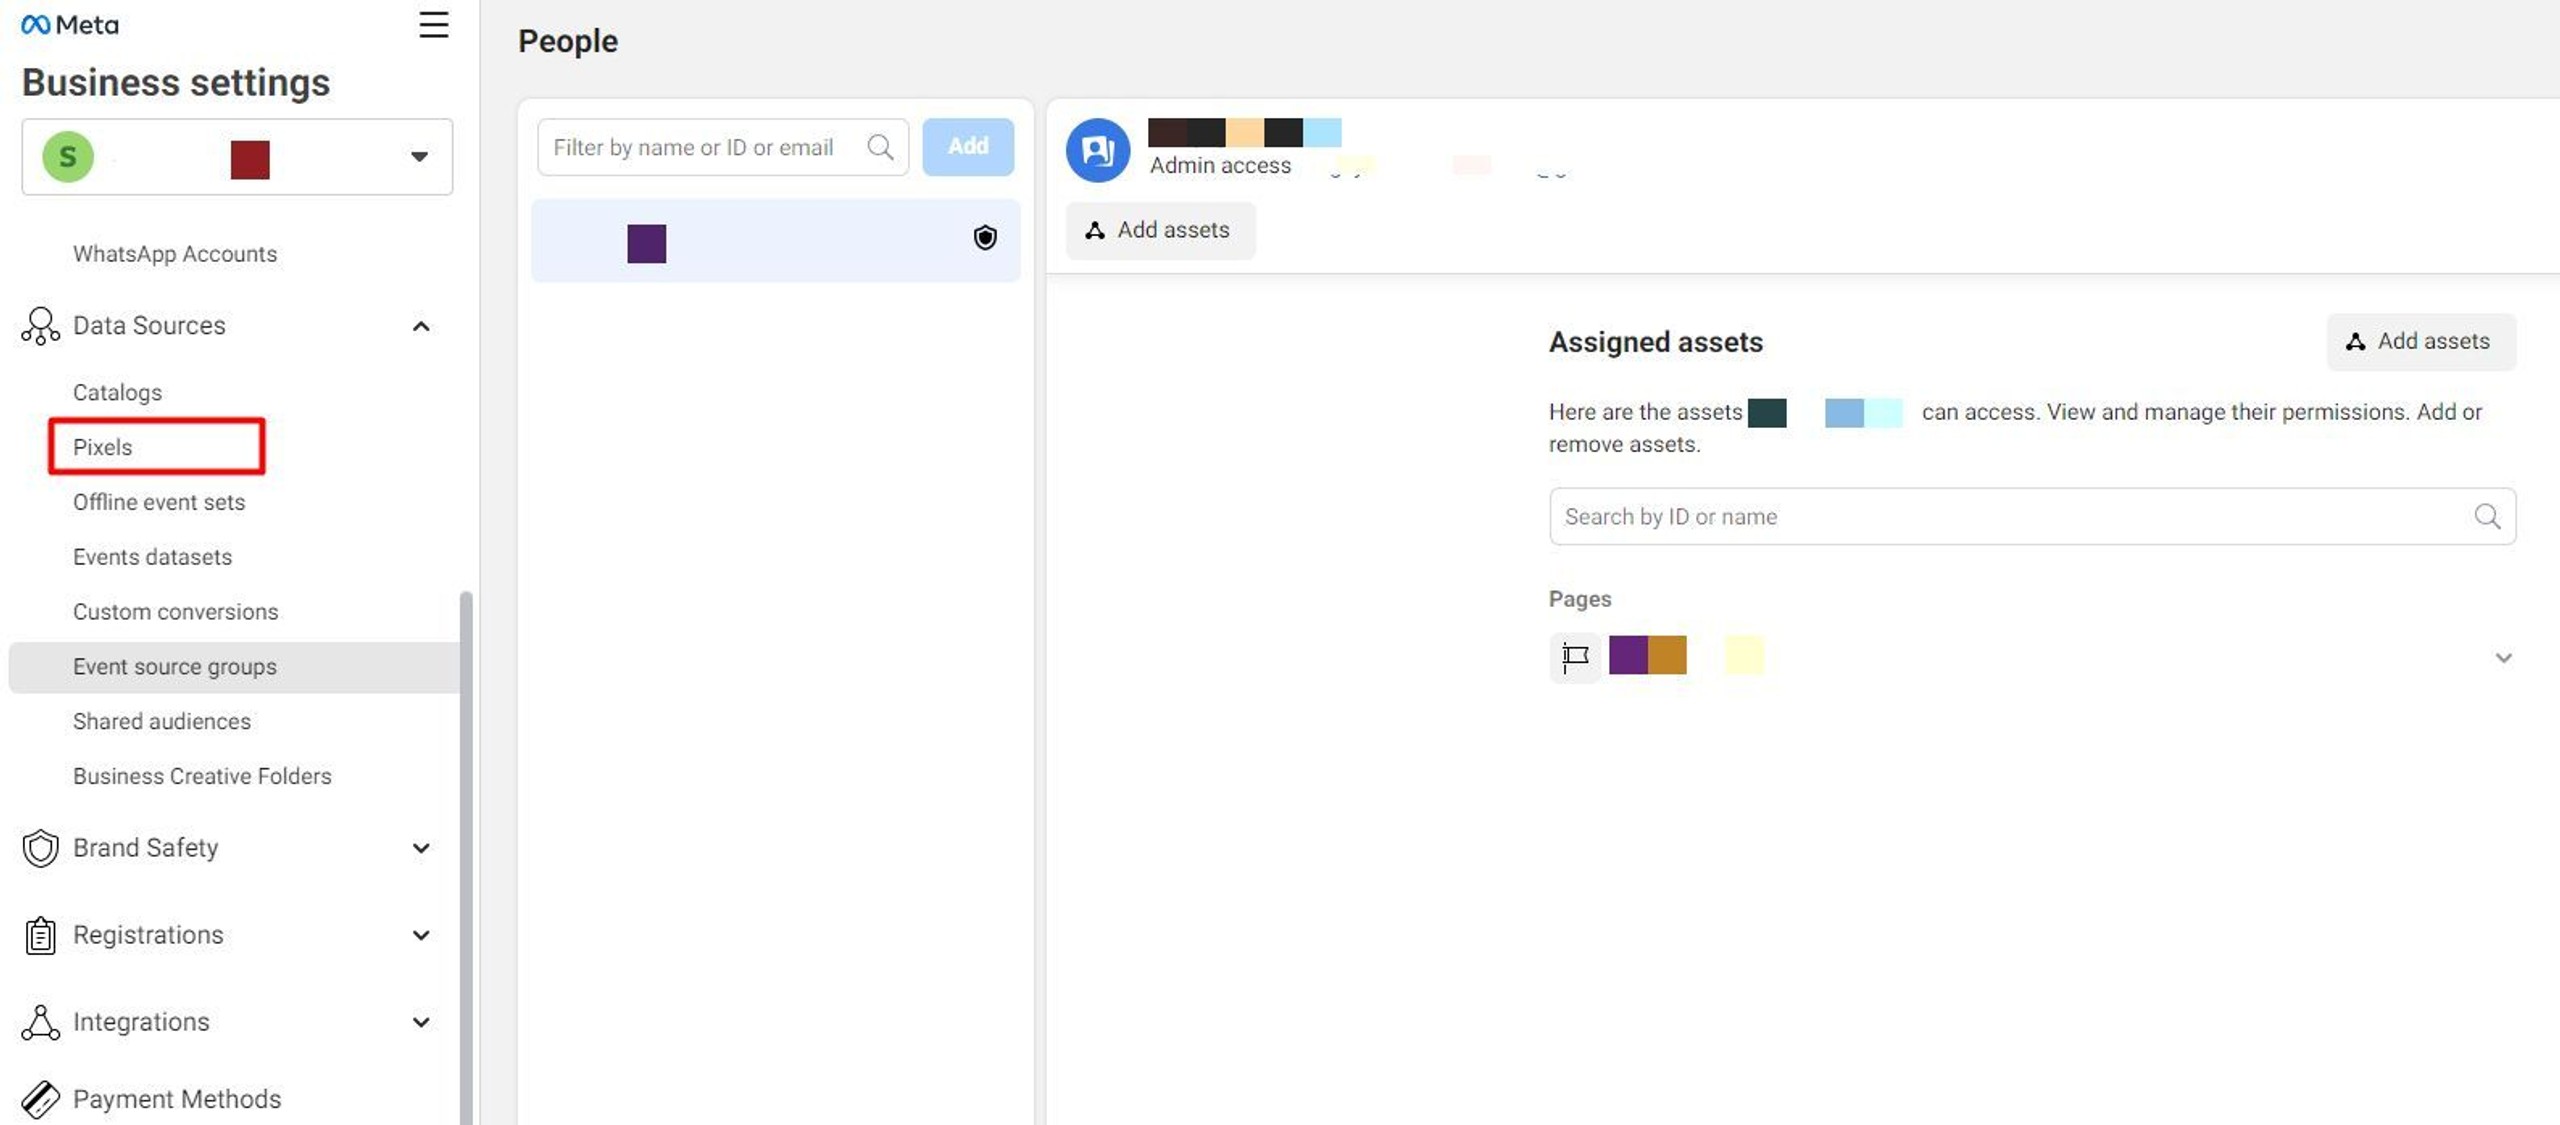
Pixels are little pieces of code you can add to your website in order to track user events. The data they can provide you with will help you better understand the state of your business and make educated decisions. Aside from that, it can be used by Facebook's algorithms to make your ads reach the right audiences.
To learn more about Facebook Pixels, check out our dedicated article.
Create custom audiences
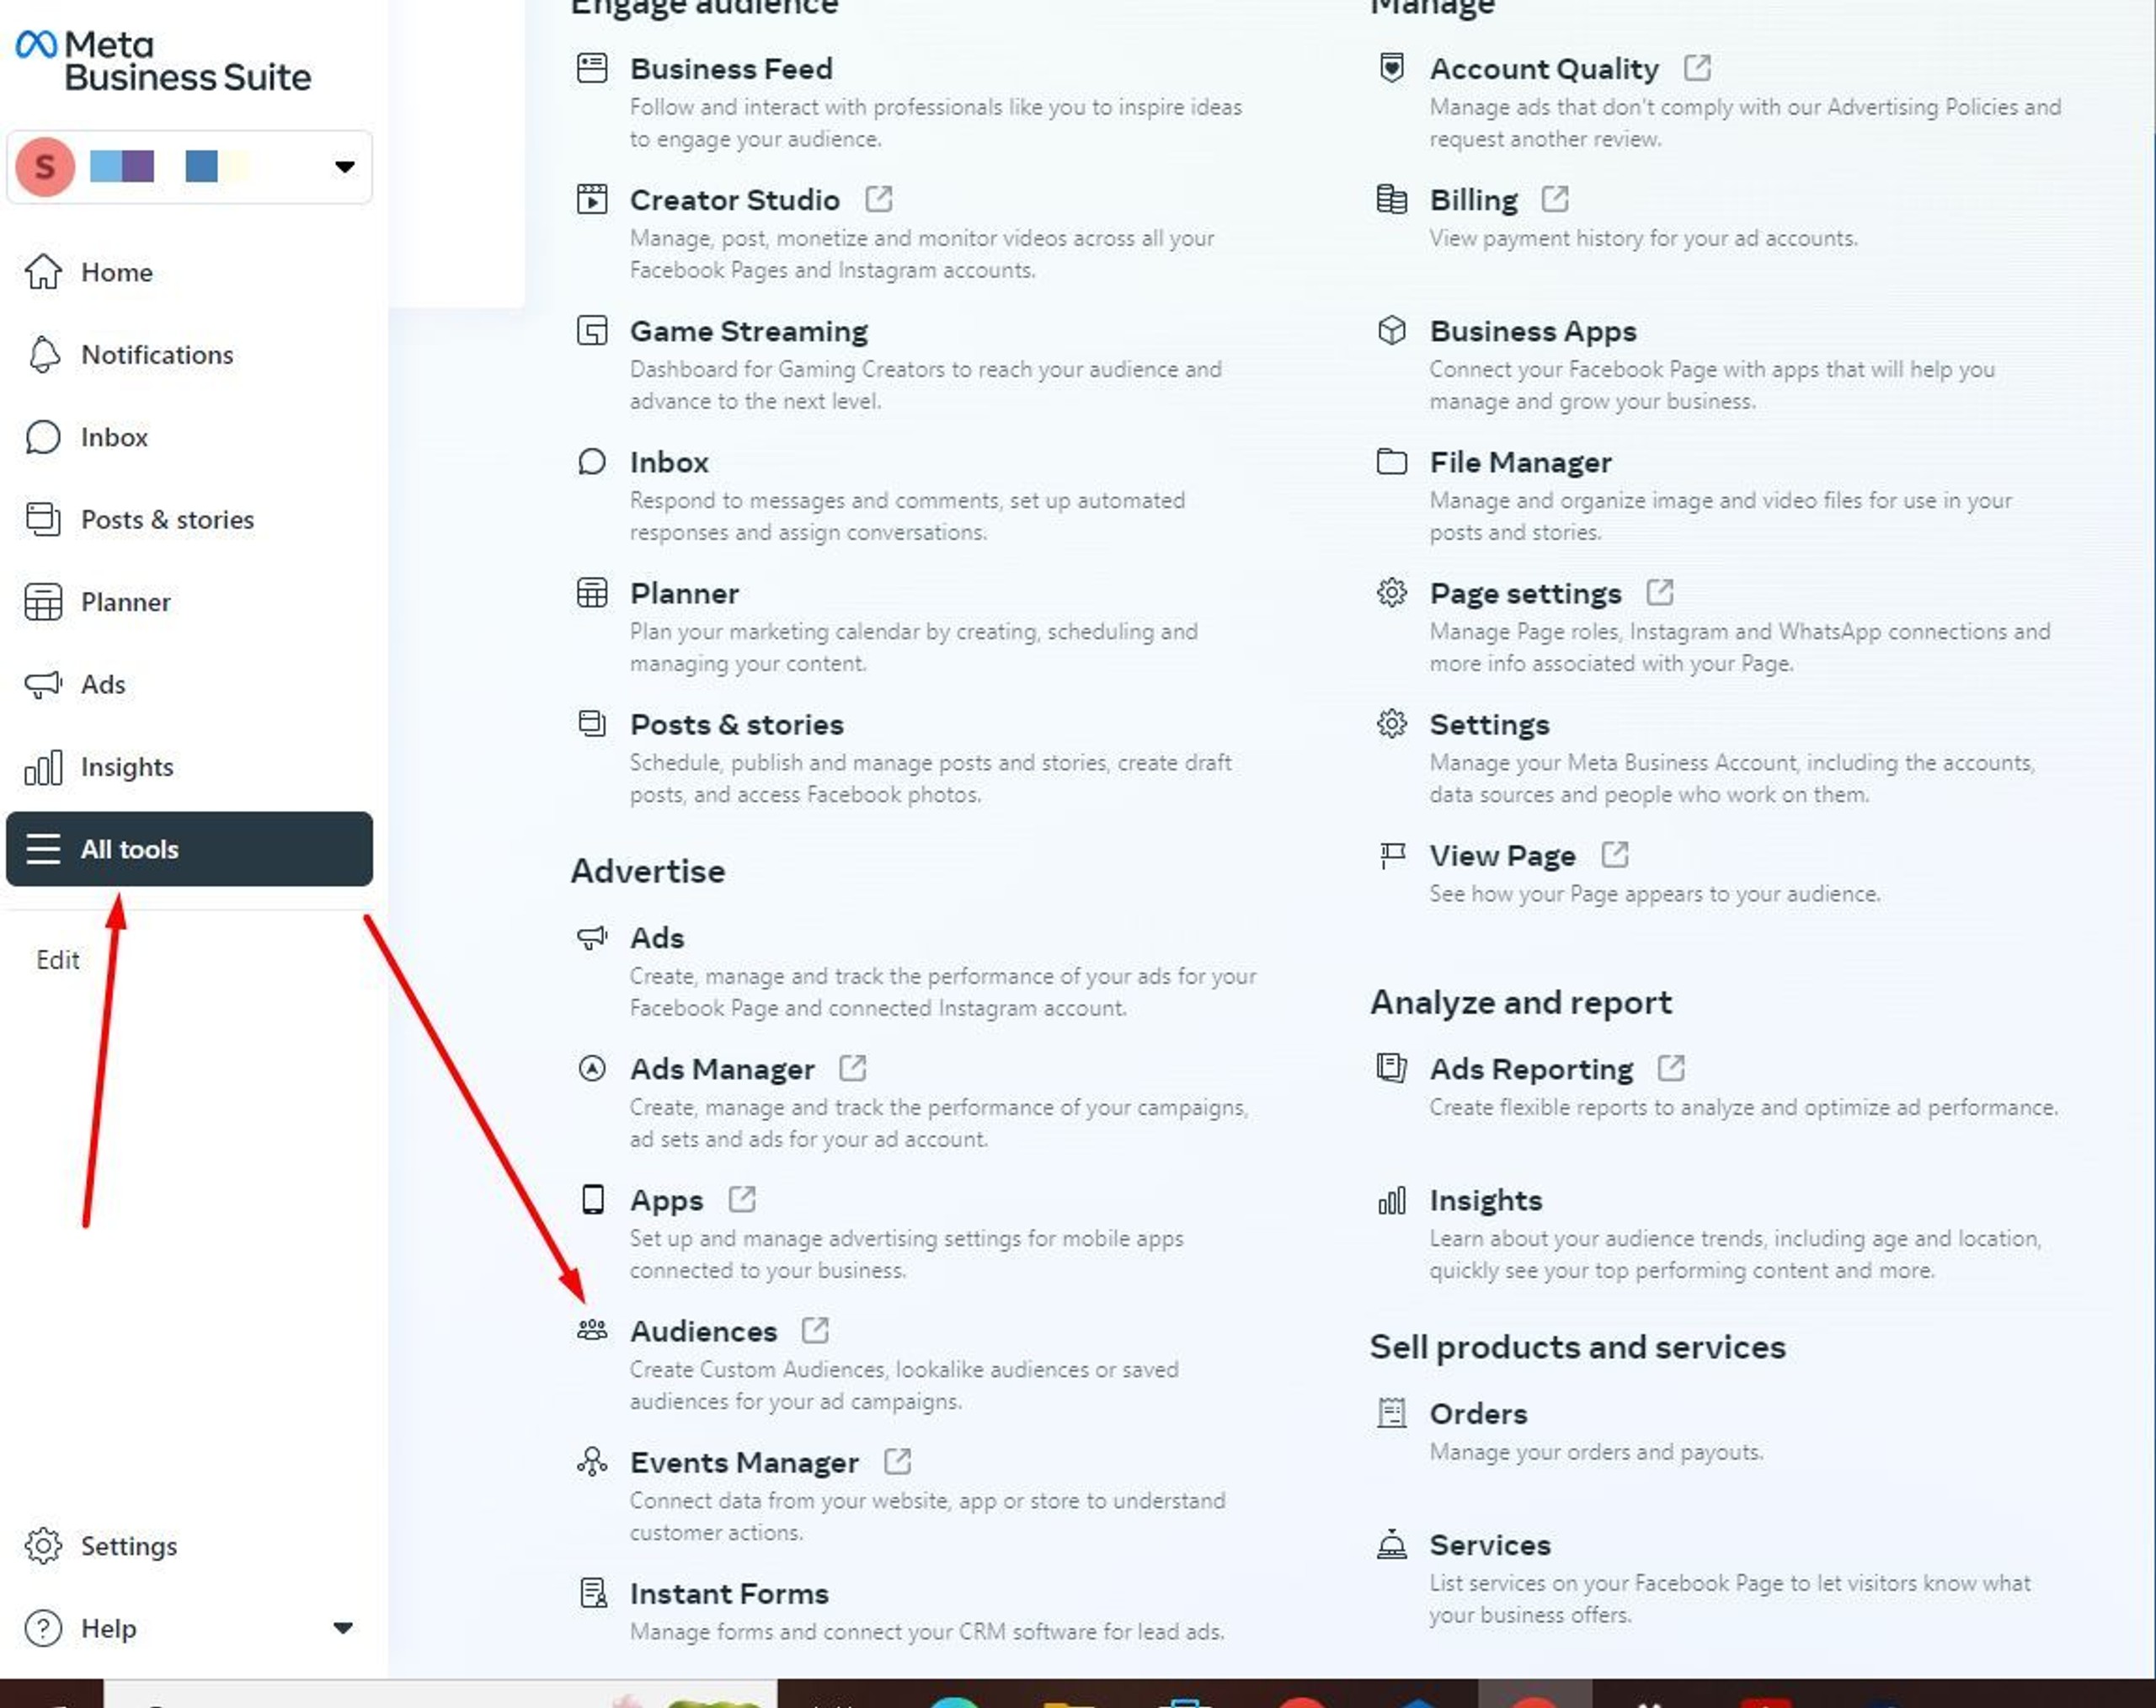
To do this, open the All tools tab in your Meta Business Suite, then select the Audiences option. You will be able to filter people by their interests, age, gender, and more, then target these custom audiences with your ads.
If you have enough conversion data from Pixel or other means, you will also be able to create lookalike audiences - audiences comprised of people who exhibit similar interests or behaviors to your existing customers. If you want to learn more about those, check out our article.
Create Ads
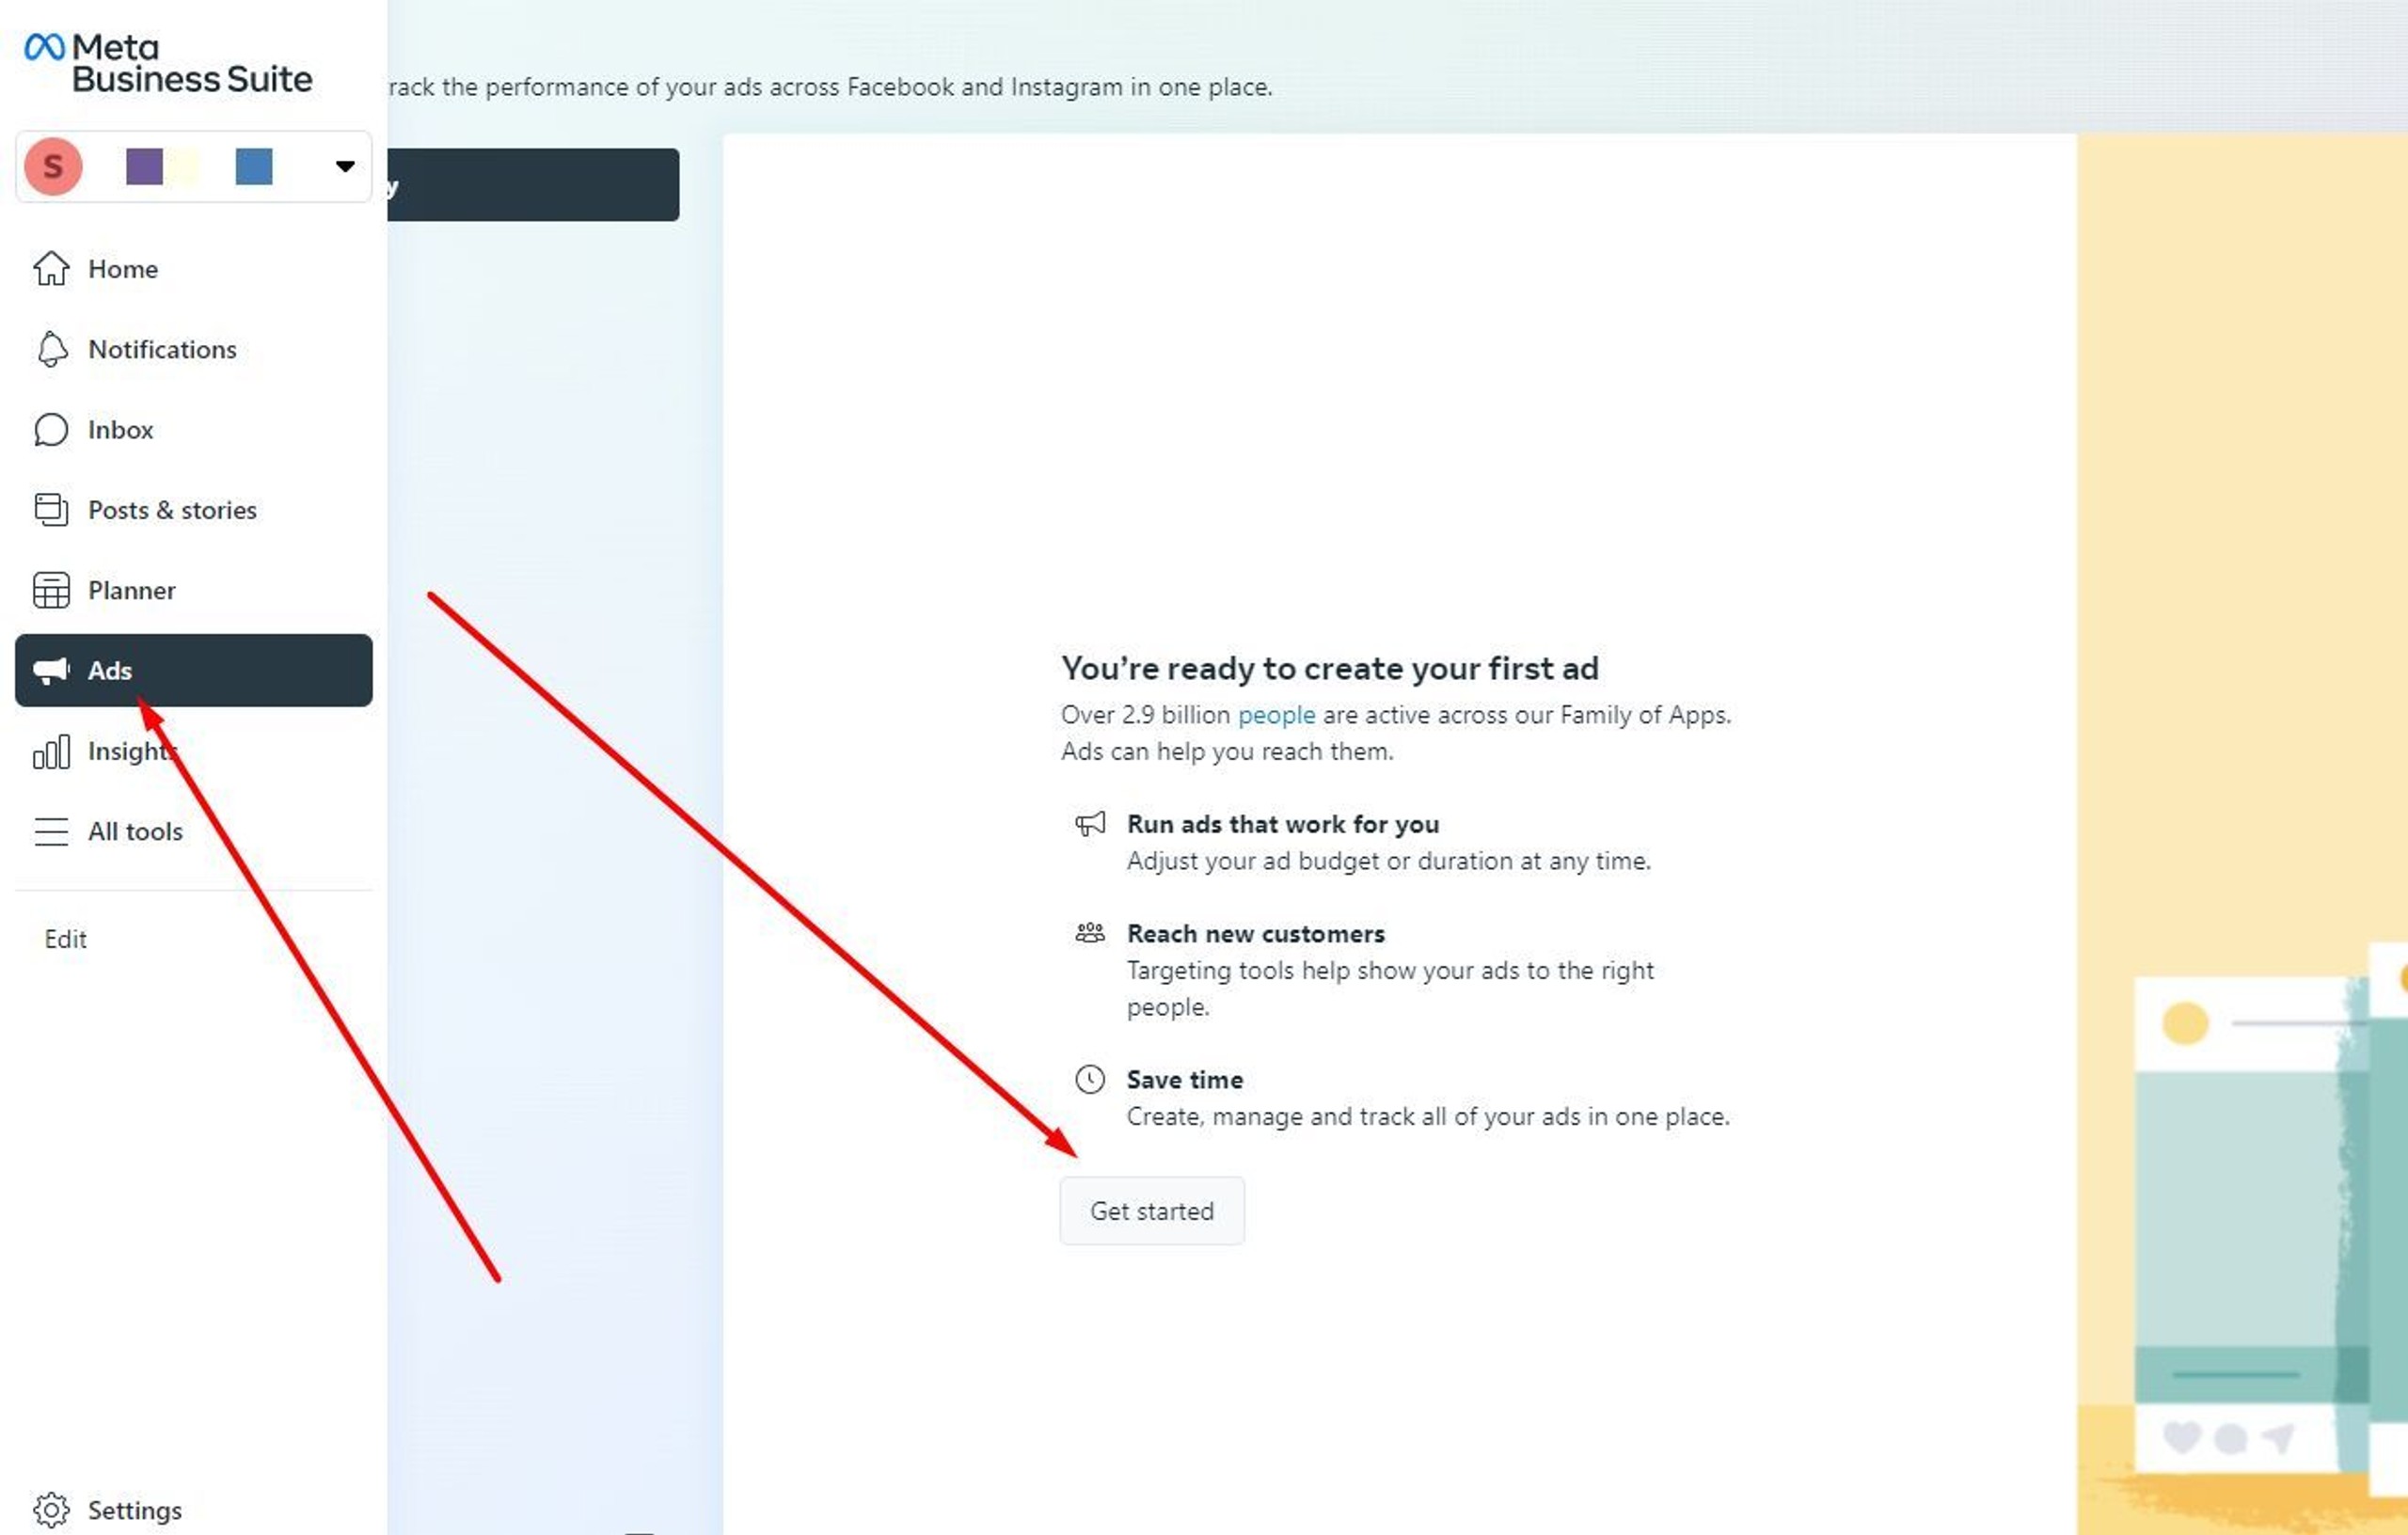
Right out of the box, Meta Business Manager comes equipped with the ability to create ads. To do this, open your Meta Business Suite and click on the Ads tab, then follow the instructions you are given.
Pay extra attention to the goal you choose for your campaign, as it will have a significant impact on Facebook's targeting. Facebook analyzes the behavior of its users to determine which actions they are more prone to take, then uses this data to enhance ad targeting. In other words, if you set the goal as "Get more messages", for example, Facebook will show your ad to talkers, not buyers.
If you have already created a custom audience, here is where you'll want to use it. Facebook will also give you predictions on how many people your ad will reach daily and how many clicks you can expect from them, based on your budget and the size of the selected audience.
Managing Facebook Pages
It would be surprising if a tool called 'manager' wouldn't have the ability to, well, manage.
Business Manager, among many other things, gives you the option to schedule posts on your connected Facebook Page and reply to messages and comments. This might seem a little redundant if you are only working with one page, as you can do all that from your page itself.
However, as your business expands and scales, you will eventually find yourself in need of more Facebook Pages.
You might expand to a different country - you will need a new Facebook page to interact with an audience that speaks another language.
You might launch a sub-brand, or create a separate, educational website for content marketing - you'll want new pages for those as well.
Therefore, it is best to get used to working with Facebook pages from Business Manager early on. It will save you a lot of confusion in the future.
Use Product Catalogs
Catalogs, also sometimes referred to as product feeds, are essentially databases of products a business offers.
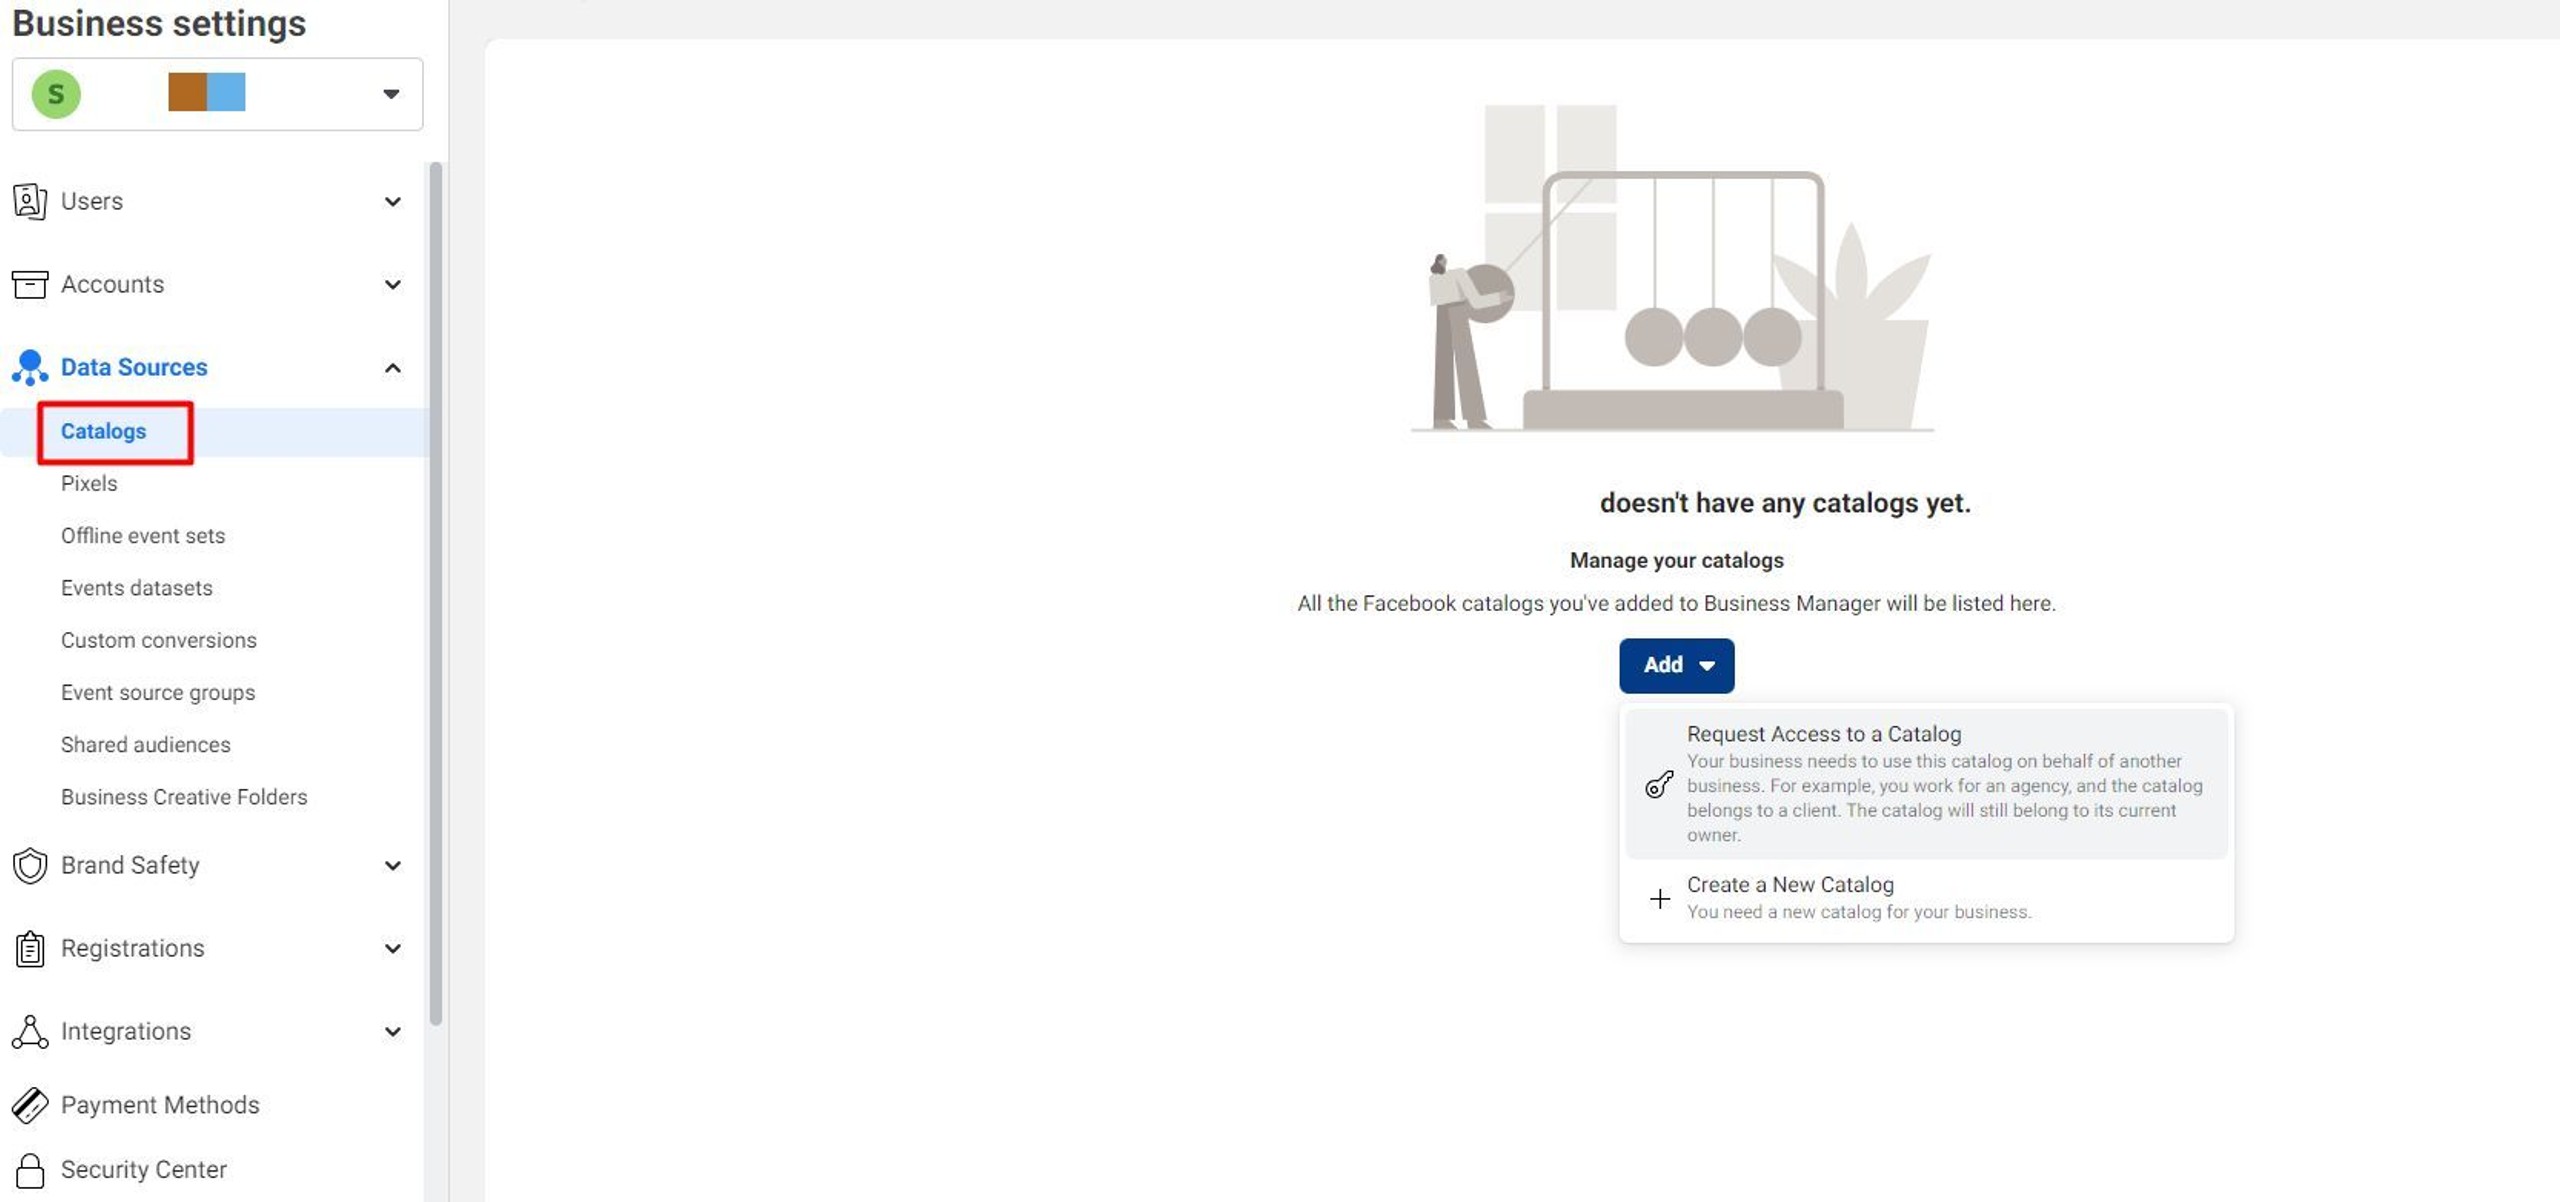
You can create multiple catalogs under your Facebook Business manager account, as well as request access to the catalogs of your clients.
These catalogs are mainly used for two closely connected things: catalog ads and a Facebook-based storefront.
The latter allows you to open a virtual branch of your online store on Facebook or Instagram. This way, your users will be able to browse and purchase your products without leaving Meta's platforms.
Catalog ads are similar to Shopping ads on Google, in that they are automatically created from your shopping feed, or catalog. They can give a nice boost to sales and don't require too much work to set up.
Meta Business Manager Insights
This guide wouldn't be complete if we didn't mention the Insights tab. To open it, click on Insights on the left side of your Meta Business Suite dashboard.
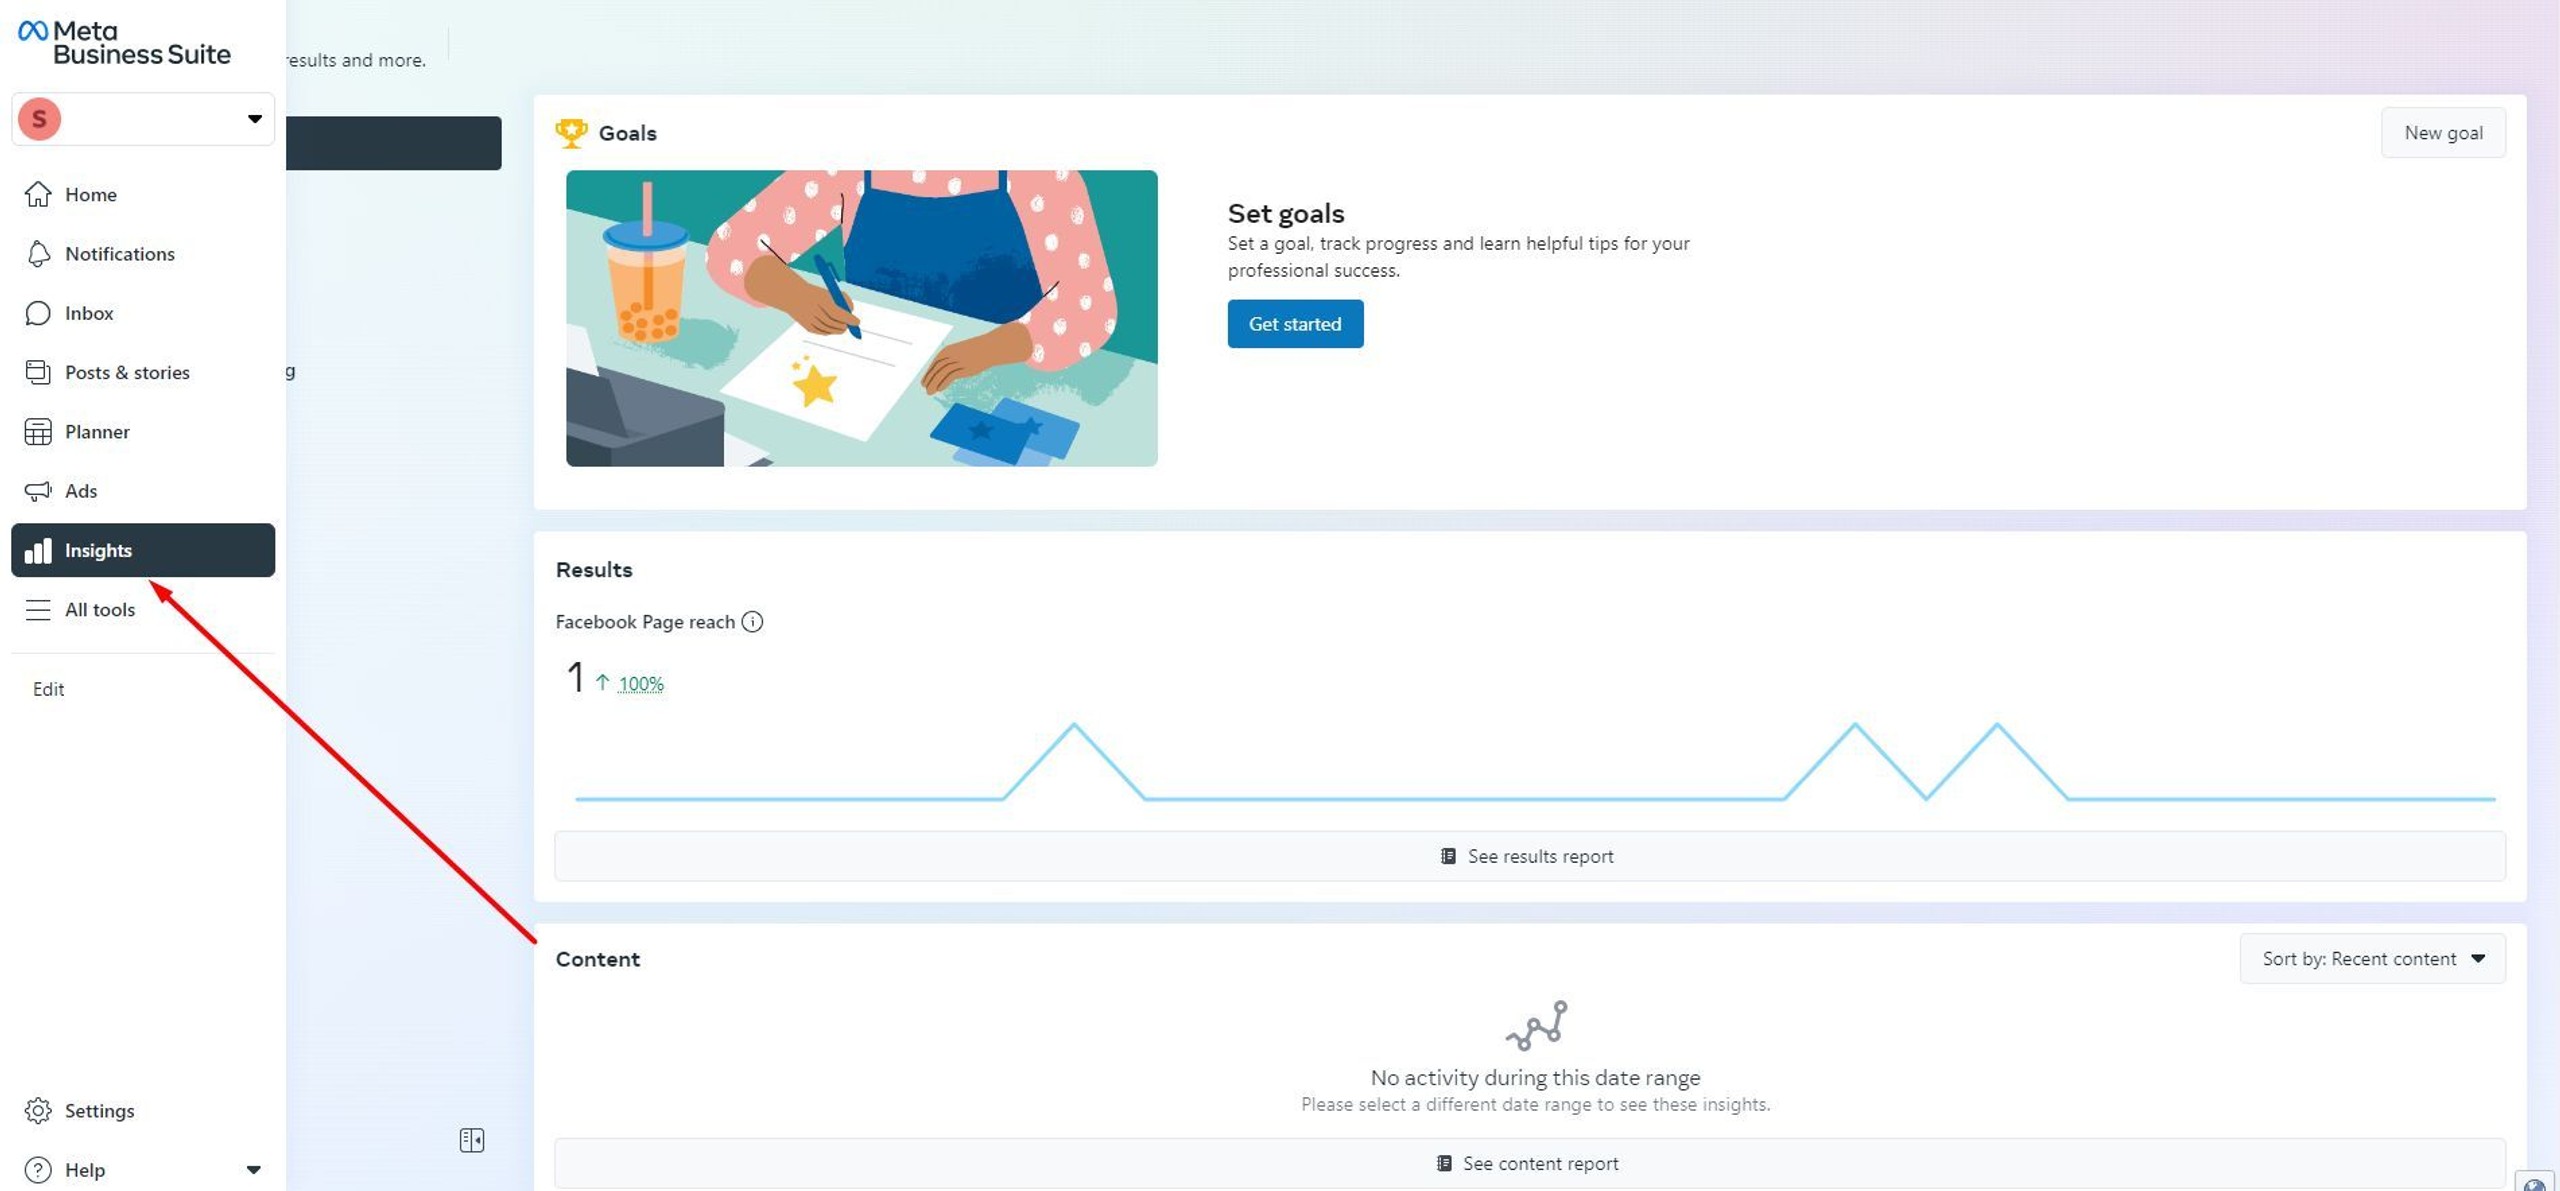
Insights is an analytics tool that can help you monitor the overall performance of your business, or at least the parts of it that are connected to your Facebook Business Manager account.
With Insights, you can:
Make use of facebook pixel data
Under Insights, you will be able to access all the data your Facebook Pixel has gathered. More than that, you will be able to create retargeting audiences based on it. To learn more about them, take a look at our dedicated article on Facebook retargeting ads.
Monitor your a/b testing
You will be able to look into the performance of individual ads within your ad groups. This way, you will have easy and quick access to your split-testing data.
Track user activity in your apps
You can use Facebook's Mobile SDK to connect your mobile app to the Business Manager. This will allow you to spy on what your app users are doing and tweak your app-related ad campaigns accordingly, all from one hub.
Learn more about your audience
Insights let you take a glimpse at the user data of people who are connected to your page. You will be able to see their age, gender, education level, and work titles, among other things.
Even if you believe you know your audience well, there's a high chance you will still find something surprising there.
Summary
There is no reason not to make your life easier than it is, which means there is no reason not to use Facebook Business Manager. In fact, using it becomes pretty much mandatory once you start putting serious effort, money, and manpower into your business's presence on Facebook.
Hopefully, this article helped you with navigating its interface and tools. If you want to learn more about using Facebook in your eCommercial endeavors, make sure to check out our blog.
