How To Install Meta Pixel on Wordpress
Posted on 3/8/2024
Reviewed by Arnt Eriksen updated at 3/9/2024
Introduction

Your online ads should be a powerful tool, not a money pit. The Meta Pixel (formerly the Facebook Pixel) is the key to making them work for you.
This simple bit of code gives you the inside scoop on what people do on your website. That means you can stop guessing and start targeting the right people with the right message.
The result? More effective ads, less wasted budget, and a boost to your bottom line.
If you're using Facebook ads, you need Meta Pixel on your WordPress site. It's that simple.
Why Install Meta Pixel?
Installing the Meta Pixel is a game-changer. It enhances your campaign results by accurately tracking user behavior on your website.
Understanding Meta Pixel
So, what exactly is Meta Pixel? It's a code embedded in your website that collects data crucial for tracking conversions from Facebook ads. Beyond that, it helps to optimize ads, build targeted audiences, and engage in retargeting based on user interactions.
How Meta Pixel Works
Meta Pixel operates by placing and triggering cookies to track user activities both on and off Facebook and Instagram. This allows for strategic ad placements, such as the ones you encounter in your Instagram and Facebook feeds.
How to Create a Meta Pixel
Meta Pixel operates by placing and triggering cookies to track user activities both on and off Facebook and Instagram. This allows for strategic ad placements, such as the ones you encounter in your Instagram and Facebook feeds.
How to Create a Meta Pixel
Before we dive into your WordPress store, let's get your Meta Pixel ready to roll. Follow these steps:
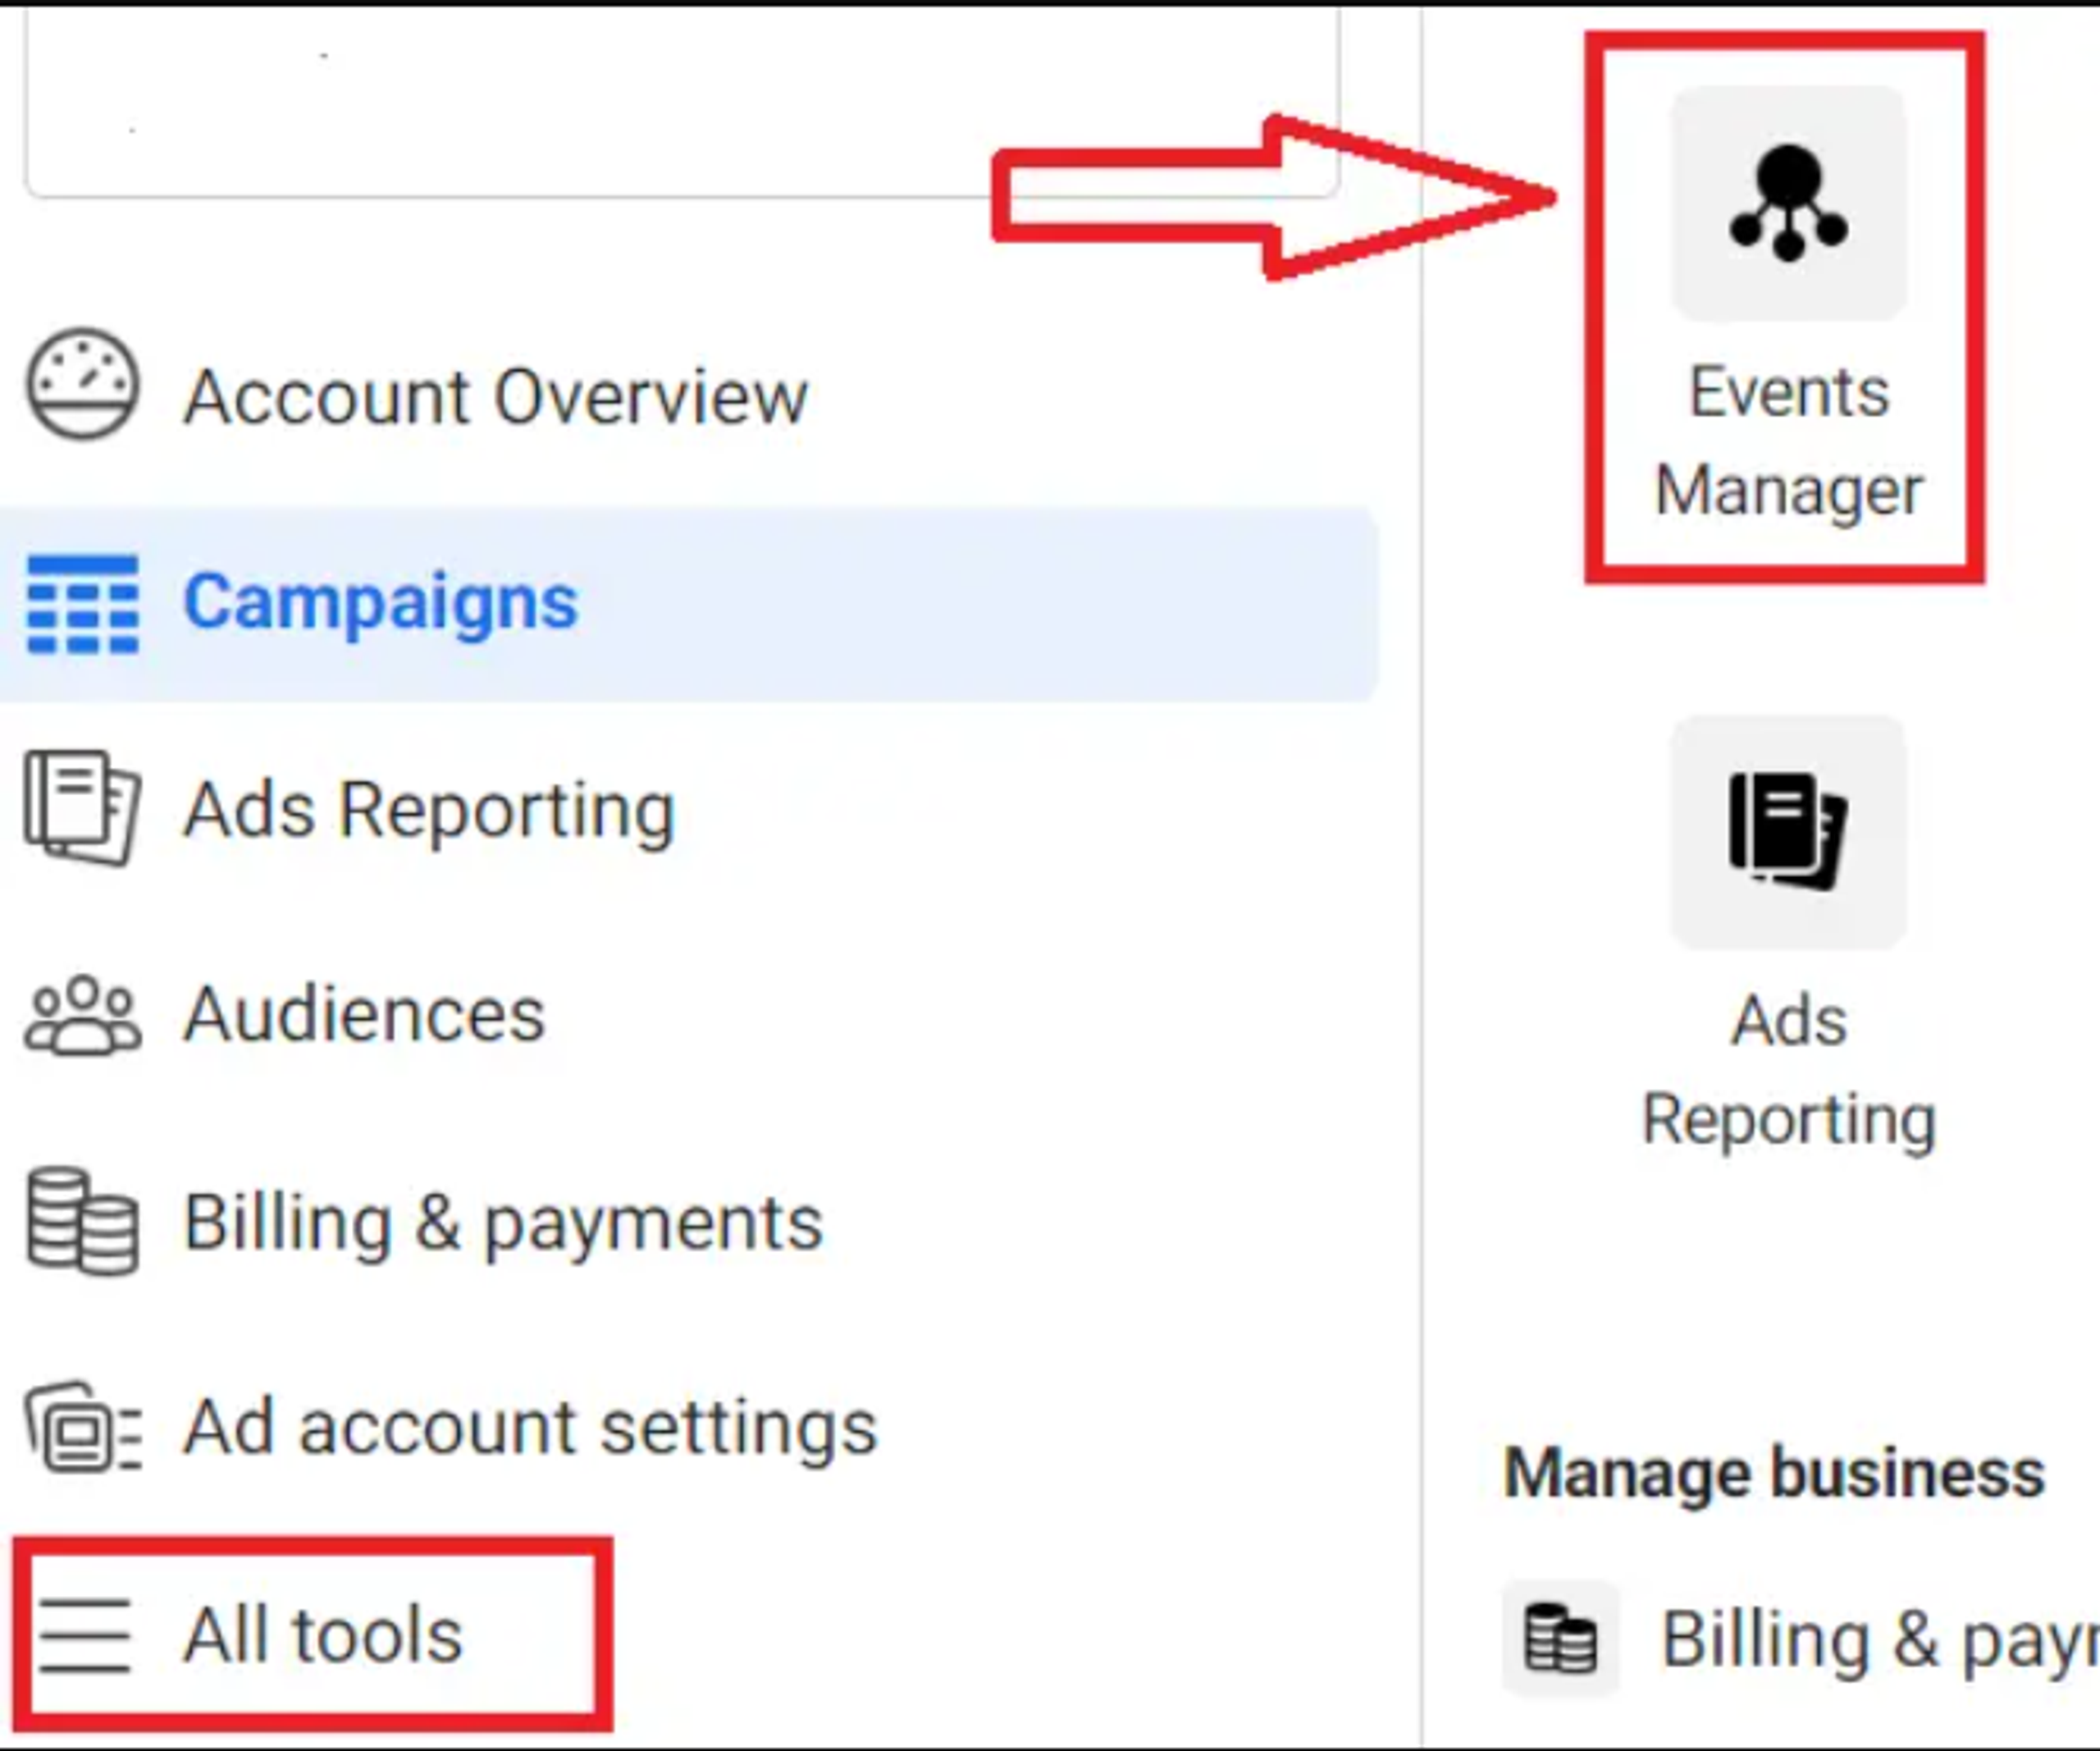
1. Find 'Events Manager':
- Look for the "Events Manager" section in the primary navigation menu.
- If you don't see it, click the three-line menu icon and look for "All Tools" – the Events Manager should be listed there.
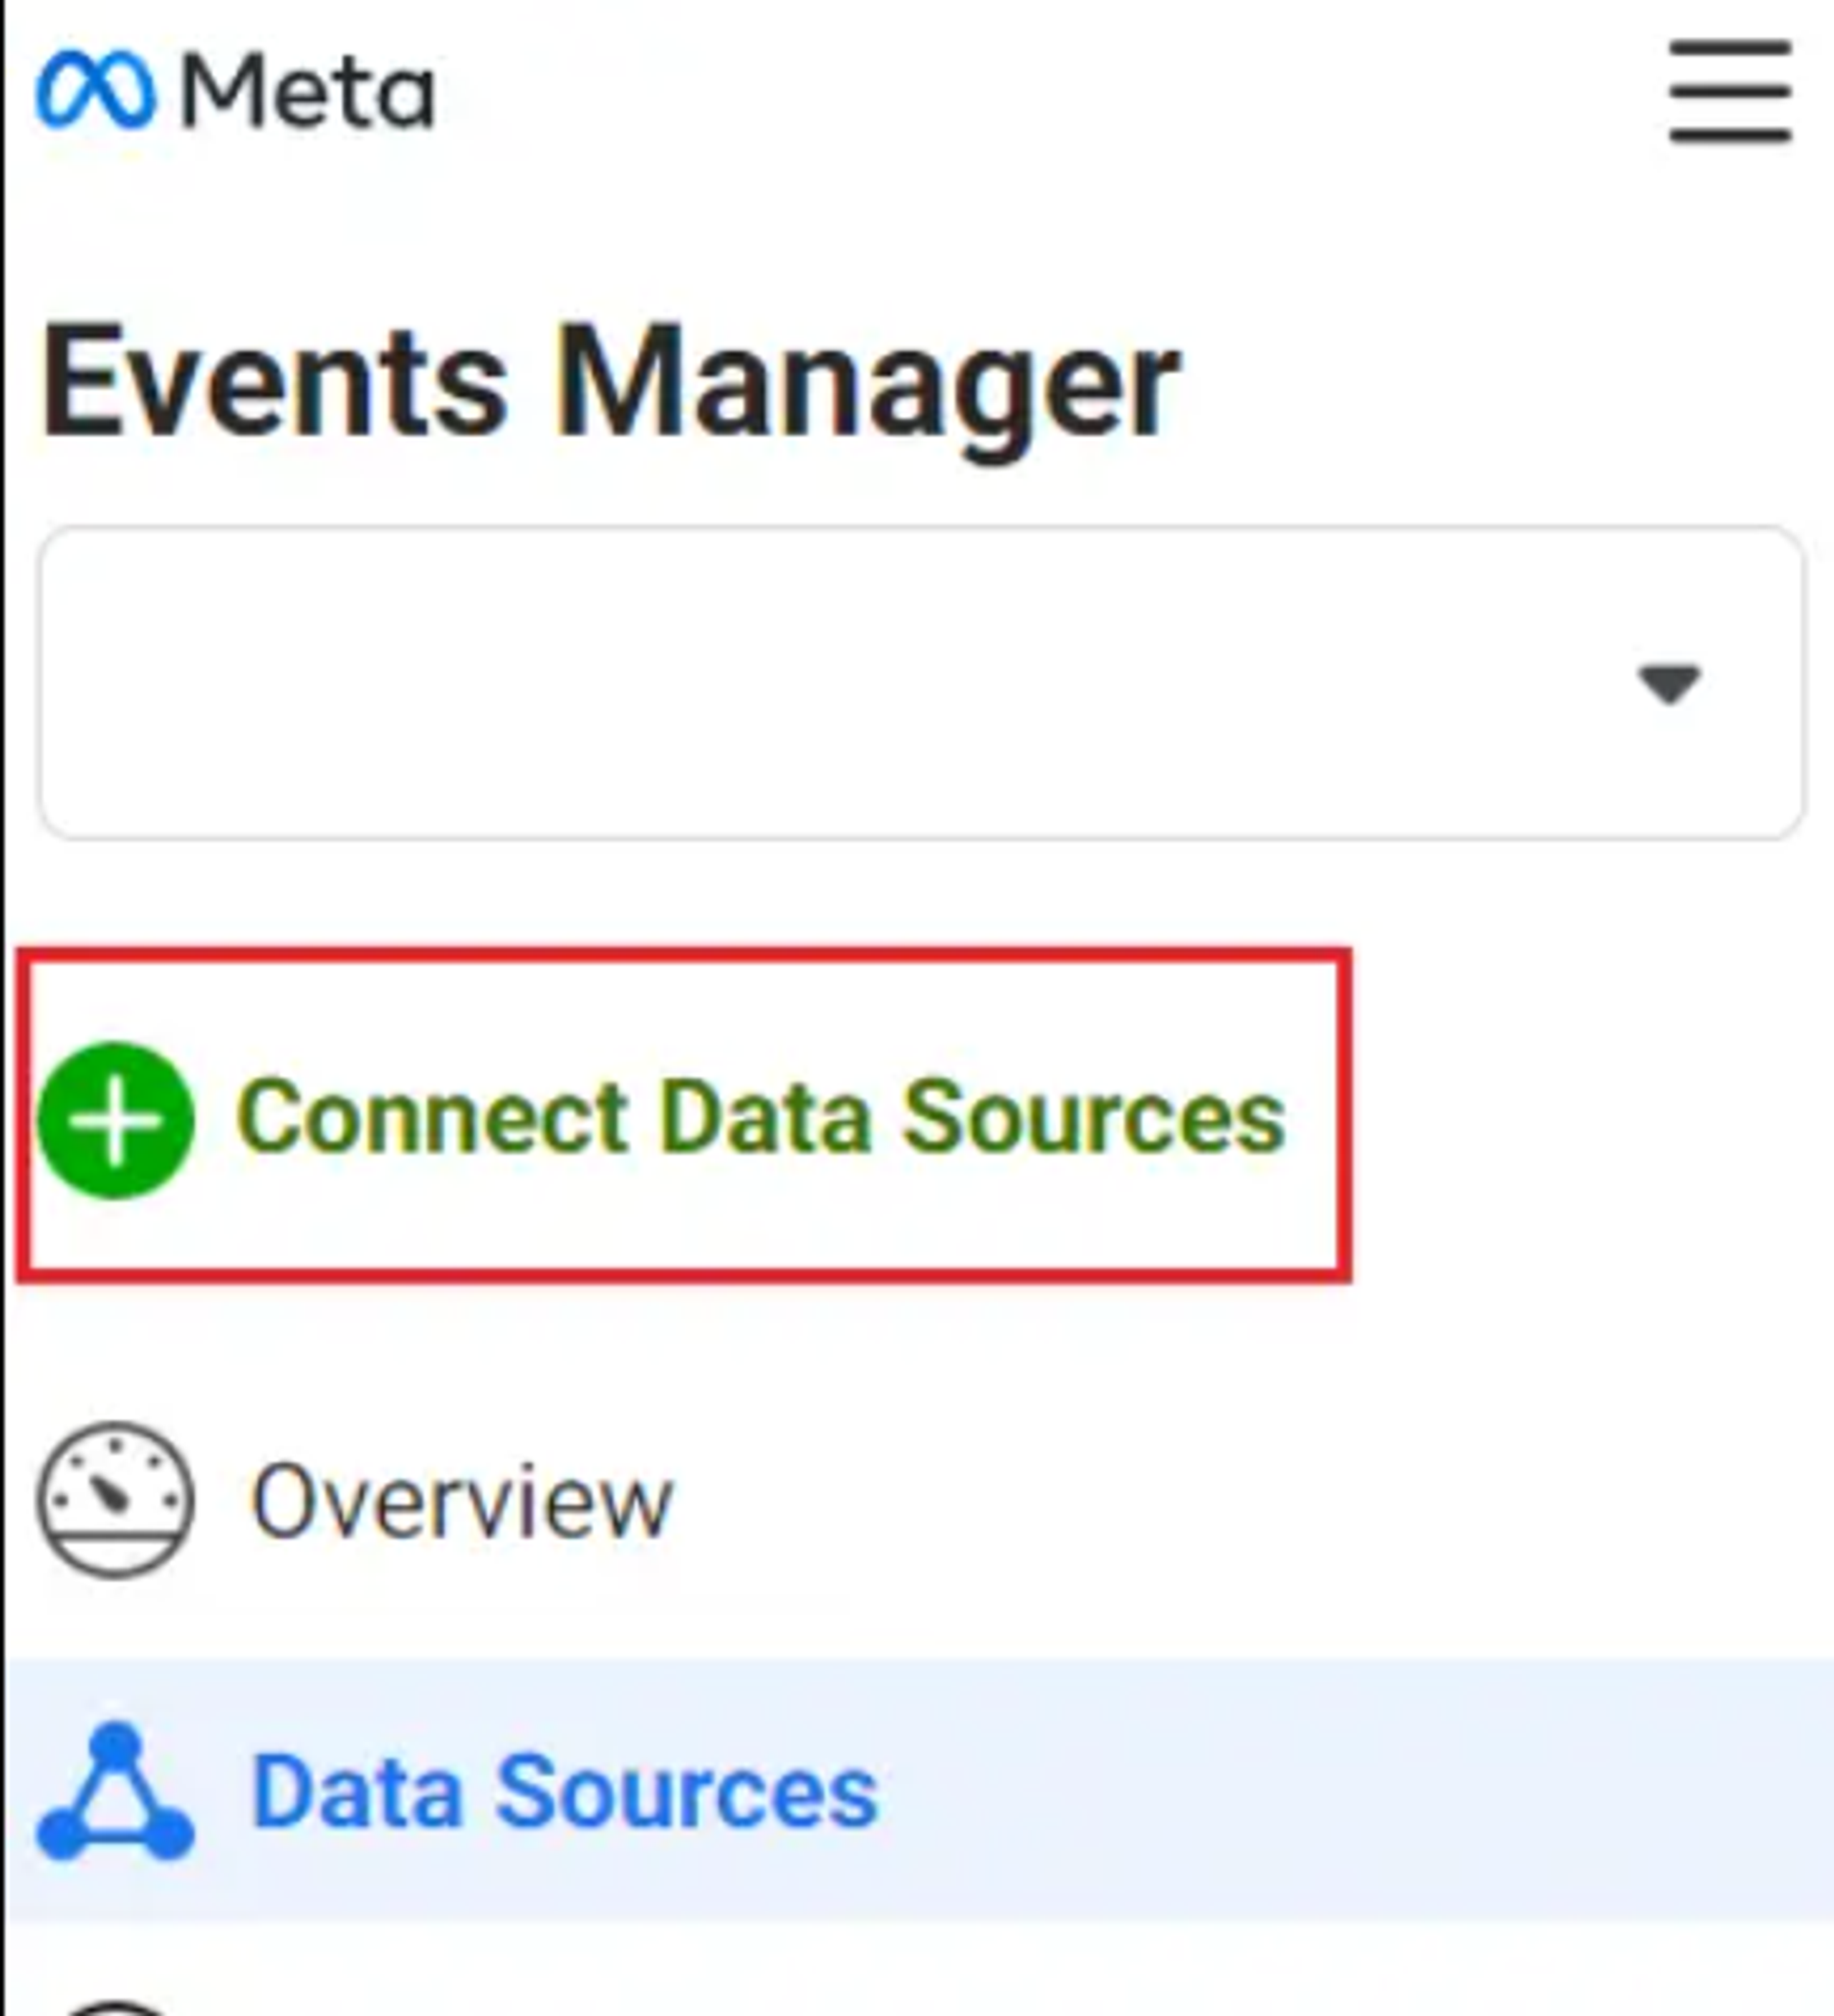
2. Click 'Connect Data Sources': In the same Events Manager section of the menu locate the green button which says "Connect Data Sources" and click it.
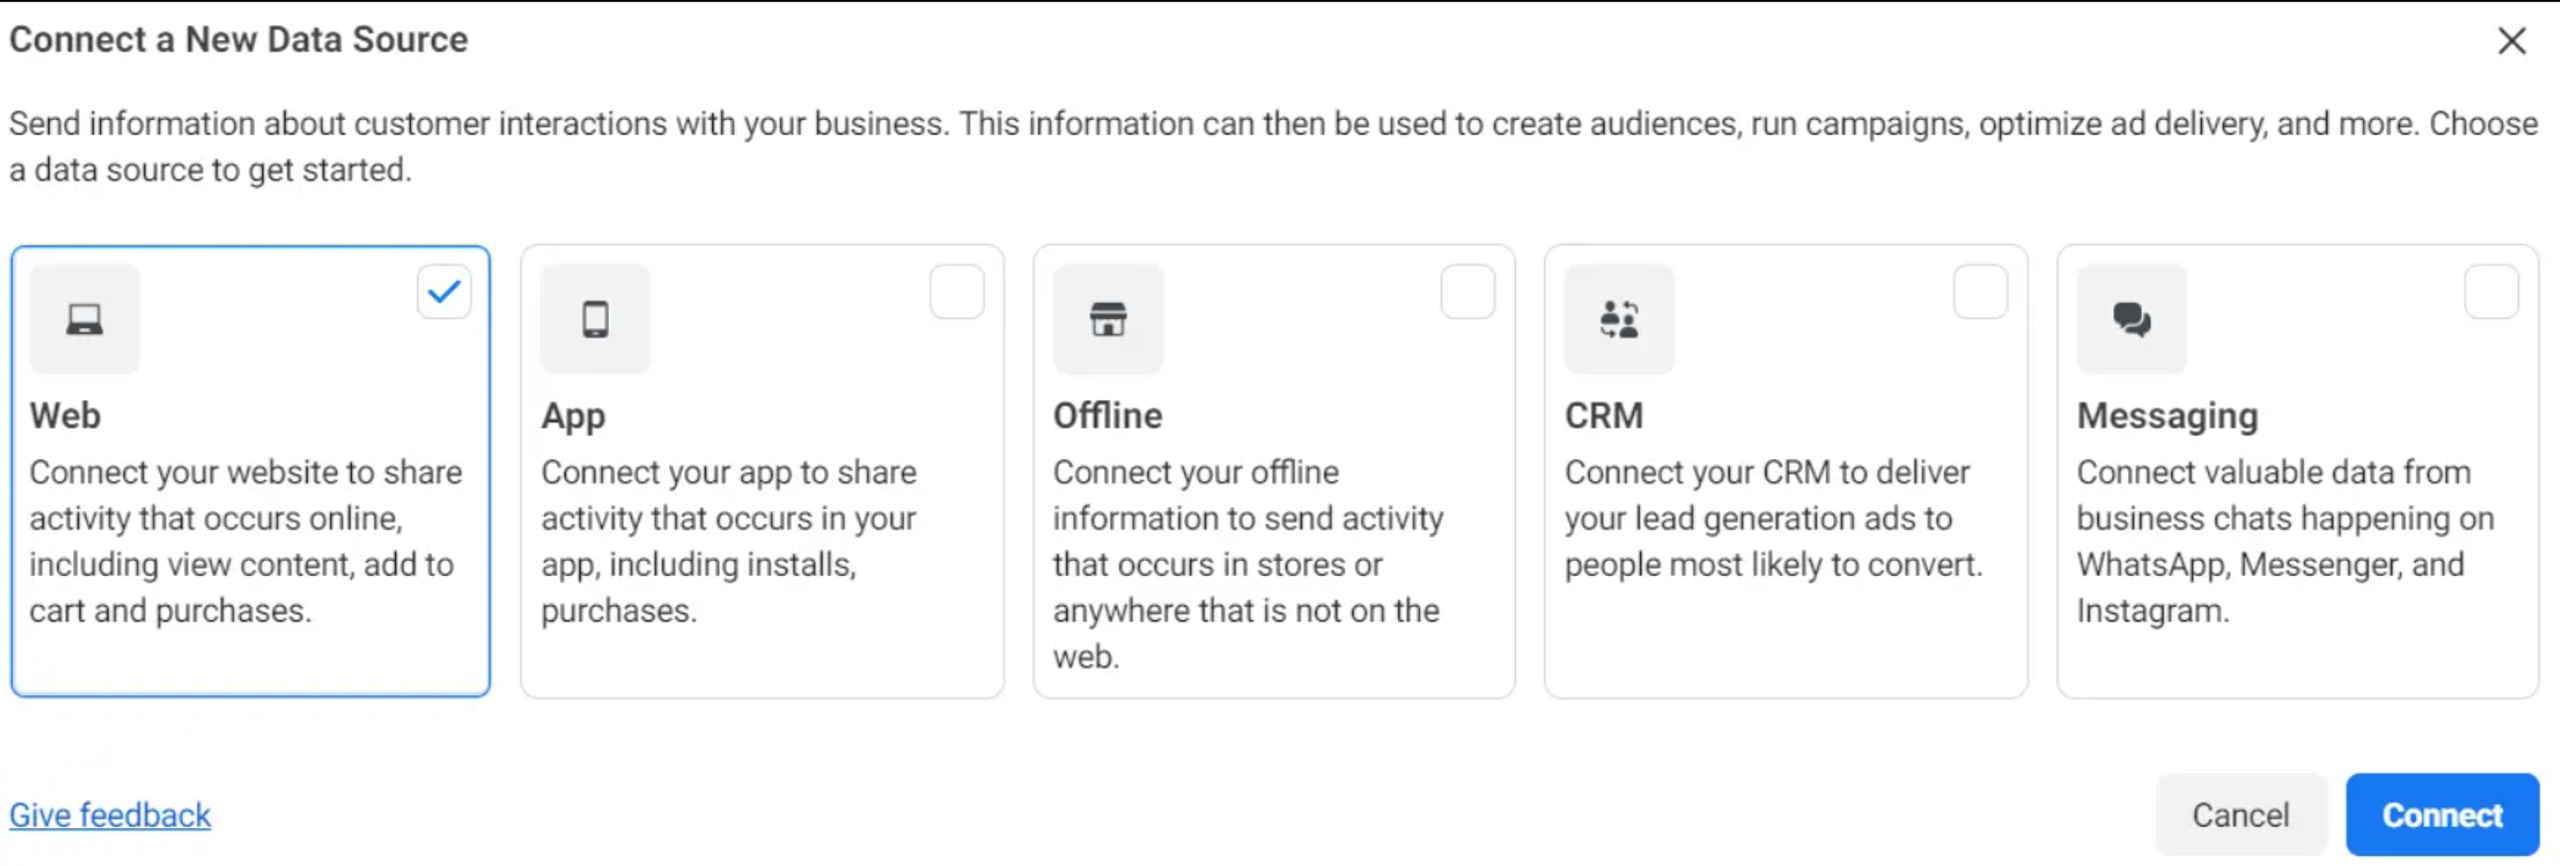
3. Choose 'Web': Facebook can track data from different sources, but for your WordPress store, select "Web" then press "Connect"
4. Name Your Pixel: Choose a name that makes sense for your business (example: "[Store Name] Pixel"). Don't overthink this; you can always change it later!
5. Click 'Create Pixel': Having taken these steps, if you click on Create Pixel, your correctly formatted Meta Pixel will be ready.
Methods of installation
There are a few ways to get this set up. Here's a breakdown of the options:
- Plugin Integration: This is the simplest method, especially if you're not comfortable editing code. Several plugins streamline the process.
- Google Tag Manager (GTM): This method offers more flexibility and customization for tracking specific events. Some familiarity with GTM is beneficial.
- Direct Code Integration: For those with website development experience, you can embed the Meta Pixel directly into your site's code. Proceed with caution to avoid disrupting your website's functionality.
Method 1: Meta Pixel Plugins
For WordPress users, leveraging dedicated Meta Pixel plugins is a straightforward and code-free approach. Firstly you need to choose what plugin to use. Some popular options include "Facebook for WooCommerce" and "PixelYourSite".
We recommend using "Facebook for WooCommerce" plugin as it is showing excellent performance without issues on dozens of websites.
Here are the steps for the Facebook for WooCommerce plugin installation:
- Login to Your WordPress Admin:
- Access the dashboard of your WordPress website by logging in with your admin credentials.
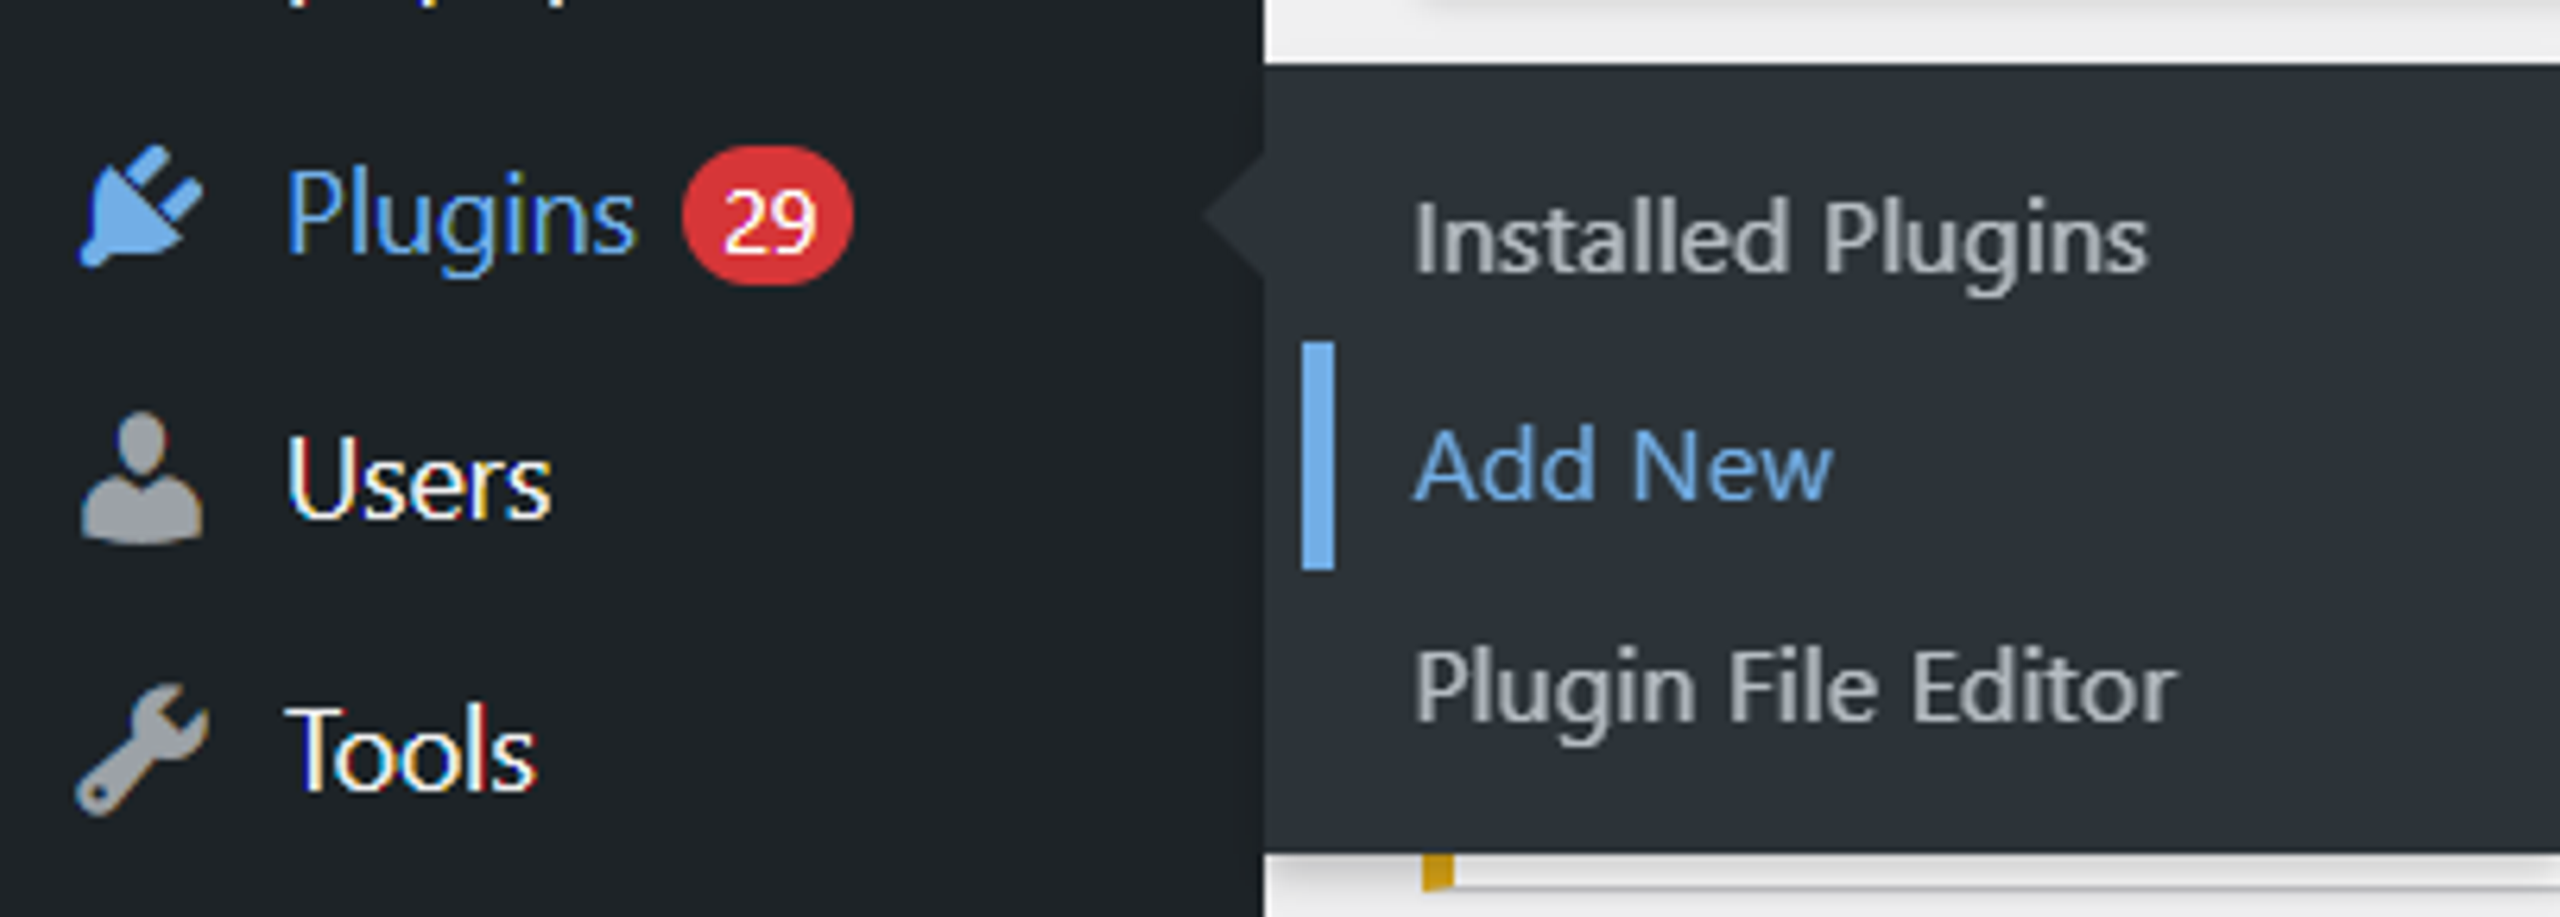
- Navigate to Plugins:
- In the left-hand menu, click on "Plugins". Then, choose "Add New".
- Search for "Facebook for WooCommerce":
- In the search bar, type "Facebook for WooCommerce".
- Locate the Plugin:
- Look for the "Facebook for WooCommerce" plugin in the search results. It is developed by Facebook.
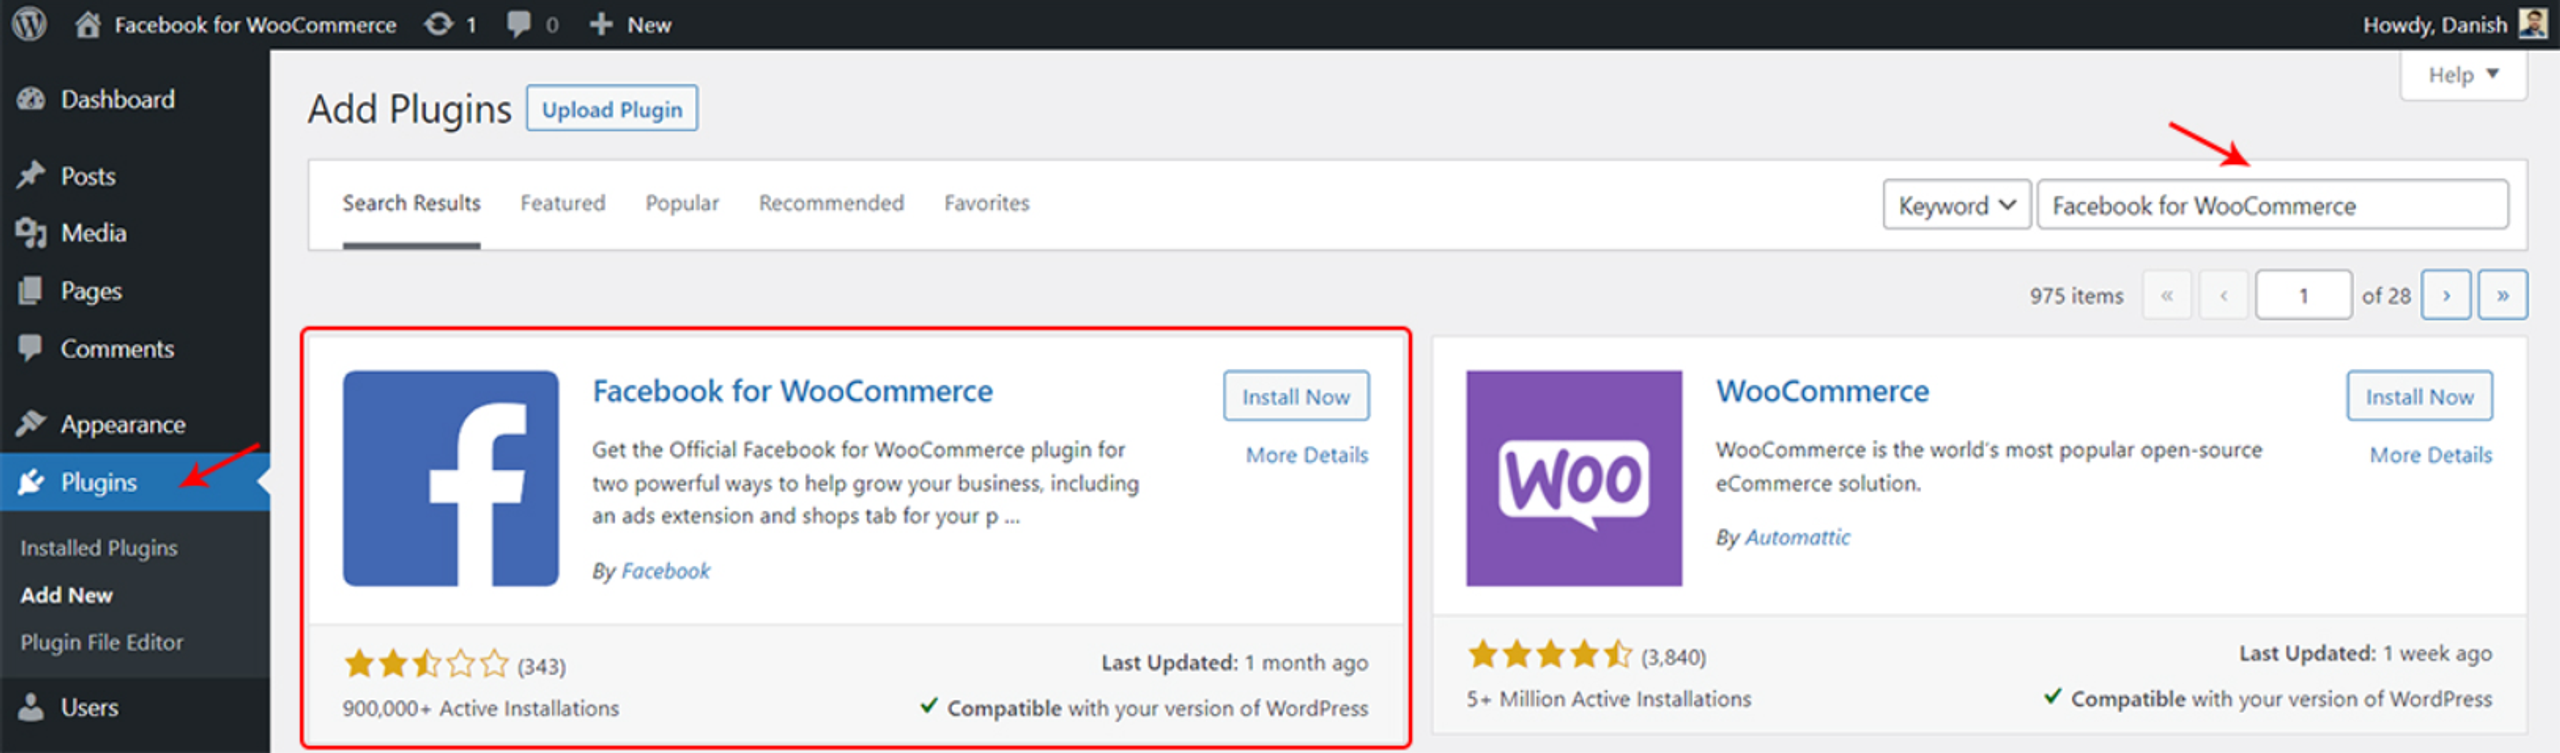
- Install the Plugin:
- Click the "Install Now" button next to the "Facebook for WooCommerce" plugin.
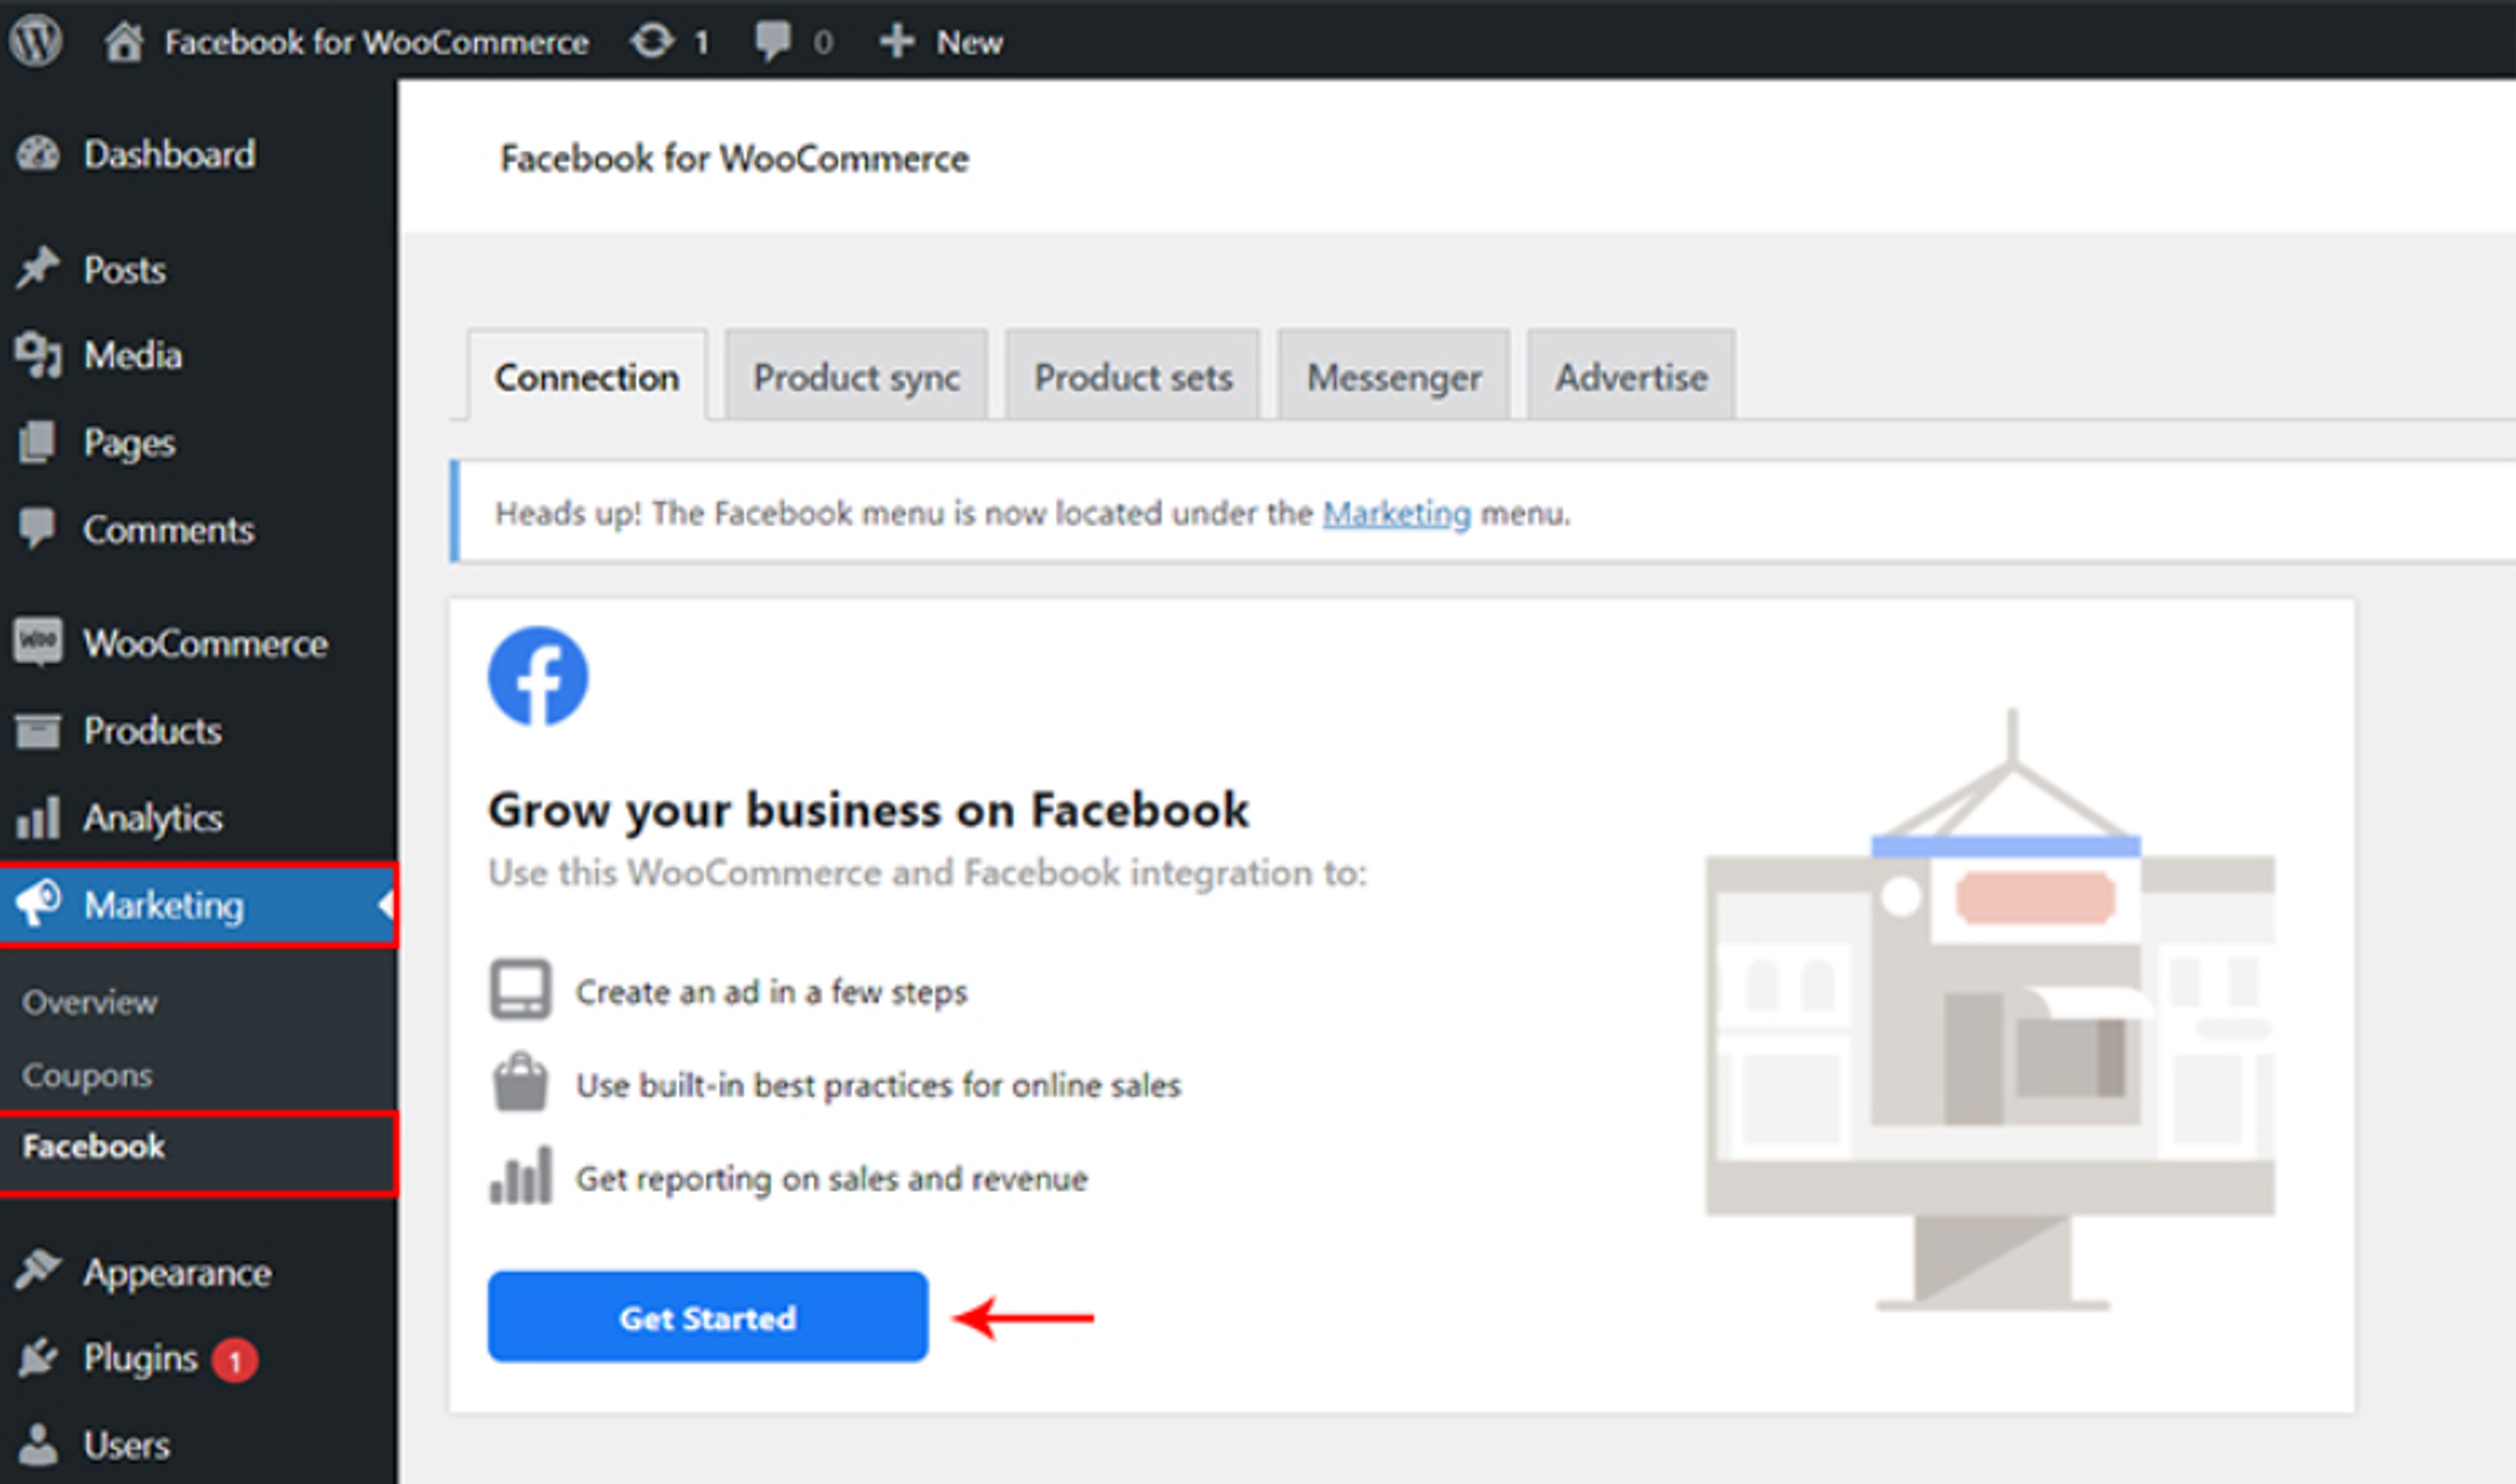
- Activate the Plugin:
- After installation, click the "Activate" button to activate the plugin on your WordPress site.
- Configure the Plugin:
- Once activated, go to "Marketing" in your WordPress dashboard and click on "Facebook."
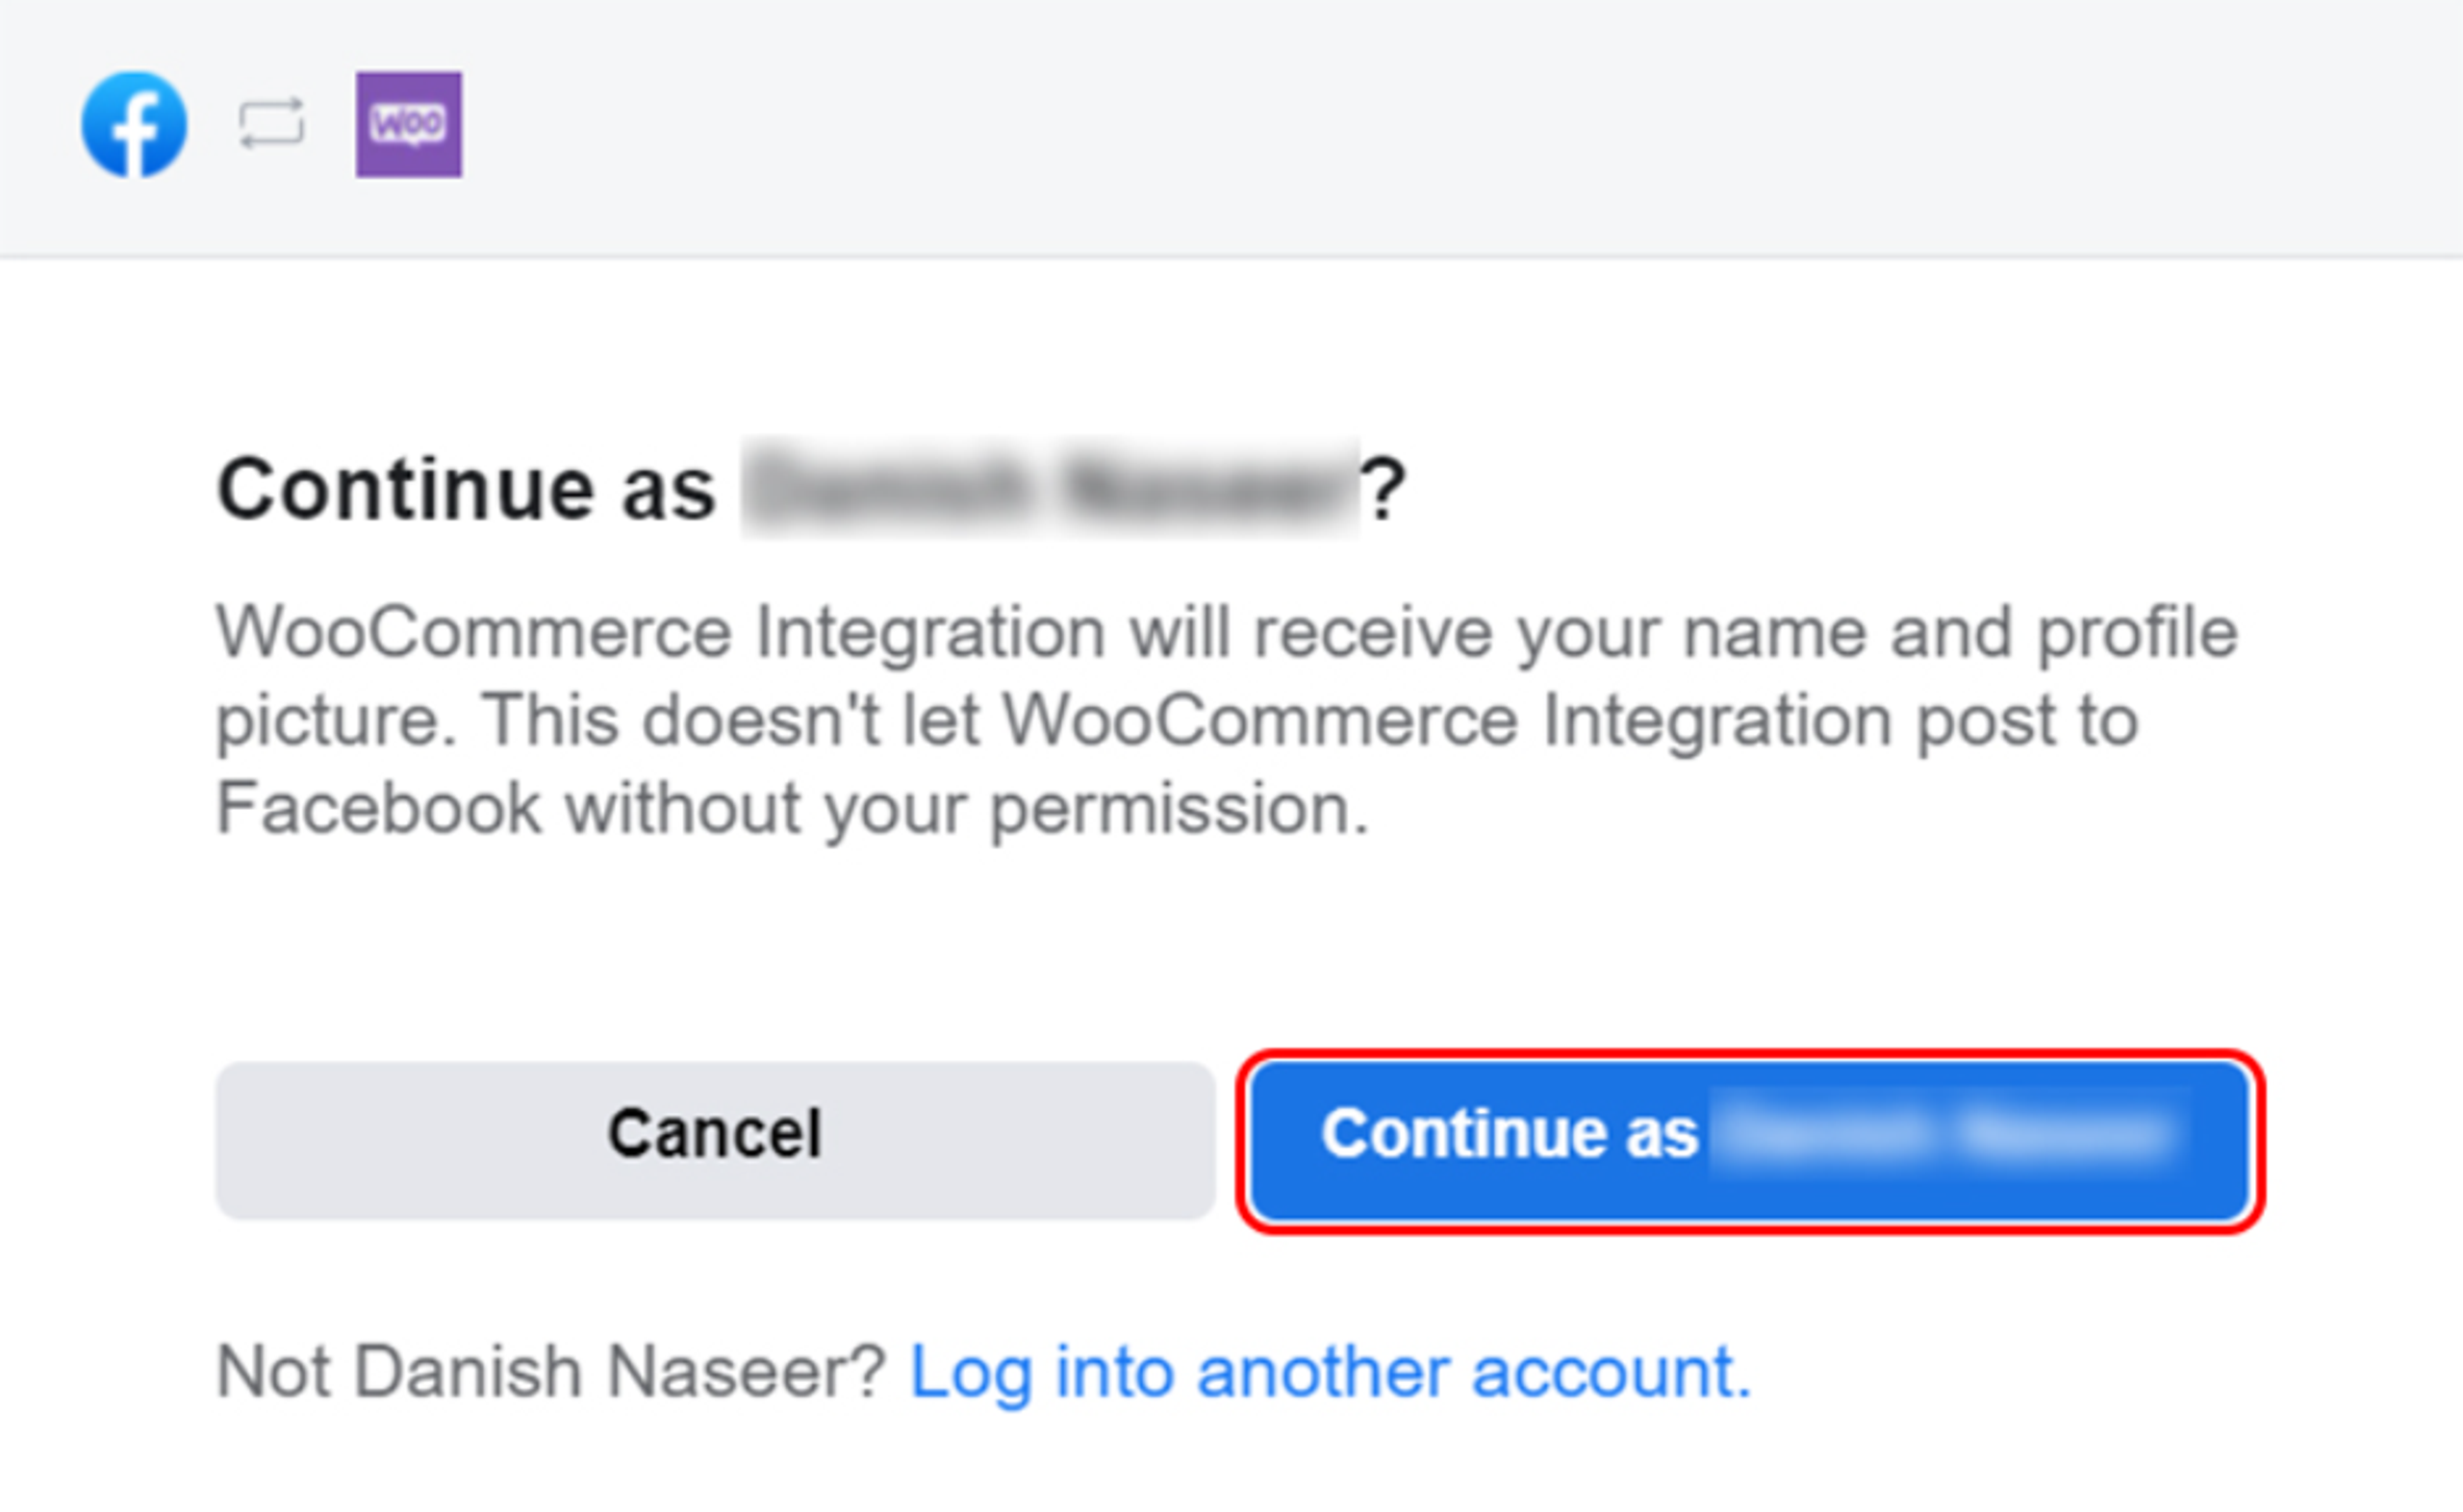
- Connect to Your Facebook Business Account:
- In the Facebook integration settings, you'll be prompted to connect your WooCommerce store to your Facebook Business Account.
- You’ll be redirected to a screen to connect your WooCommerce store with a Facebook account.
- Select the Facebook account you are already logged in to and click ‘Continue as…’.
- Another option is to log into another Facebook account.
Configure Meta Pixel and Shop:
- You’ll be asked three options on the next screen, i.e., Facebook Shop, Facebook Ads, and Instagram Shopping.
- In this tutorial, we recommend checking the Facebook Shop option only. If you want to add Facebook Ads and Instagram Shopping features, you can do it directly from your Facebook business account later.

- Follow the on-screen instructions to log in to your Facebook account and grant the necessary permissions.
- After connecting, configure your Meta Pixel settings and link your WooCommerce products to your Facebook Shop.
Although plugins are a popular solution for managing Meta Pixel on WordPress sites, like any other tool, it can face certain challenges. Here are some potential problems that users might face while using plugins:
- Conflict with Other Plugins:
- Incompatibility issues can occur if your plugin conflicts with other plugins on your WordPress site. It is important to make sure that all plugins are up to date and compatible with the latest version of your plugin.
- Theme Compatibility:
- Some WordPress themes may not be fully compatible with your plugin, which may result in layout or functionality issues. Users should check for theme updates or contact the theme developers for assistance.
- Plugin Updates:
- Please update to the latest version to avoid errors or compatibility issues. Check regularly for updates and make sure you are using the latest version of the plugin.
- Integration with Other Platforms:
- If you use additional platforms or third-party tools with the plugin, ensure seamless integration. You may experience compatibility issues when trying to synchronize data between different systems.
- Tracking Accuracy:
- Although plugins are designed to track accurately, discrepancies can occur if the installation process is not completed correctly. It is very important to make sure that the pixel is tracking accurately by using tools like Meta Pixel Helper extension.
- JavaScript Errors:
- JavaScript errors on your website can interfere with the proper functioning of plugins. Troubleshoot any JavaScript errors by checking the browser console for issues that might affect the plugin.
- Server Configuration:
- In some cases, server configurations may impact the performance of the plugin. Ensure that your hosting environment meets the plugin's requirements and consult with your hosting provider if necessary.
- Data Sync Delays:
- Occasionally, there might be delays in data synchronization between your WordPress site and the Meta platform. Patience is key, and if delays persist, check for any server-related issues.
- Support and Documentation:
- Users may face challenges if they encounter issues and find that the support documentation is insufficient. It's advisable to review the official documentation and seek assistance from your plugin support if needed.
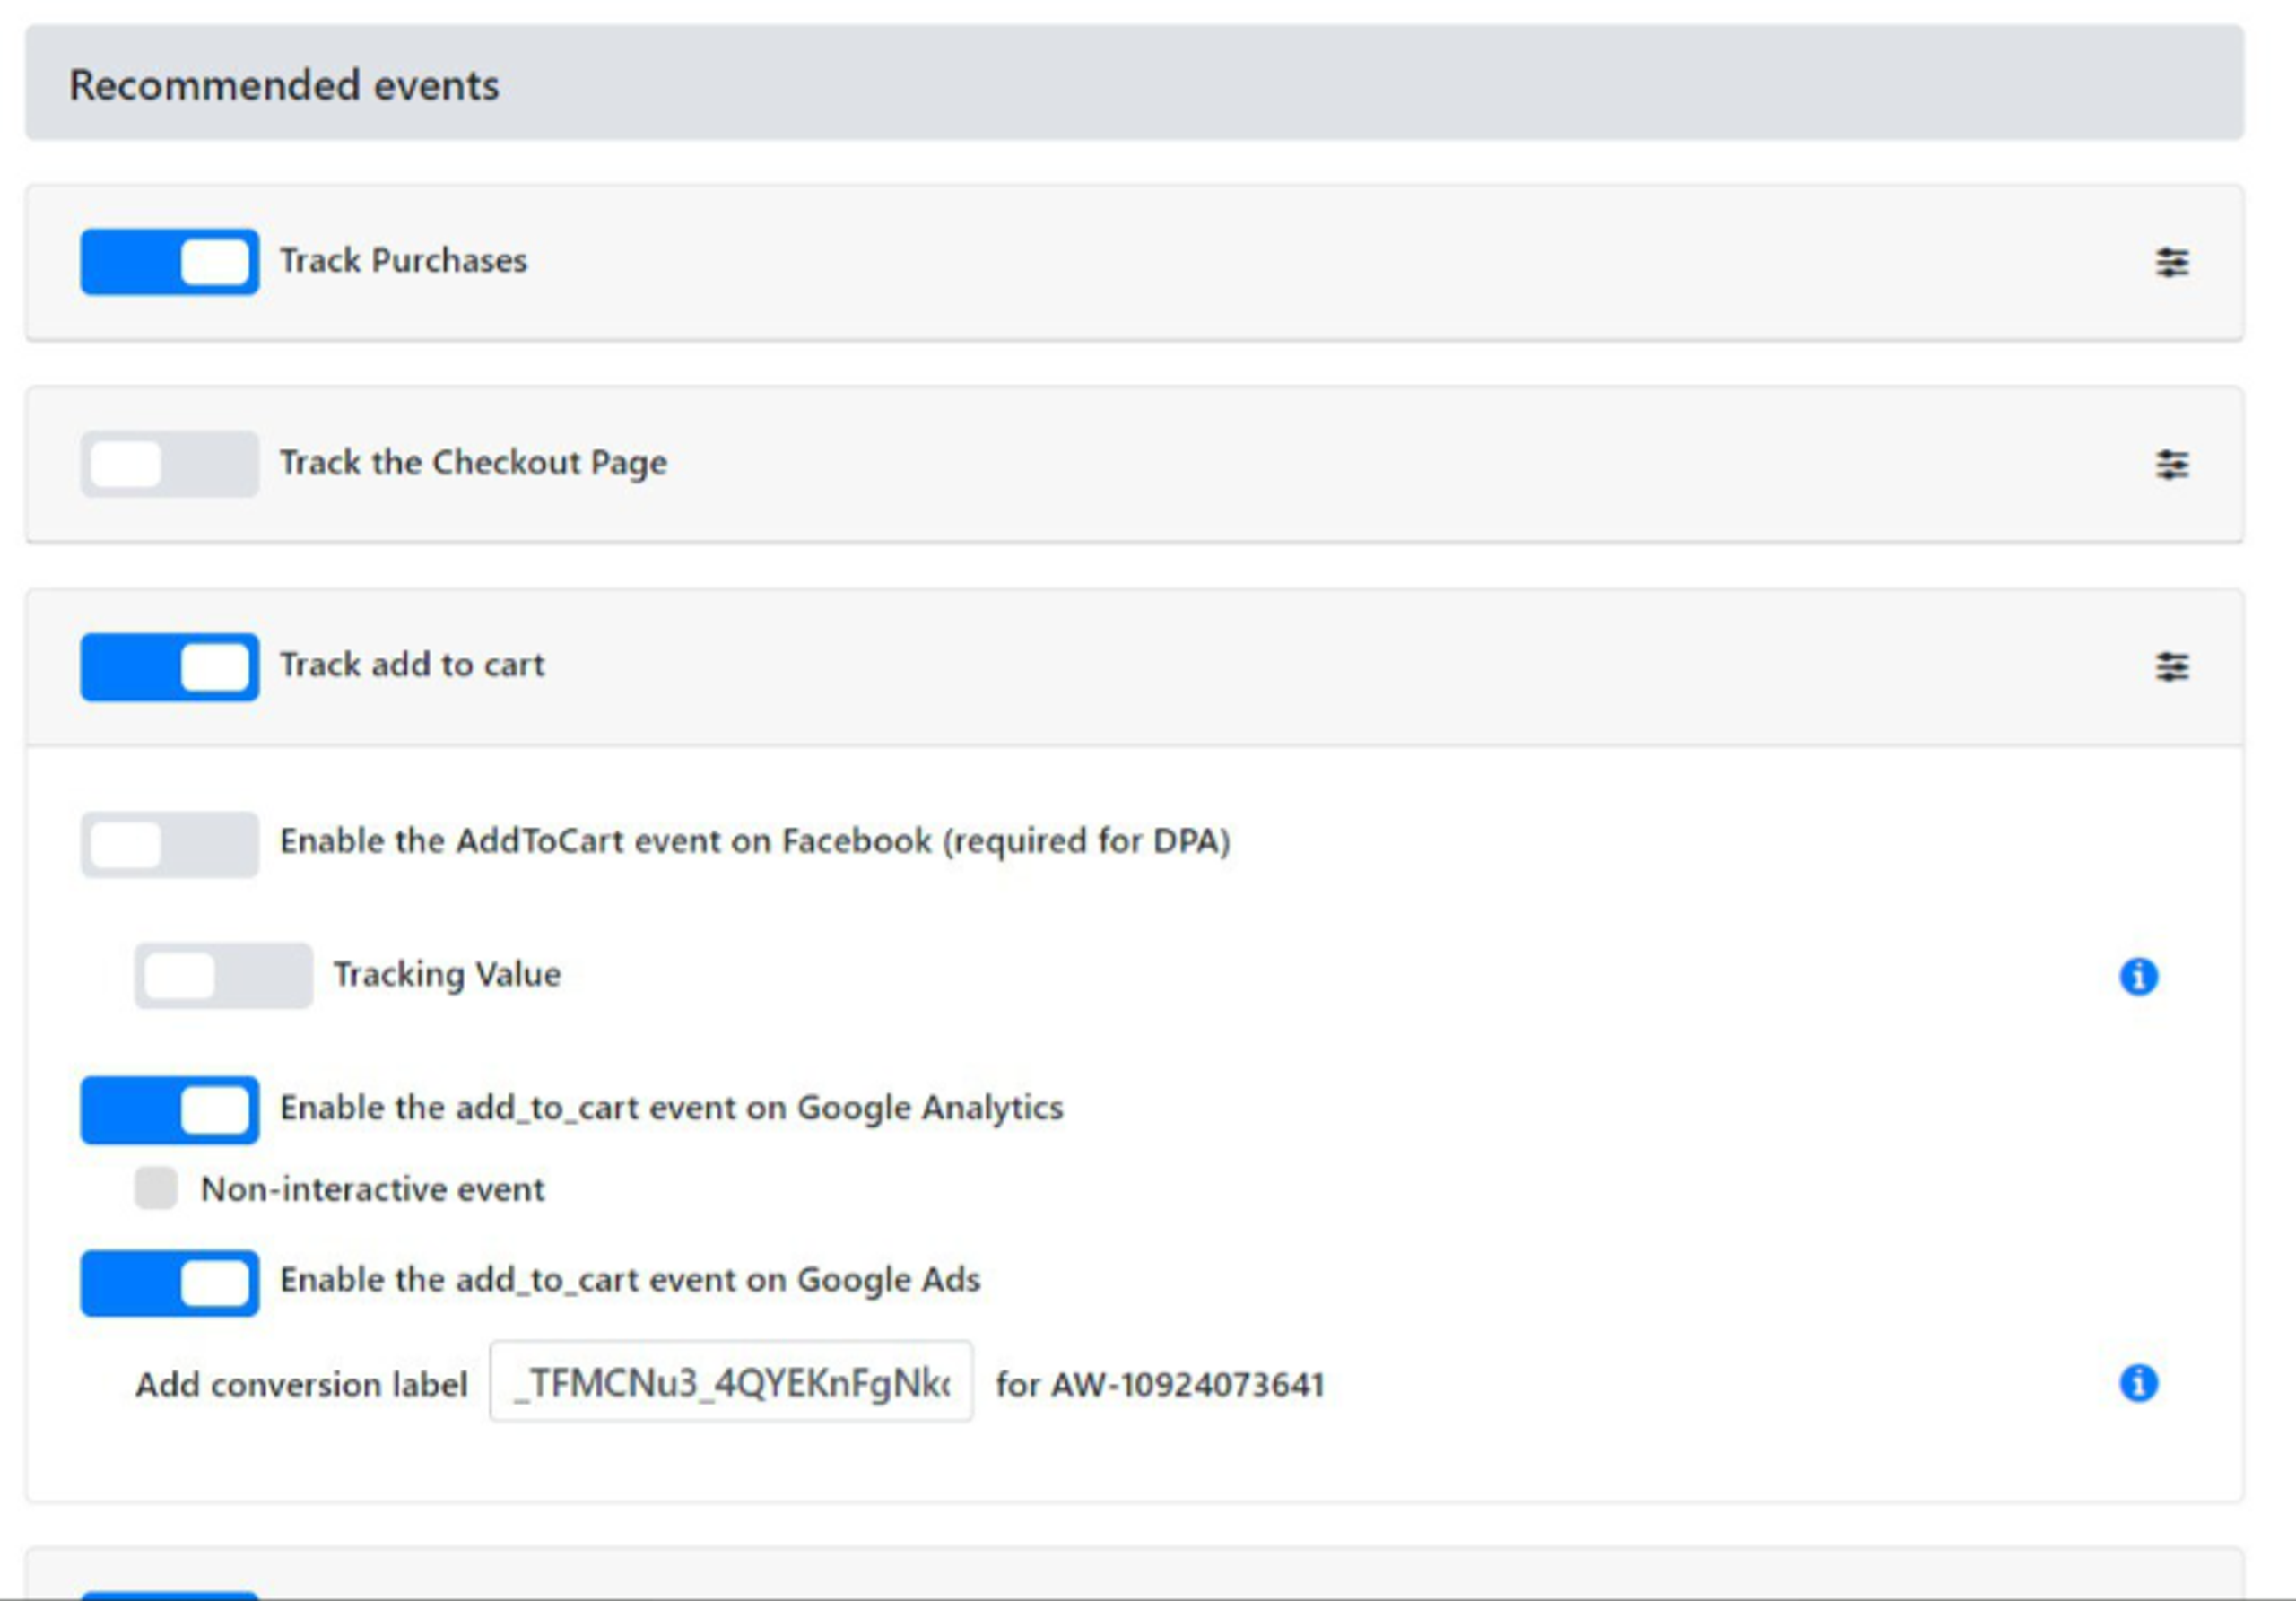
Besides all the mentioned limitations, we don`t recommend using the "PixelYourSite" plugin. Our experience of working with this plugin revealed that the deduplication of purchase events is not functioning correctly, resulting in more events appearing in the Events Manager than actually occurred. Moreover, this plugin has a tendency to miscalculate events, such as counting a purchase event every time a user visits the thank you page.
Another less apparent drawback is the rather complex process of enabling and disabling this plugin. Unlike other plugins where inserting or removing the pixel identifier is sufficient, here, one must completely disable all options, which consumes some amount of time to investigate this case. This happened to us when we were trying to turn off Meta Pixel tracking in "PixelYourSite" and use "Facebook for WooCommerce". We couldn't find the reason for the event duplication in Pixel even if we removed Pixel ID from the "PixelYourSite" tracking settings. Until we figured out that the solution is to not only remove it but also disable all the settings in the plugin that could cause Meta Pixel events to be triggered. Some of those settings are shown below.
To mitigate all these mentioned plugins' issues, users should follow best practices, regularly update the plugin, and troubleshoot any conflicts with themes or other plugins. Additionally, staying informed about updates and consulting the plugin's support resources can help address and resolve potential problems.
Method 2: Google Tag Manager Integration
Assuming you have already created GTM account with the container in it, GTM snippets should be added to the website code. We recommend using the "GTM4WP" plugin for this, as with it GTM installation is automatic, and the "GTM4WP" plugin's internal settings allow you to track a lot of additional information.
For this you'll need to proceed with the following steps:
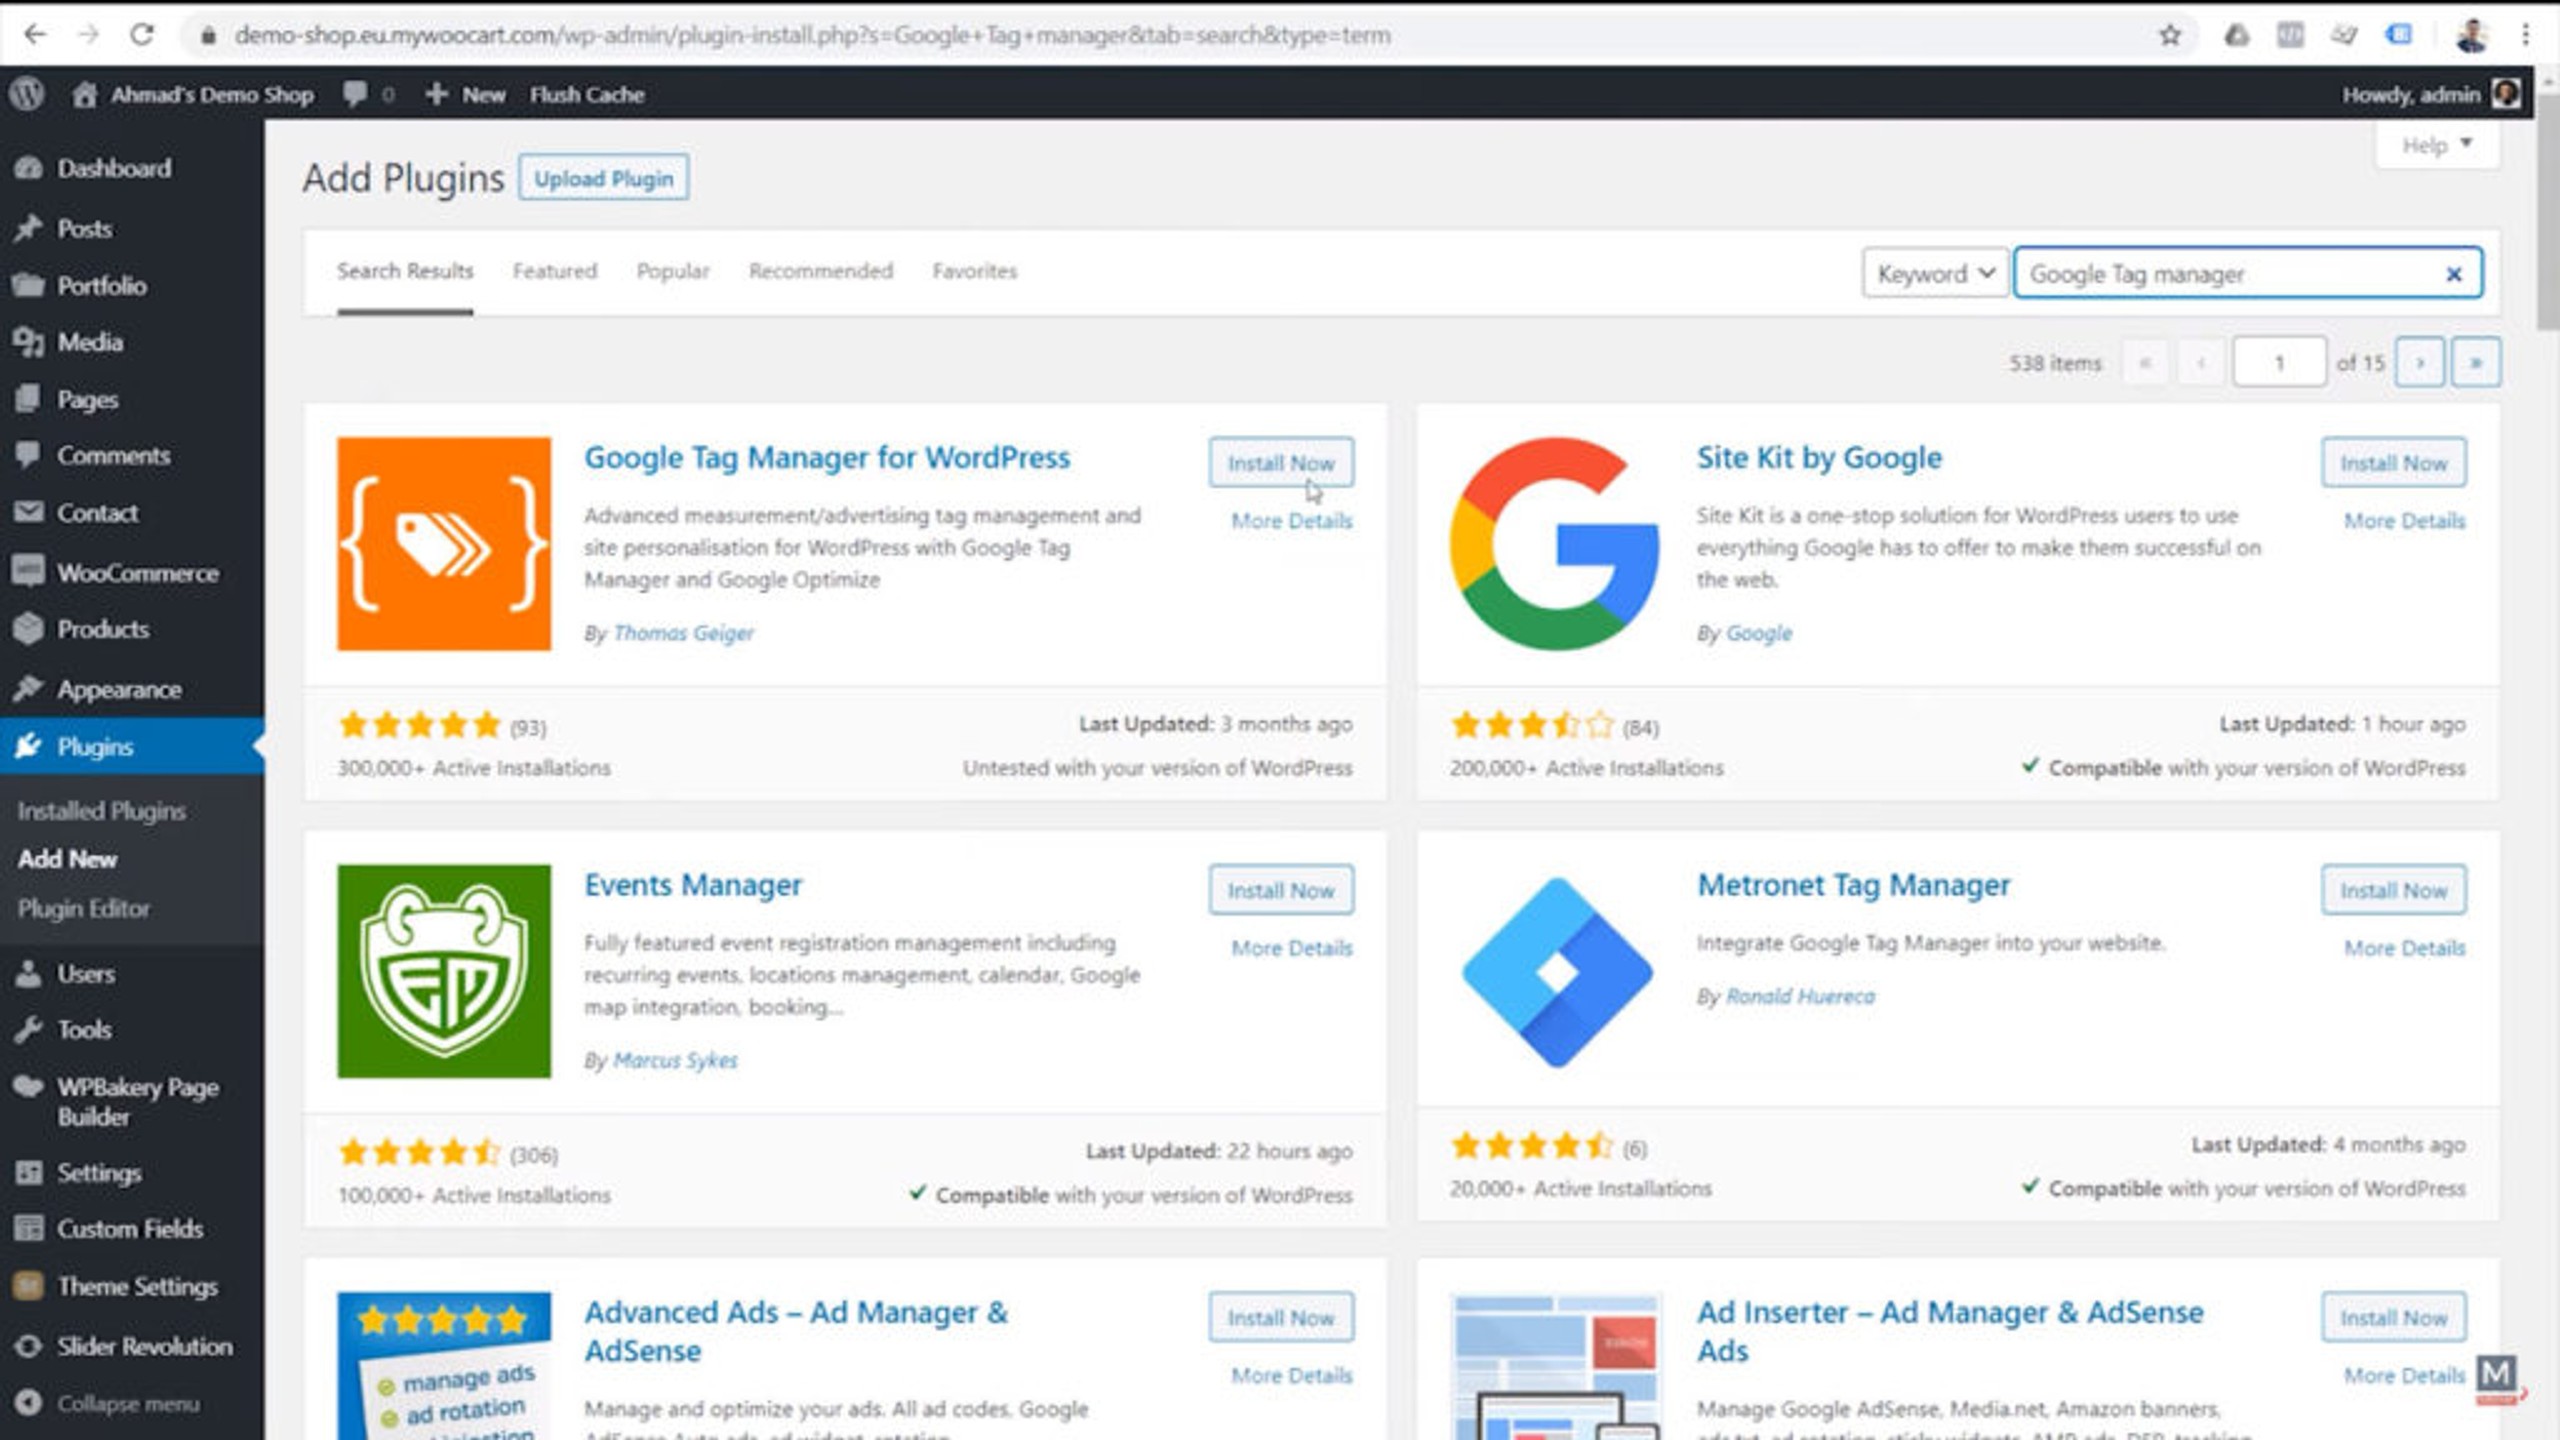
1. Log into your WordPress admin panel
- Go to Plugins - Add new
- Search for "Google Tag Manager" (you need GTM4WP)
- Click on "Install now" in the search results.
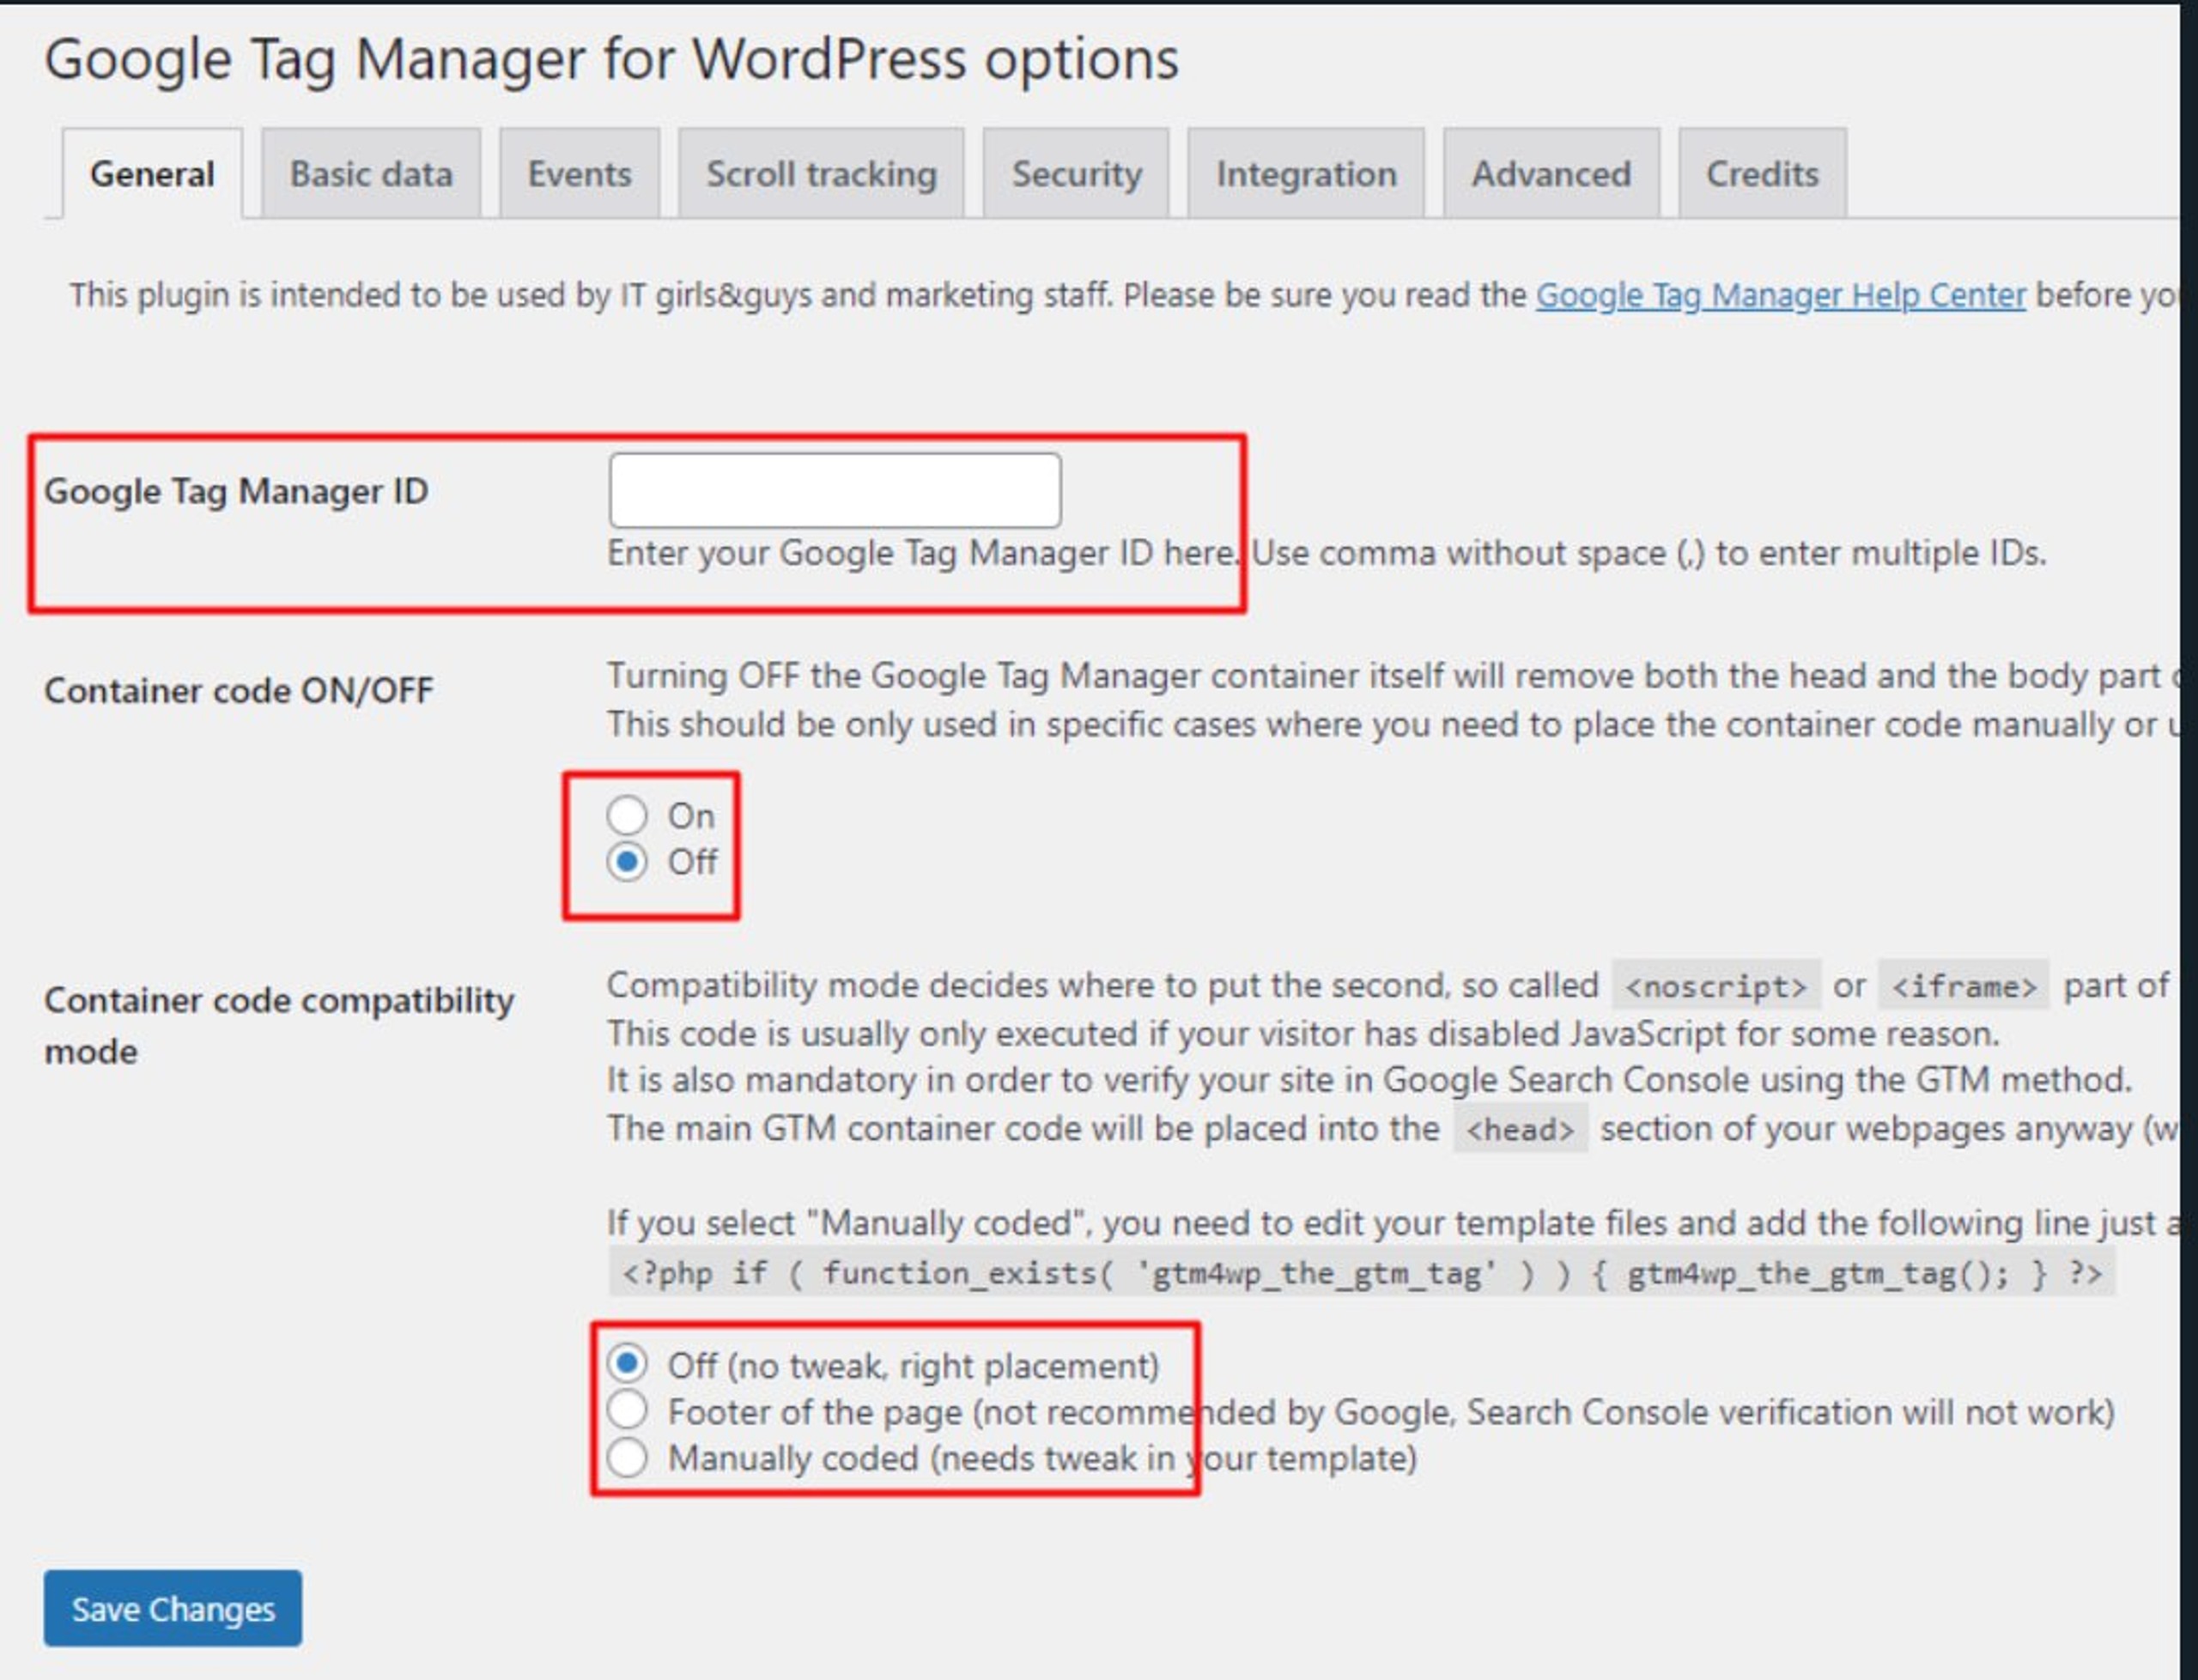
2. Configure GTM4WP plugin
- Go to Settings / Google Tag Manager and enter your Google Tag Manager container ID ‘GTM-XXXXXXX’.
- Press "ON" at Container Code ON\OFF
- Press Off (no tweak, right placement)
- Save changes.
3. Remove the Google Tag Manager script if it was added directly to your website code before to avoid GTM scripts duplication.
After GTM snippers are added with GTM4WP plugin to the website it's time to configure Meta Pixel tracking in GTM.
Create Meta Pixel Tag:
- Go to Google Tag Manager and create a new container for your site or select an existing one.
- After creating the container, navigate to the "Tags" tab in your GTM container.
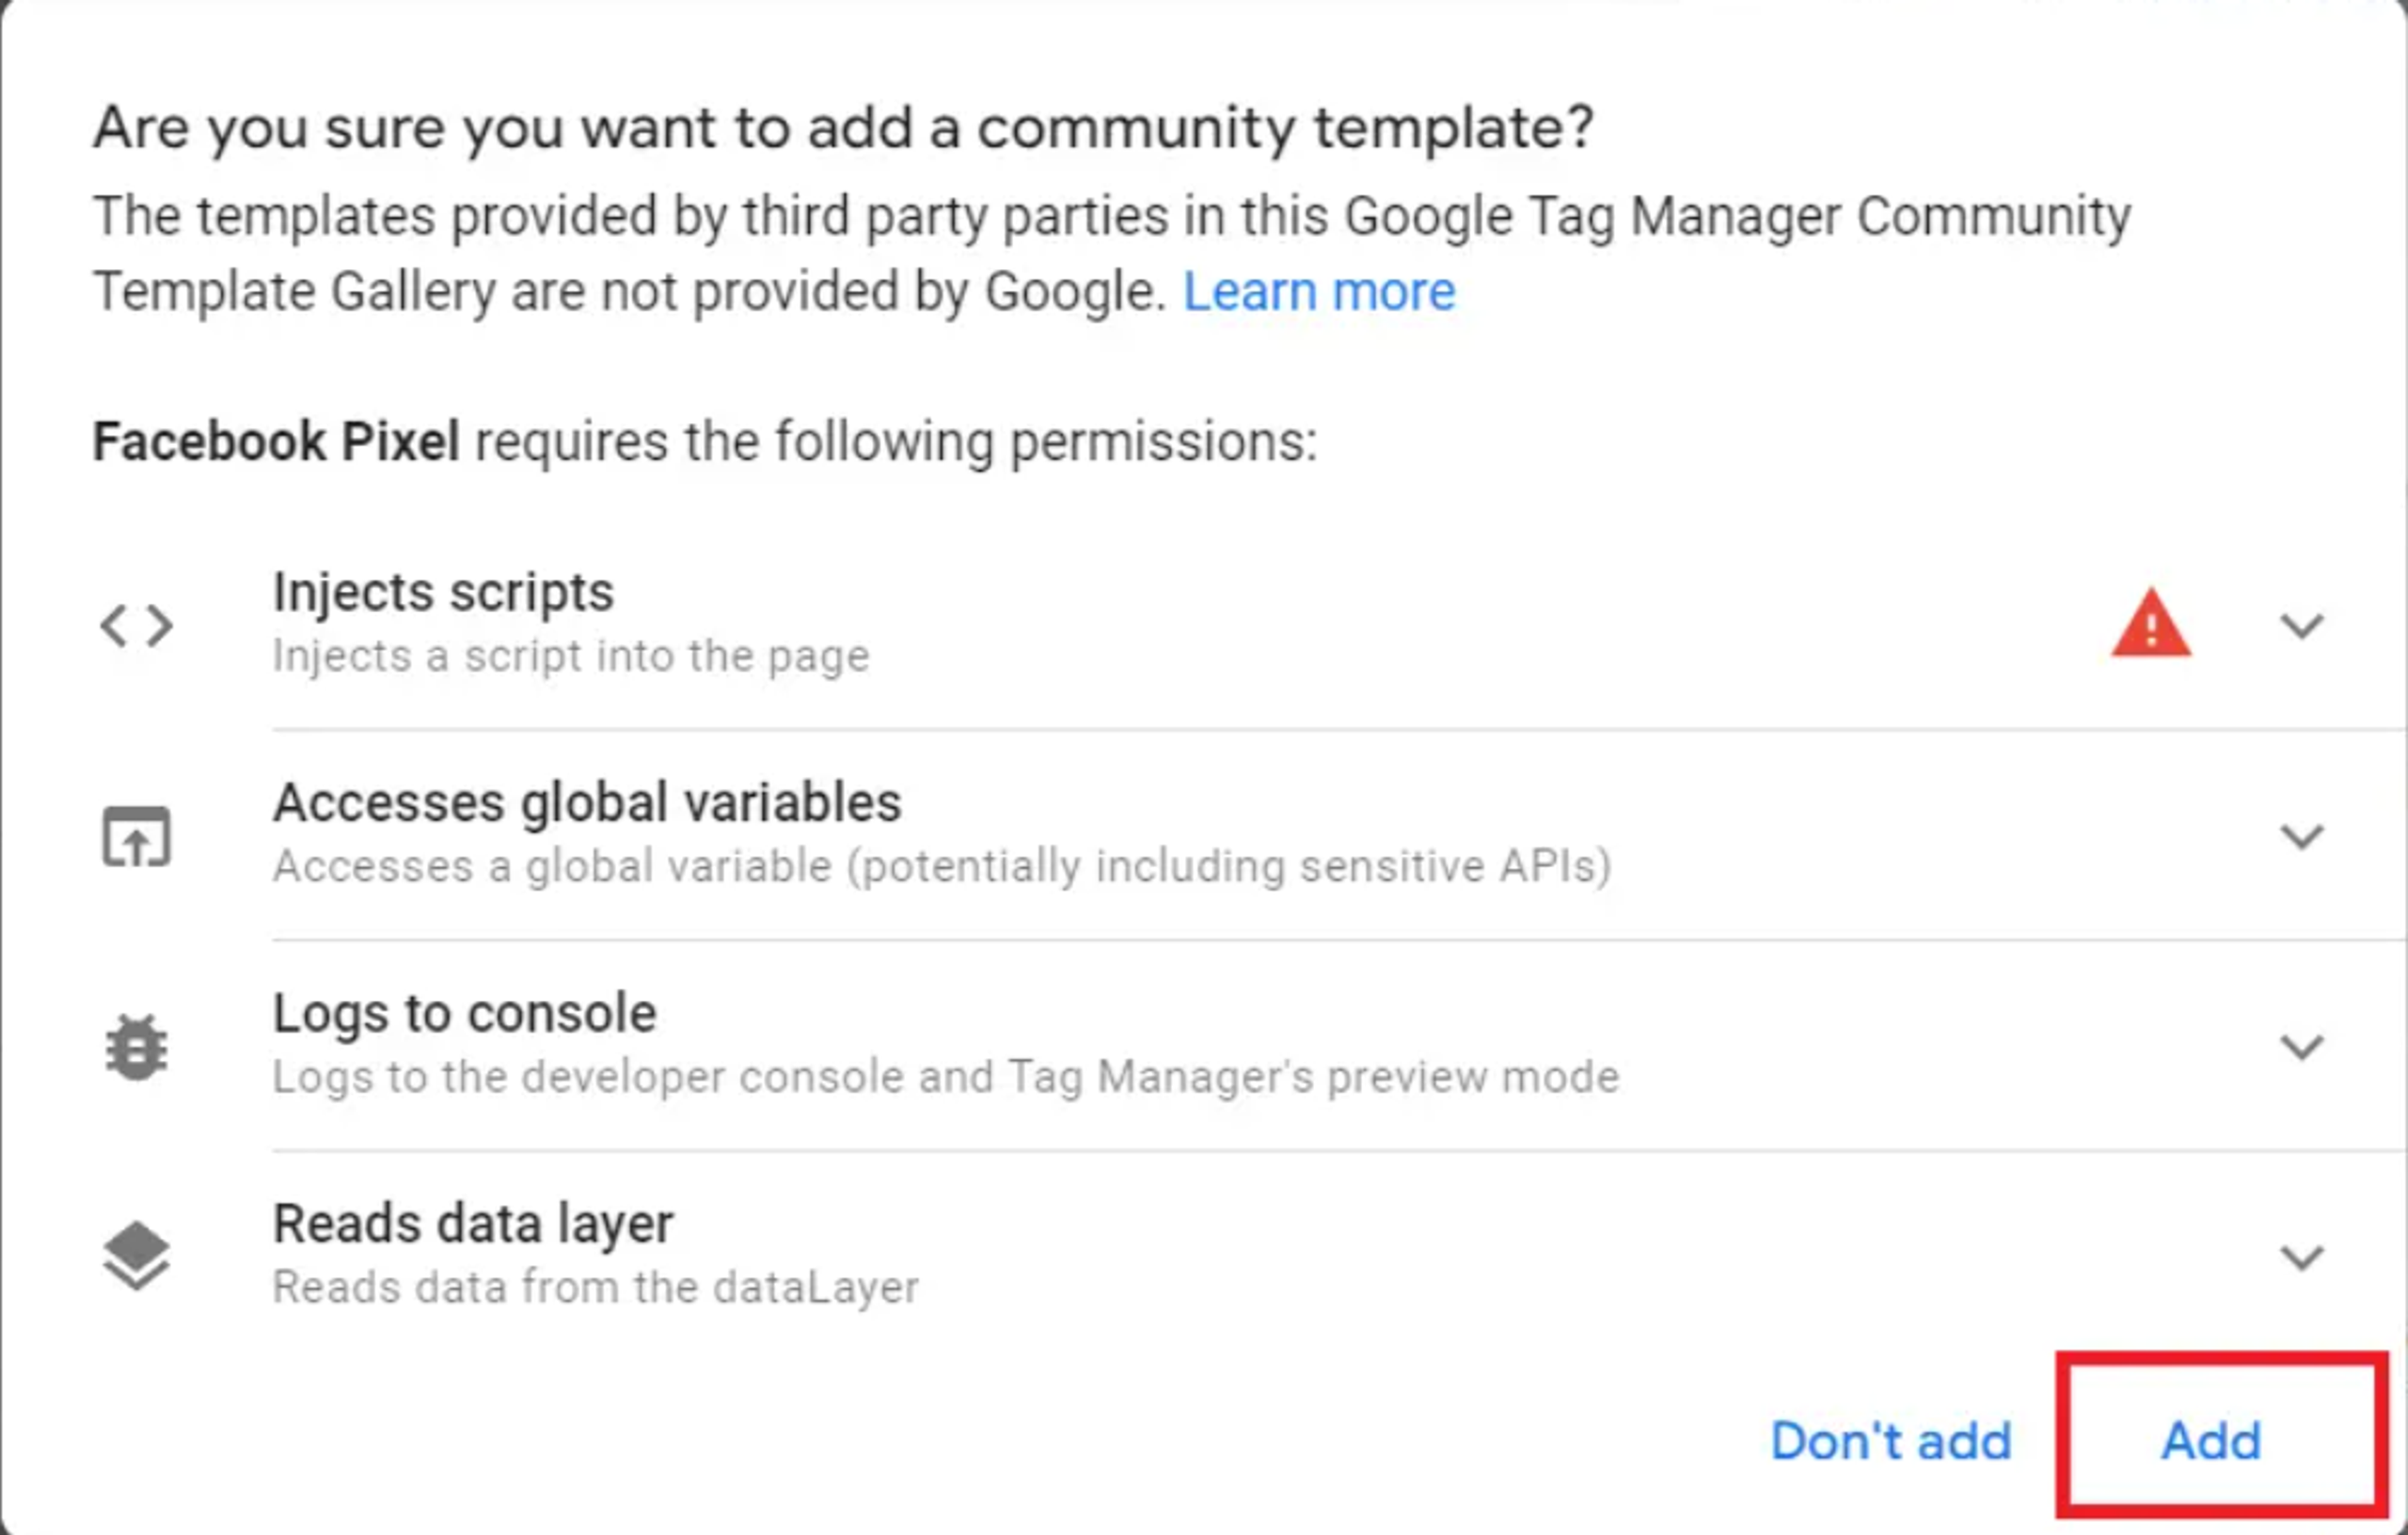
- Click on "Add a new tag" and open the Templates Gallery.

- Find and add "Facebook Pixel" template tag.

Configure the Facebook Pixel Tag:
- In the template settings, enter the name of your tag and Meta Pixel ID, obtained during the creation of the Meta Pixel on Facebook.
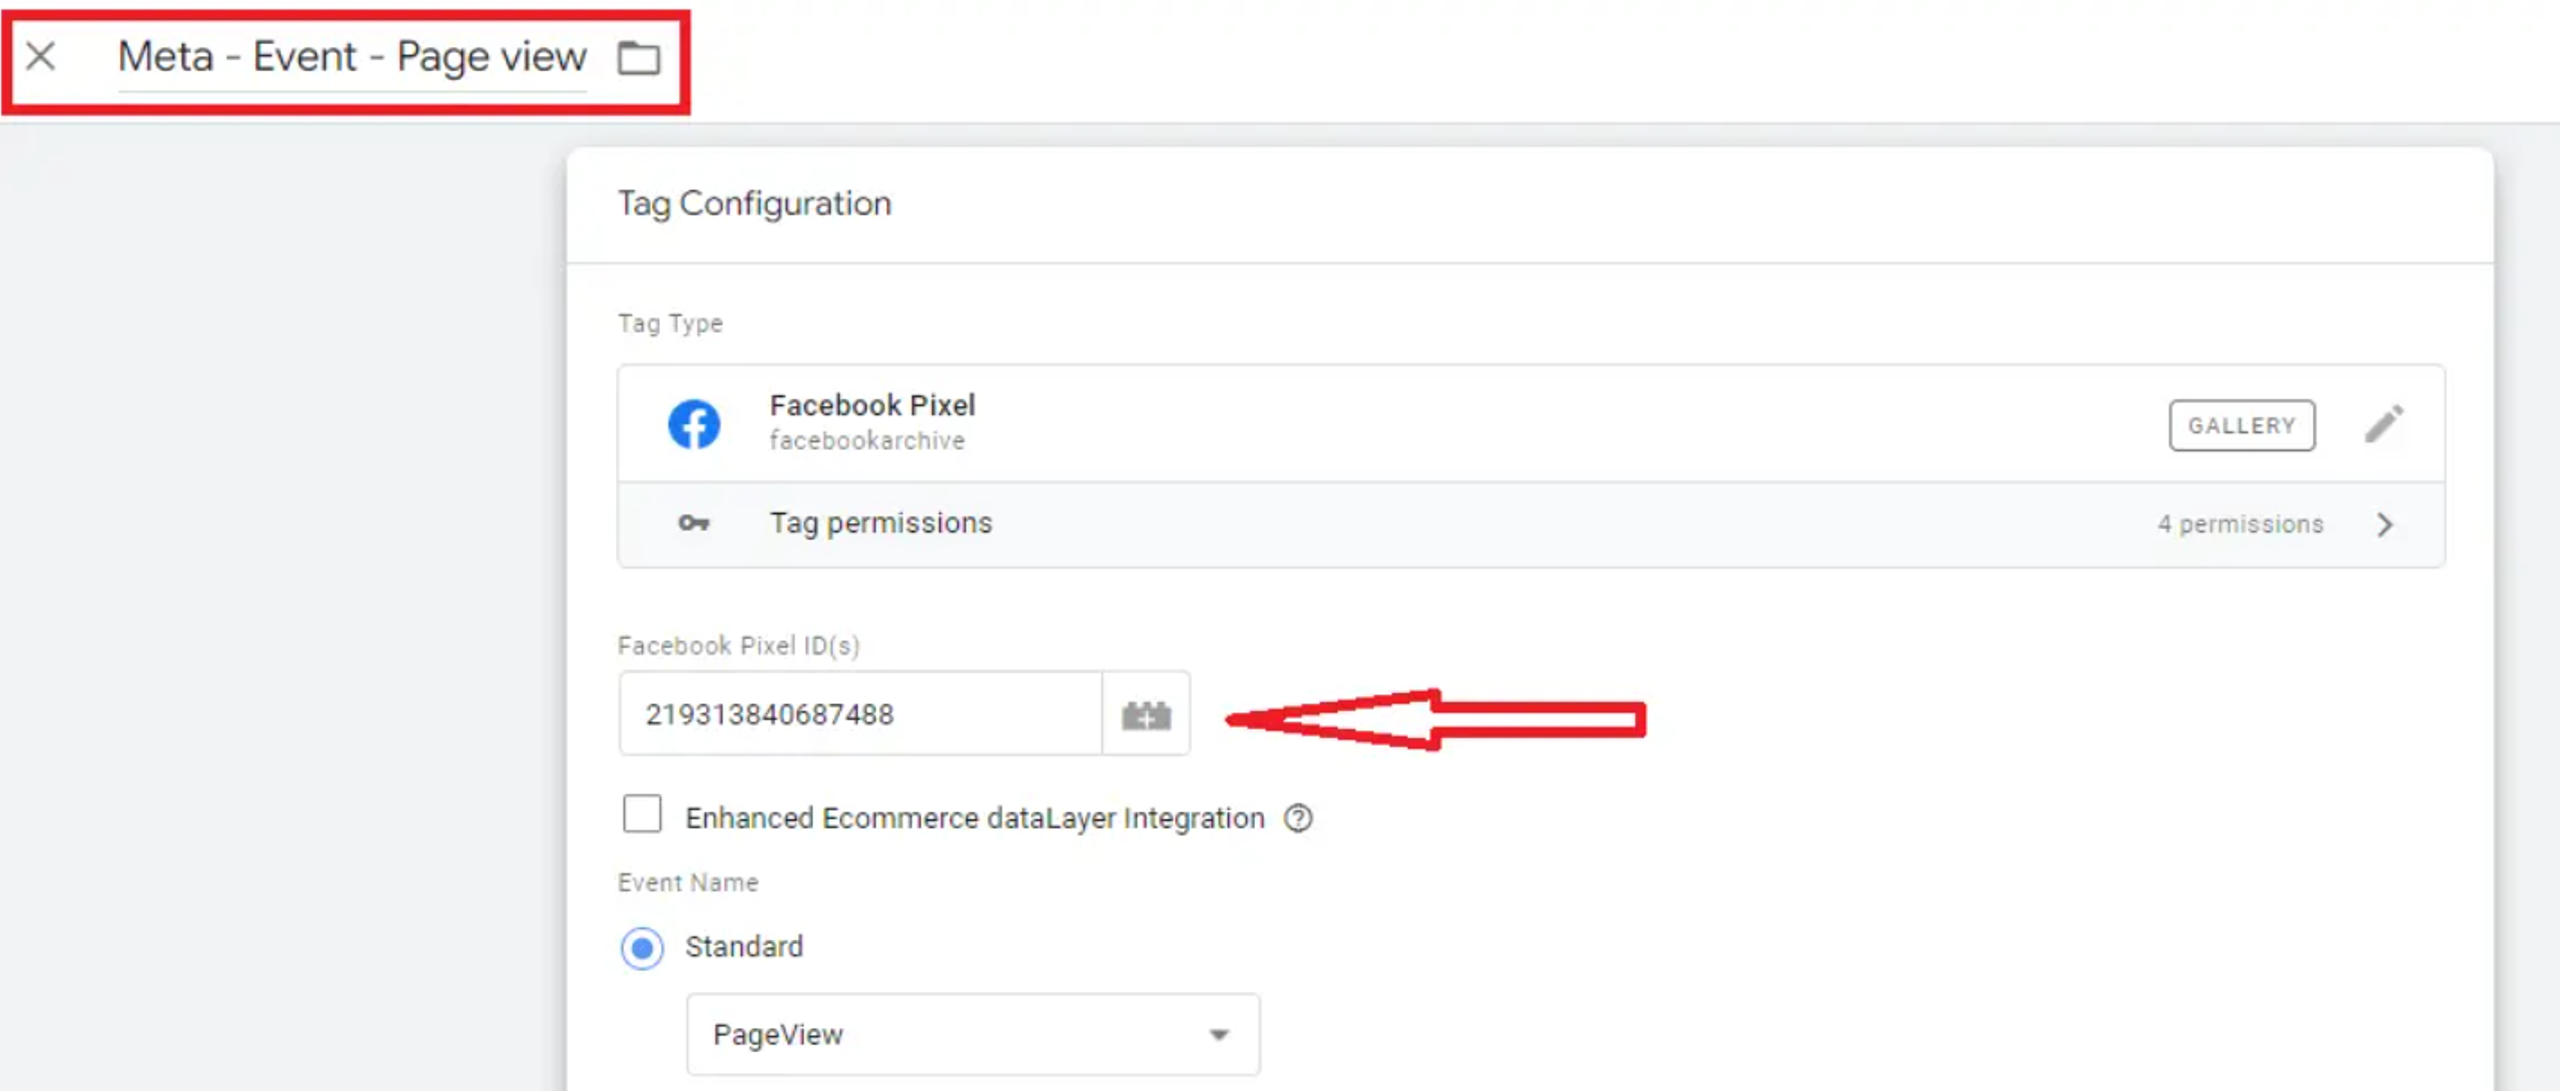
- Choose a trigger for your Meta Pixel tag: Press "Triggering", and then choose either the "All Pages" or "Initialization - All Pages" trigger types. Both will work well enough for your purposes.

- Then press "Save". Your first Meta Pixel tag has now been created.
Check and Publish:
- After inputting all necessary settings, check the functionality of your tag using the preview mode.

- Then add your store URL:
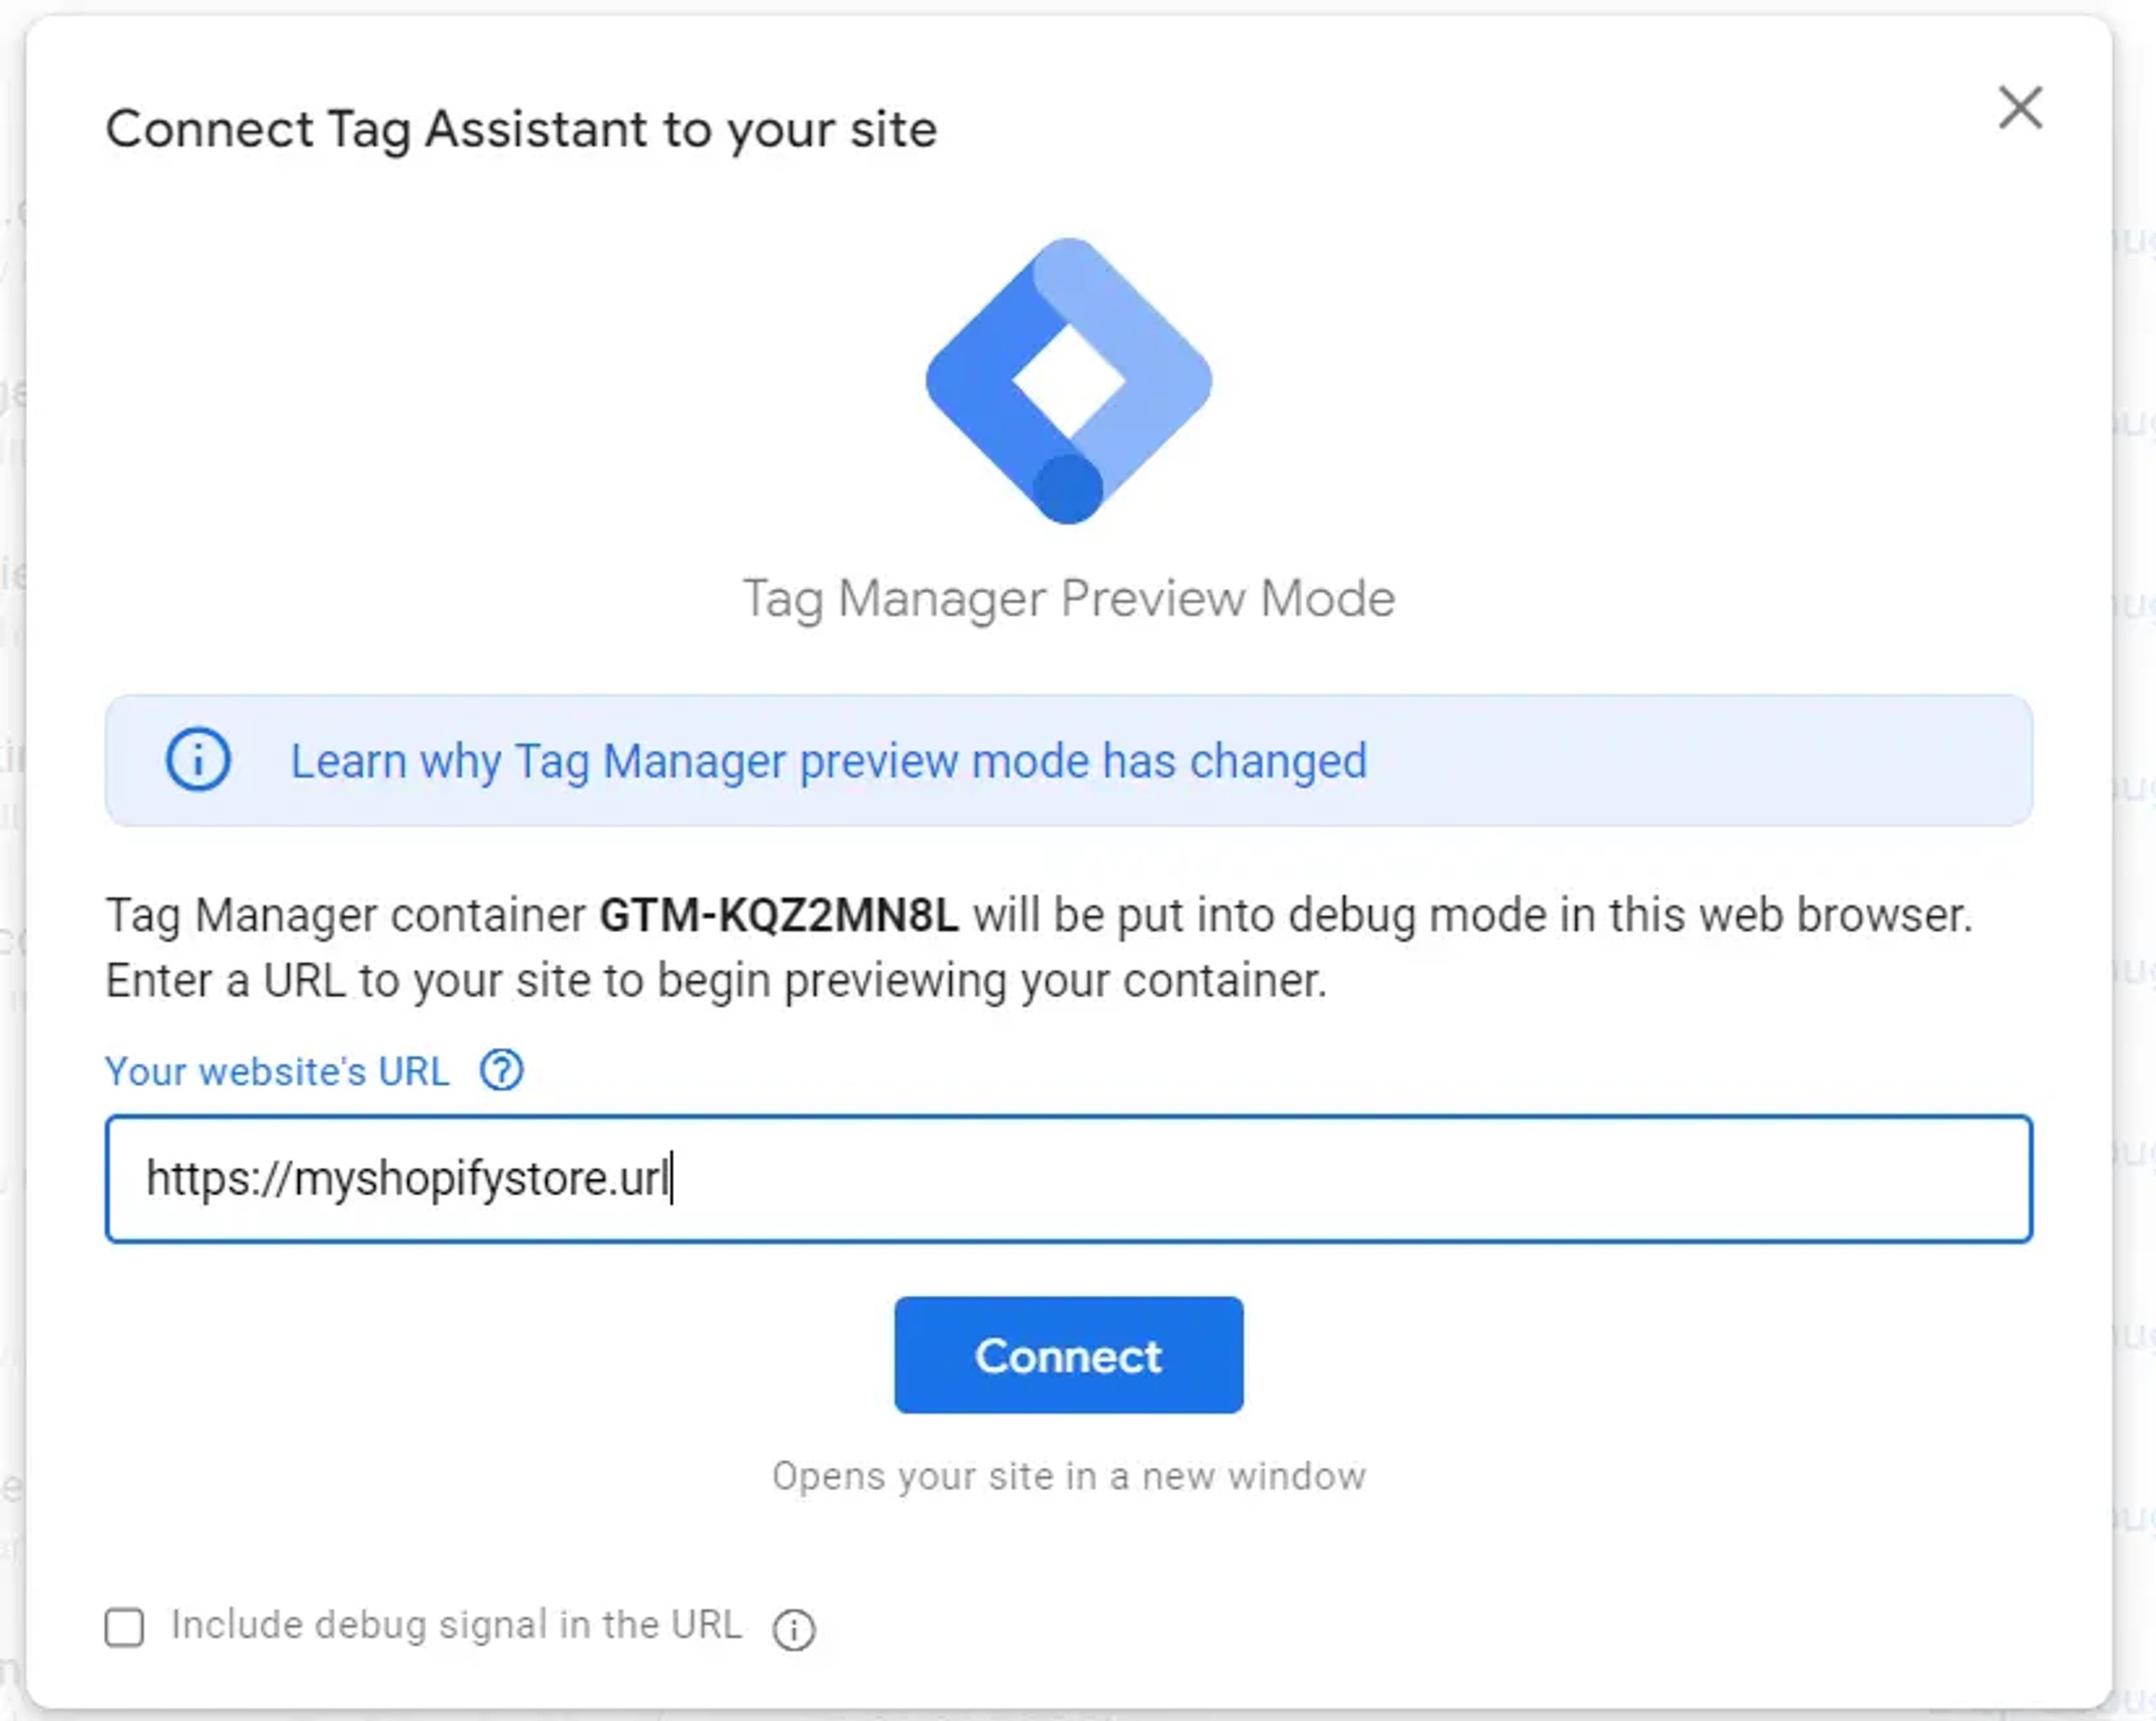
- Tab with the URL "https://tagassistant.google.com/" will be opened and you will see all the tags that are firing on your page, including your Meta Pixel tag.
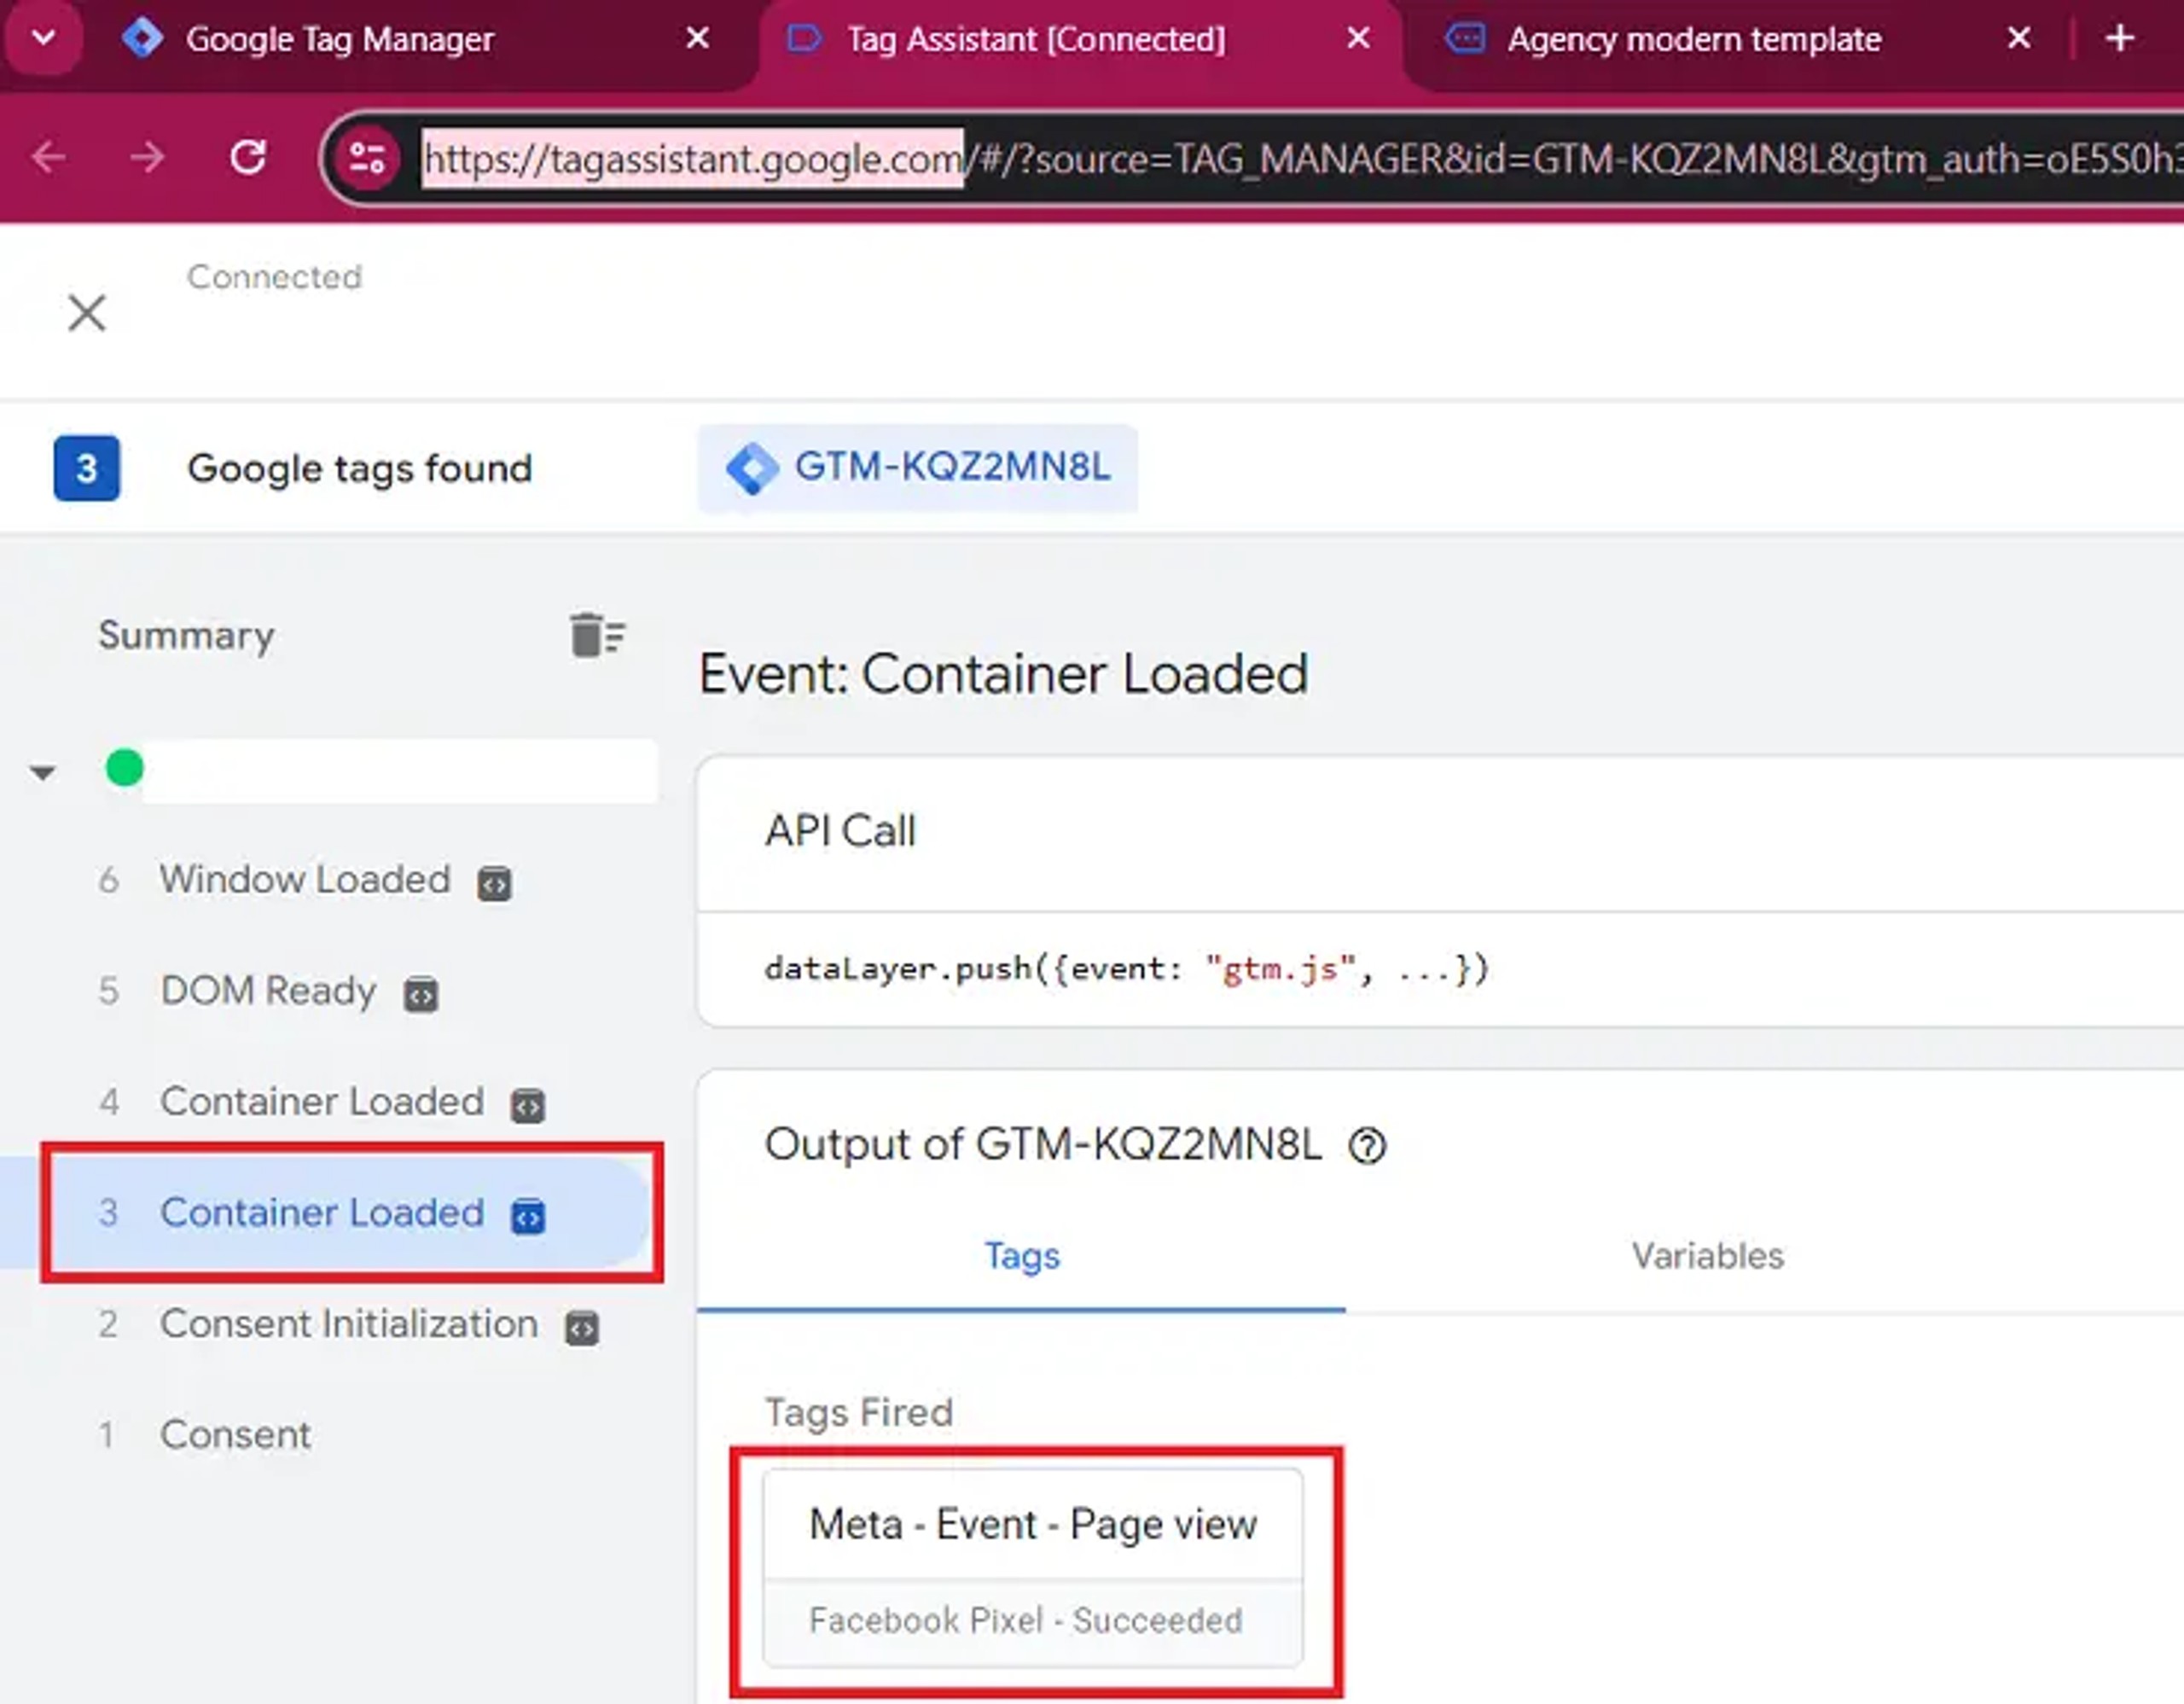
- If everything is working correctly, save your changes and publish the container.
Method 3: Manual Integration in Theme Files
For users confident with editing WordPress theme files, manually integrating Meta Pixel is a viable option. We don't recommend this method for beginners as it potentially may lead to the website break.
Here's a step-by-step guide.
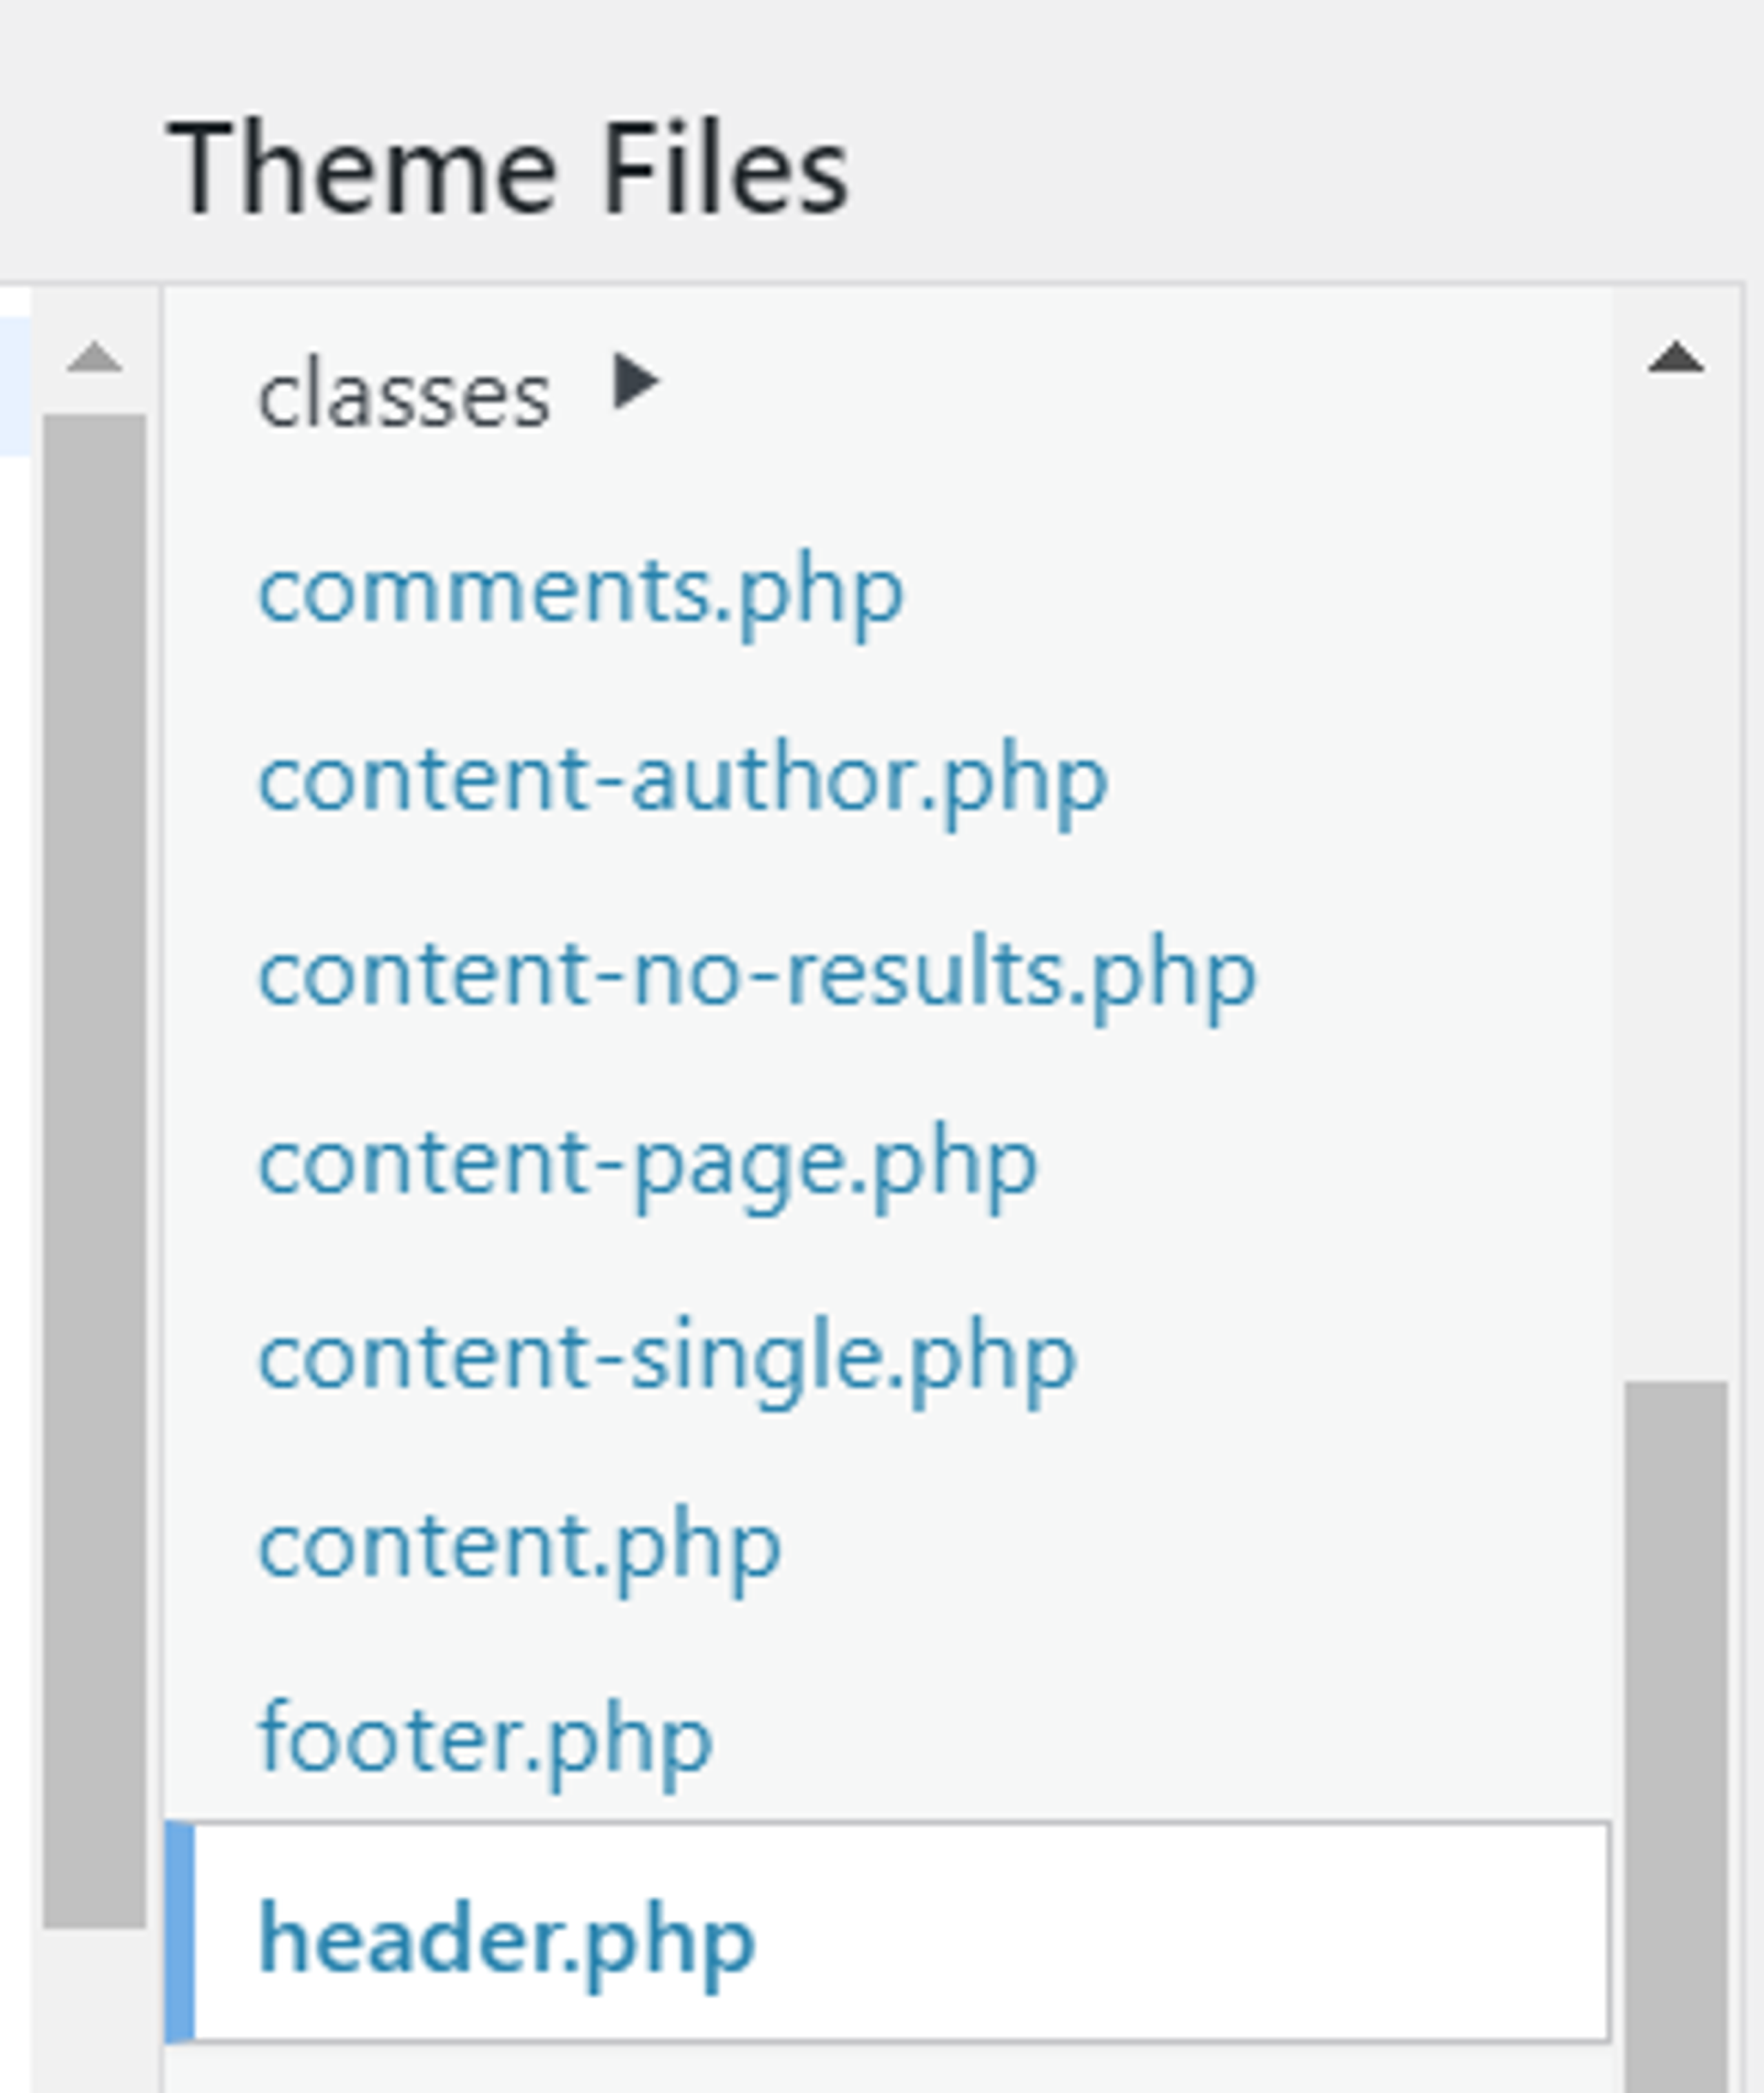
Access Theme Editor:
- Navigate to your WordPress dashboard and access the Theme Editor under the "Appearance" menu.

- In the Theme Editor, find and select the "header.php" file. This file contains the code for the site's header.
- Copy the Meta Pixel code provided by Facebook and paste it just before the closing </head> tag in the "header.php" file.
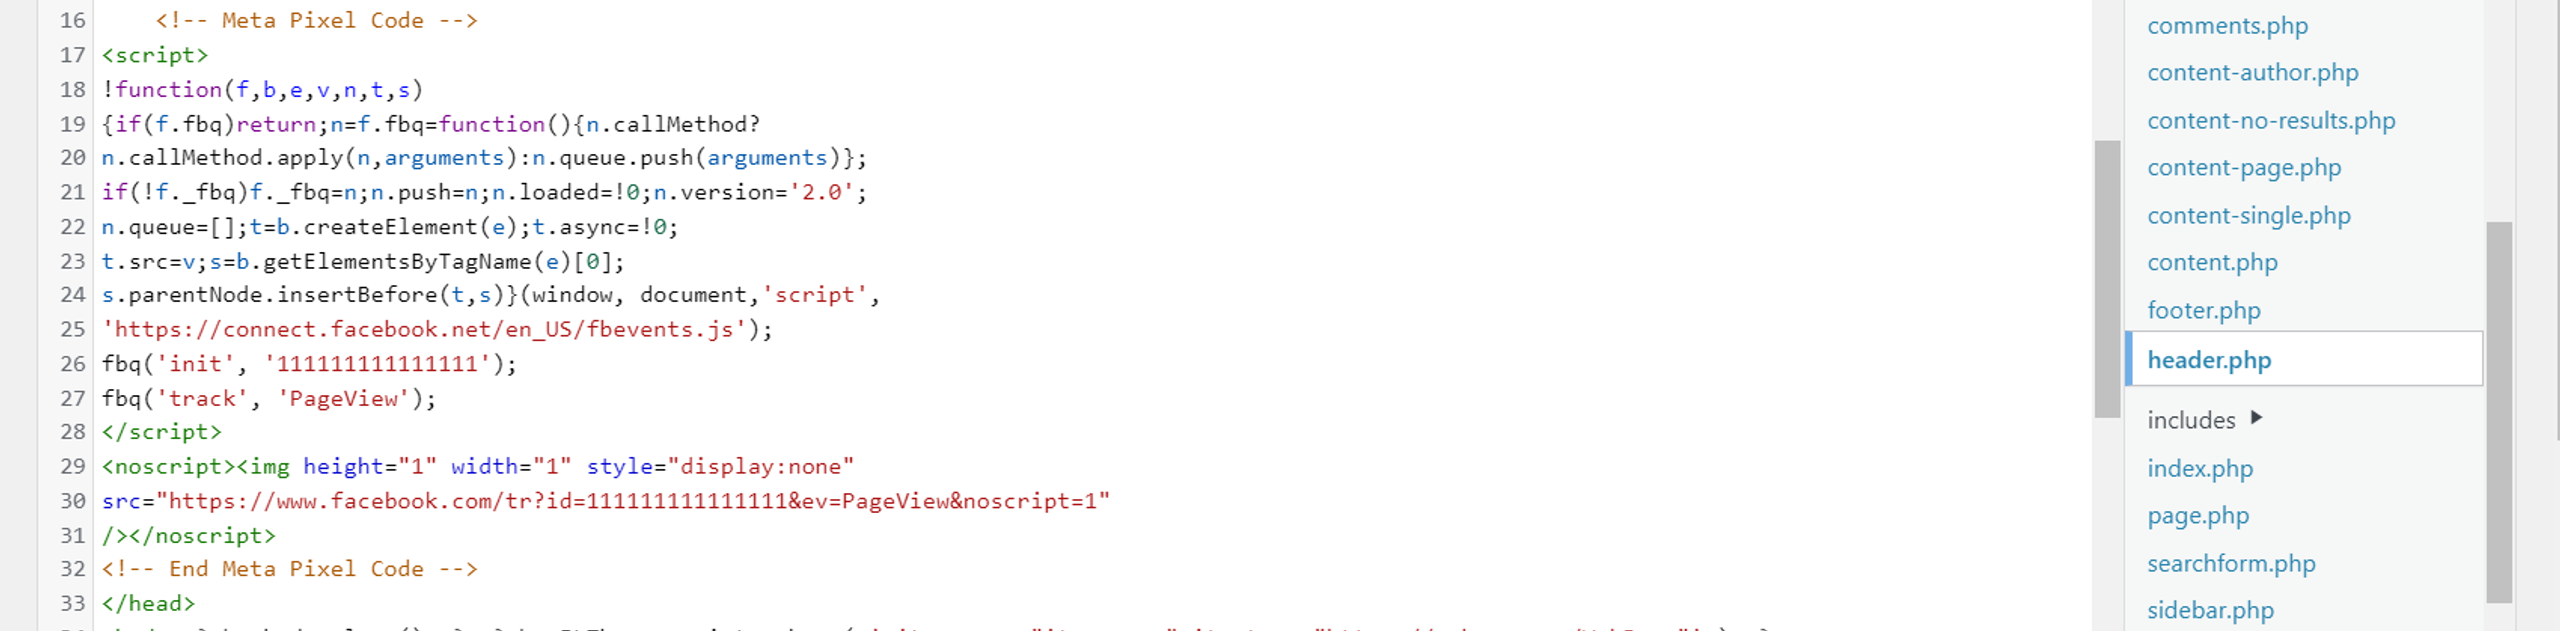
- Save the changes to the theme file. Ensure that the Meta Pixel code is now a part of every page on your WordPress site.
How to Test if The Meta Pixel is Working
Now that your Meta Pixel is in place, it's essential to ensure that it's functioning correctly. Accurate data collection is the foundation on which to make informed marketing decisions.
Here's a step-by-step approach to testing your installation:
Tool 1:Meta Pixel Helper extension
1. Install the Extension:
- Visit the Chrome Web Store (https://chrome.google.com/webstore).
- Search for "Meta Pixel Helper" and click "Add to Chrome"

2. Visit Your Store: Open your store in a new tab.
3. Look for the Icon: The Pixel Helper icon (a small blue square) in your Chrome toolbar should change color and display a number, indicating that the Pixel is installed.
4. Click the Icon: Clicking on the Pixel Helper icon will provide details of the events your Meta Pixel is tracking on your website.

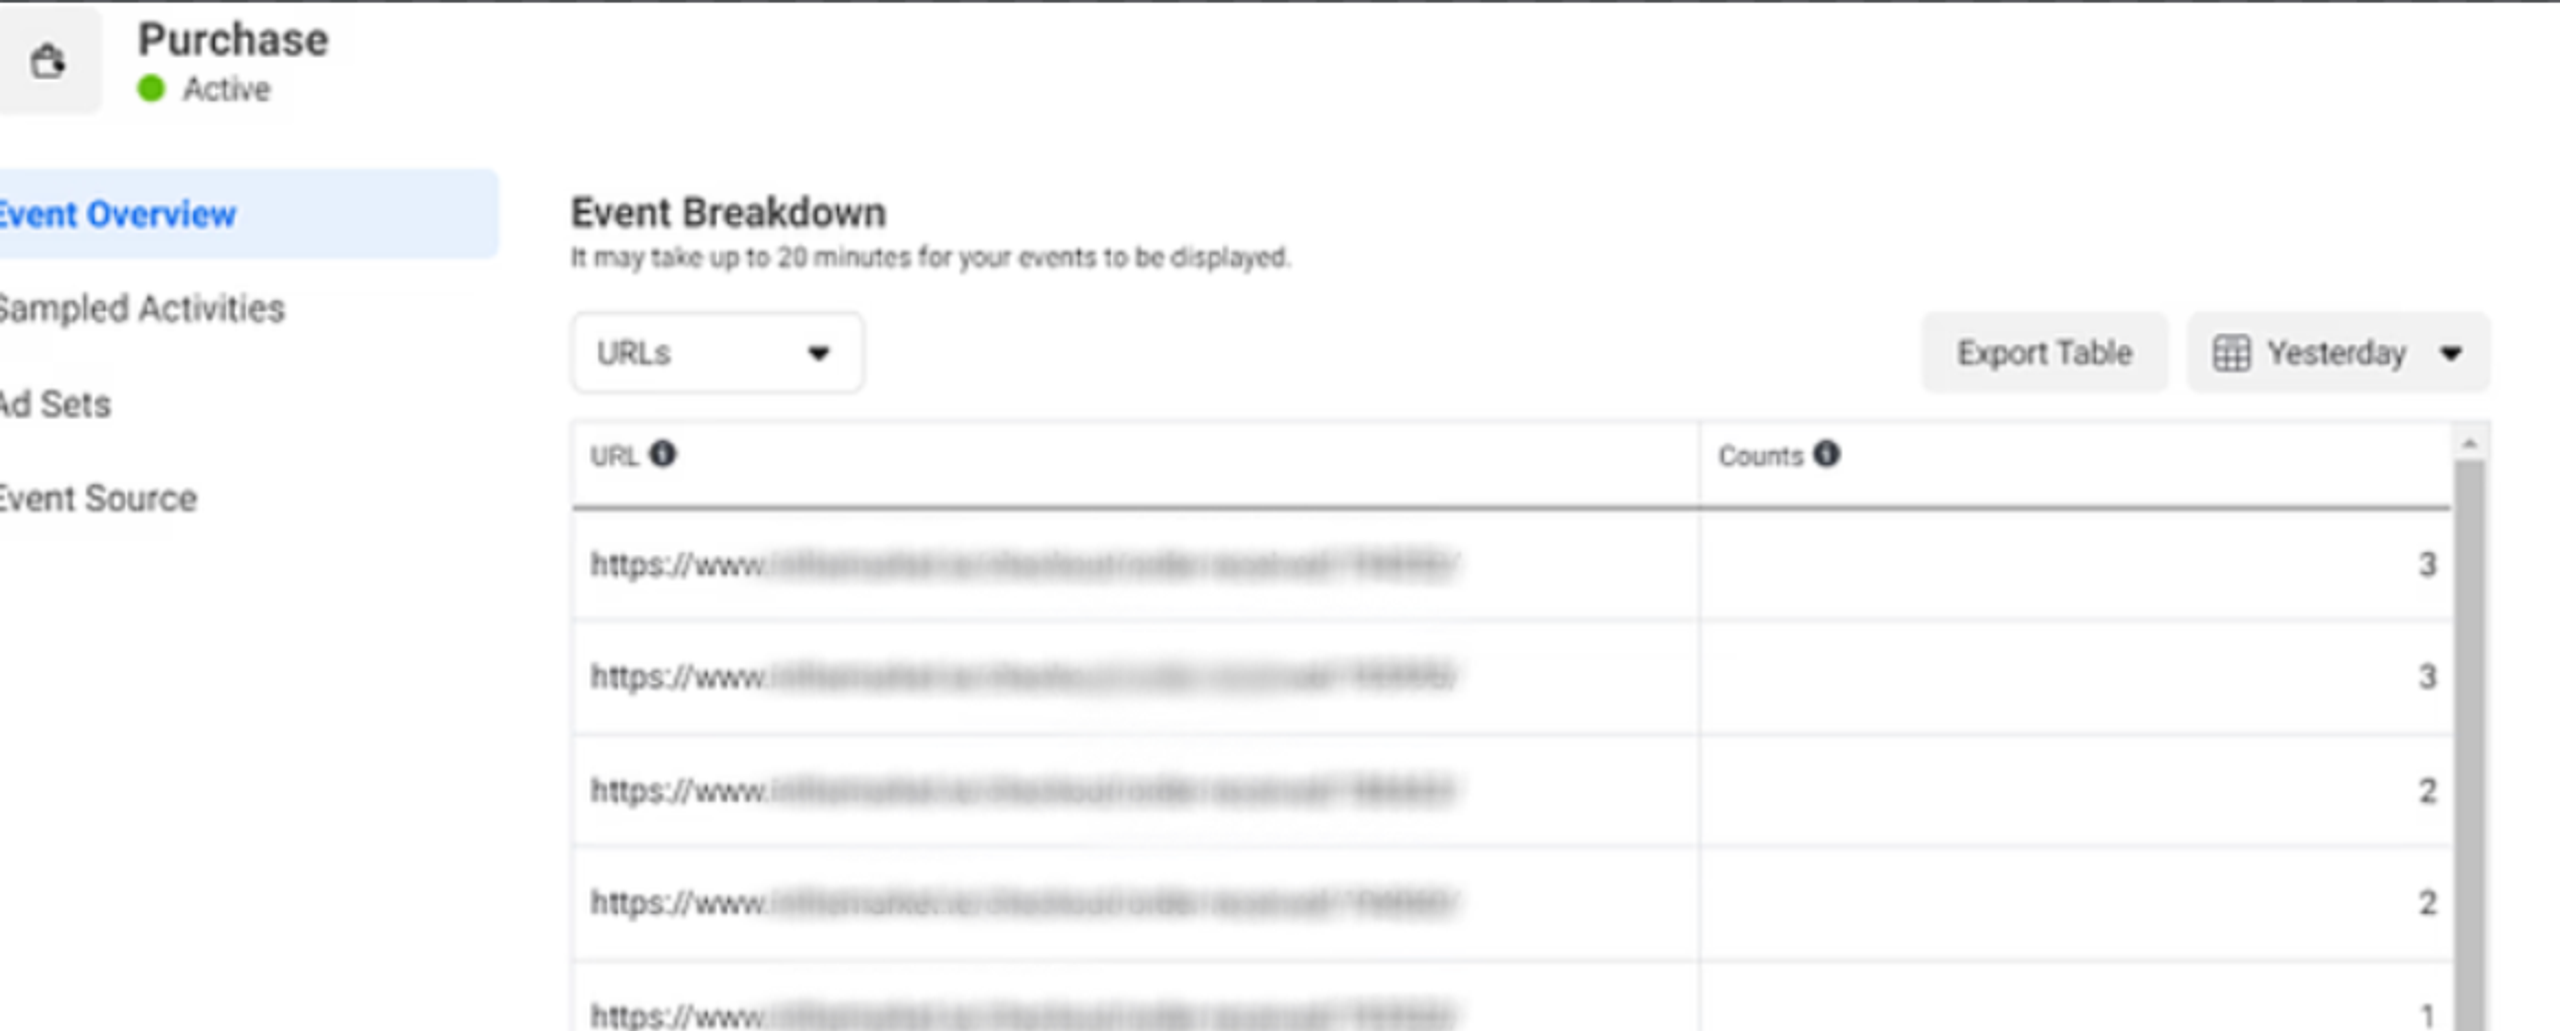
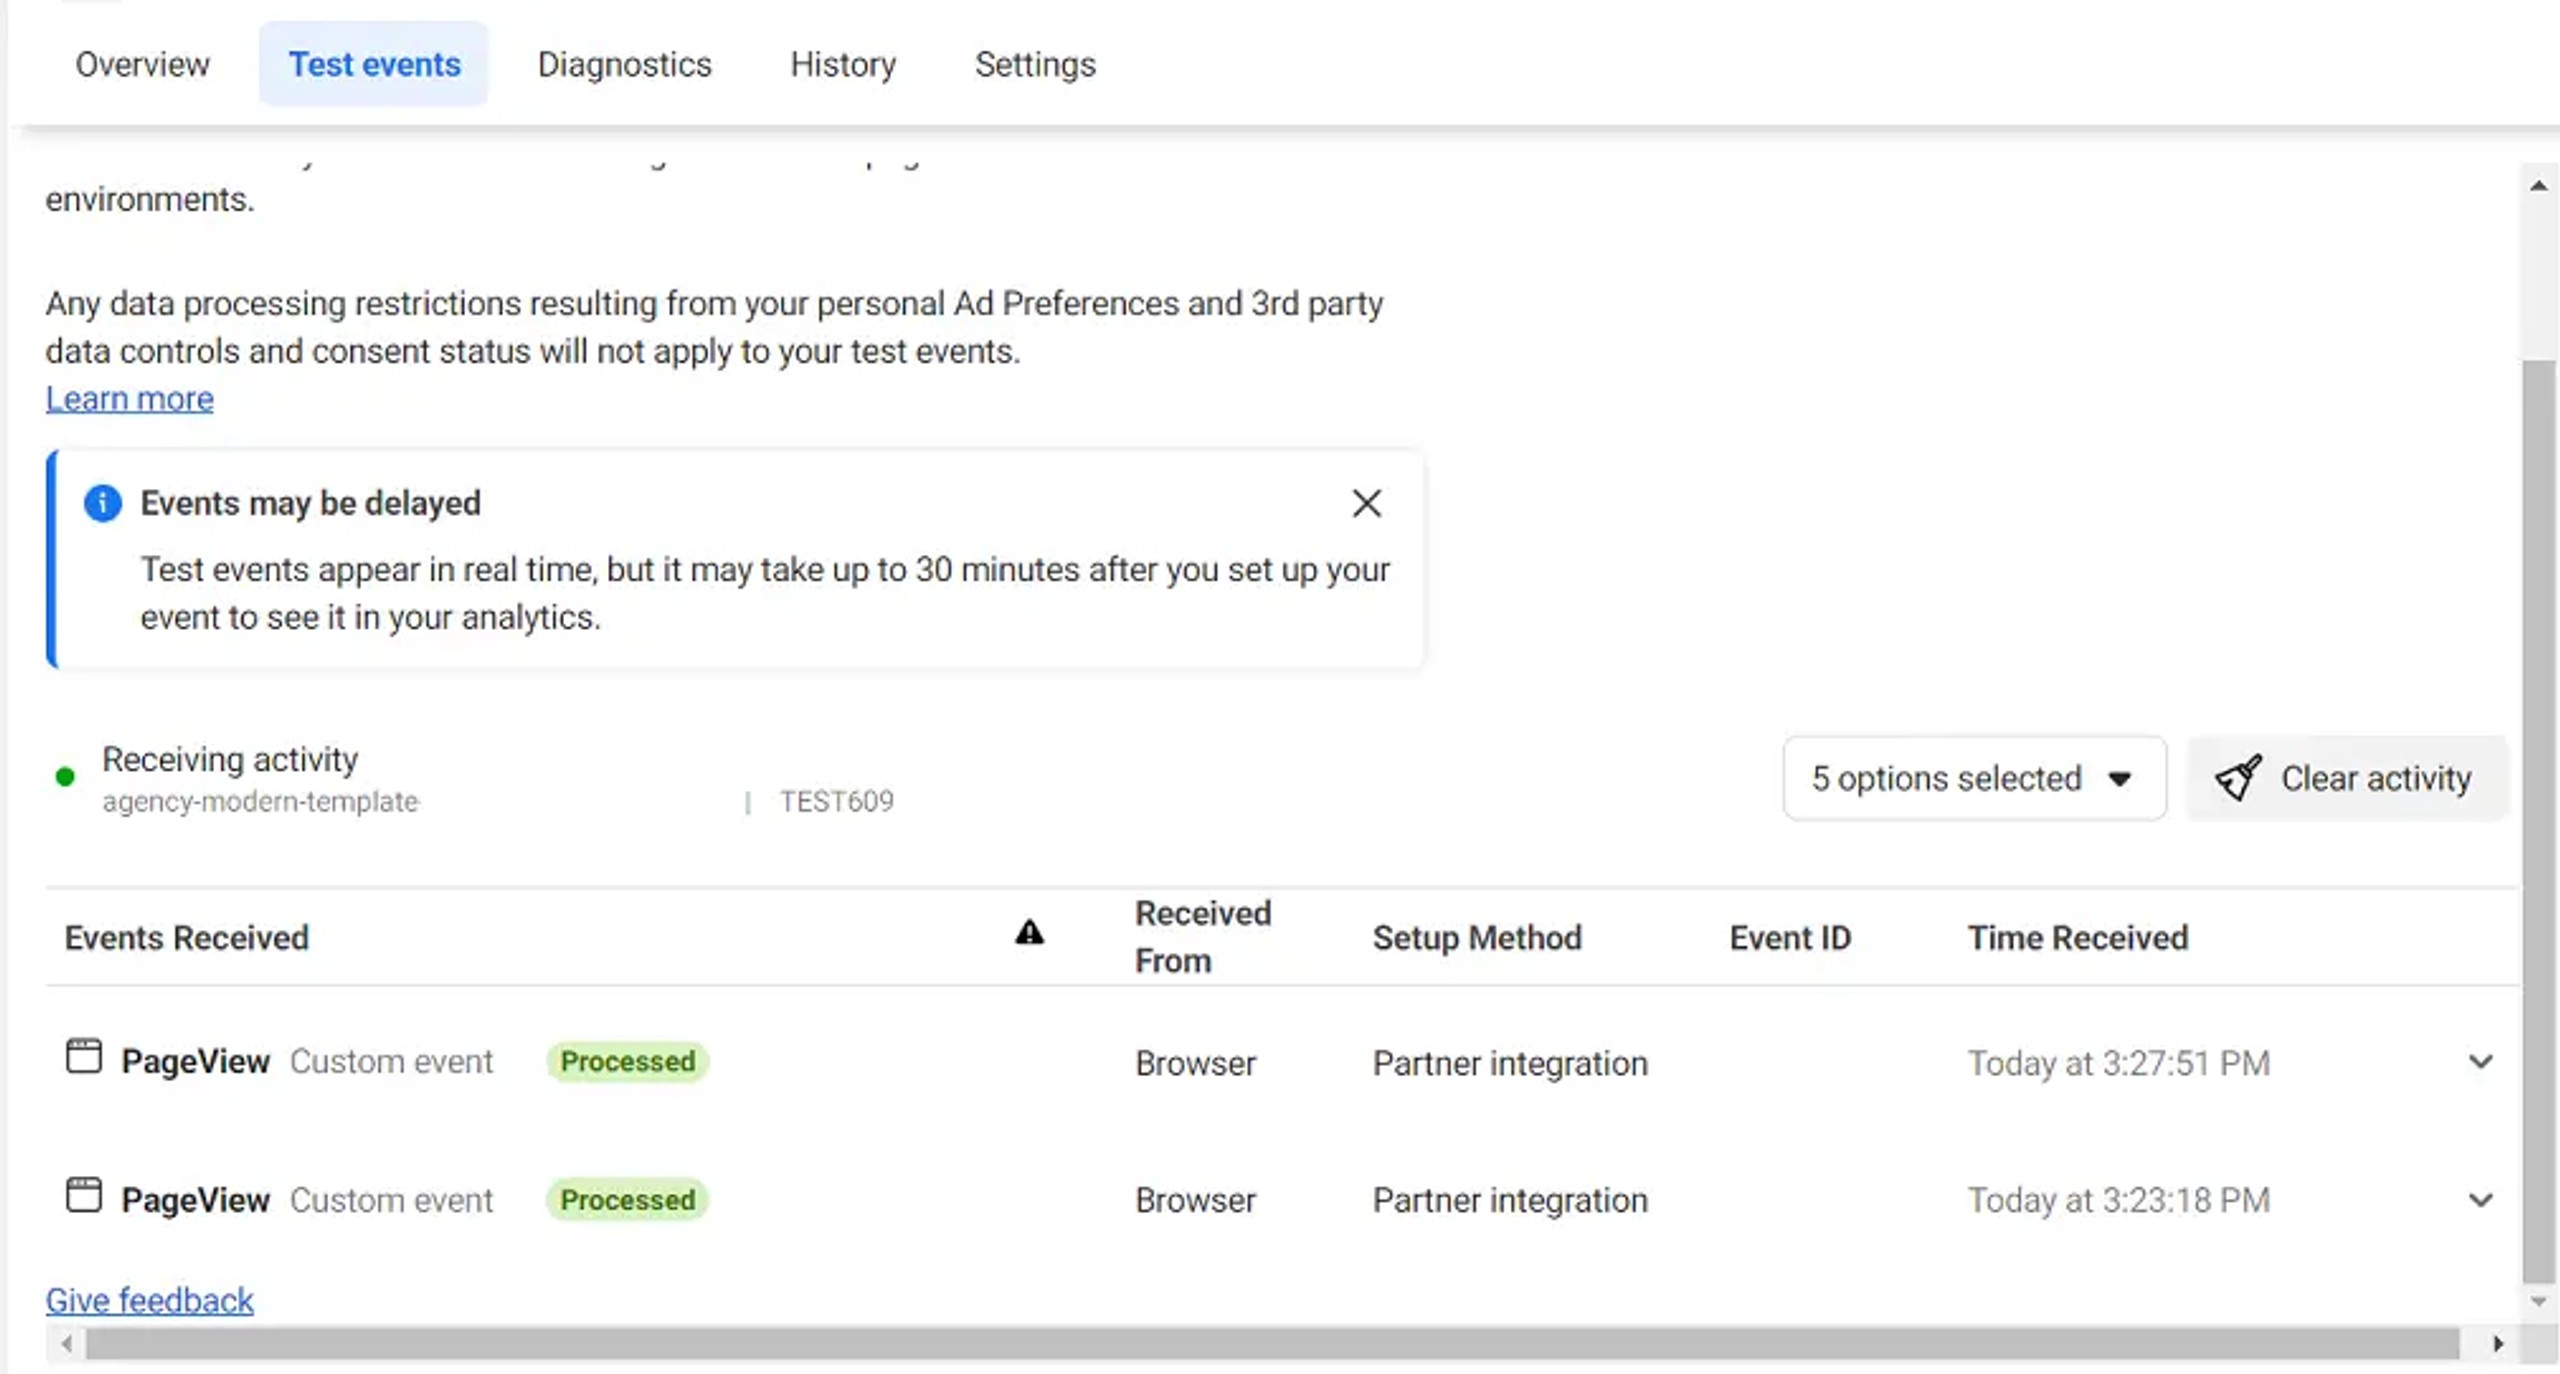
Tool 2: Events Manager Test Events
1. Open Events Manager: Navigate to Events Manager and select your Meta Pixel.
2. Go to the 'Test Events' tab: You'll find this tab within your Pixel's settings.
3. Perform the Following Actions:
- Enter your store URL
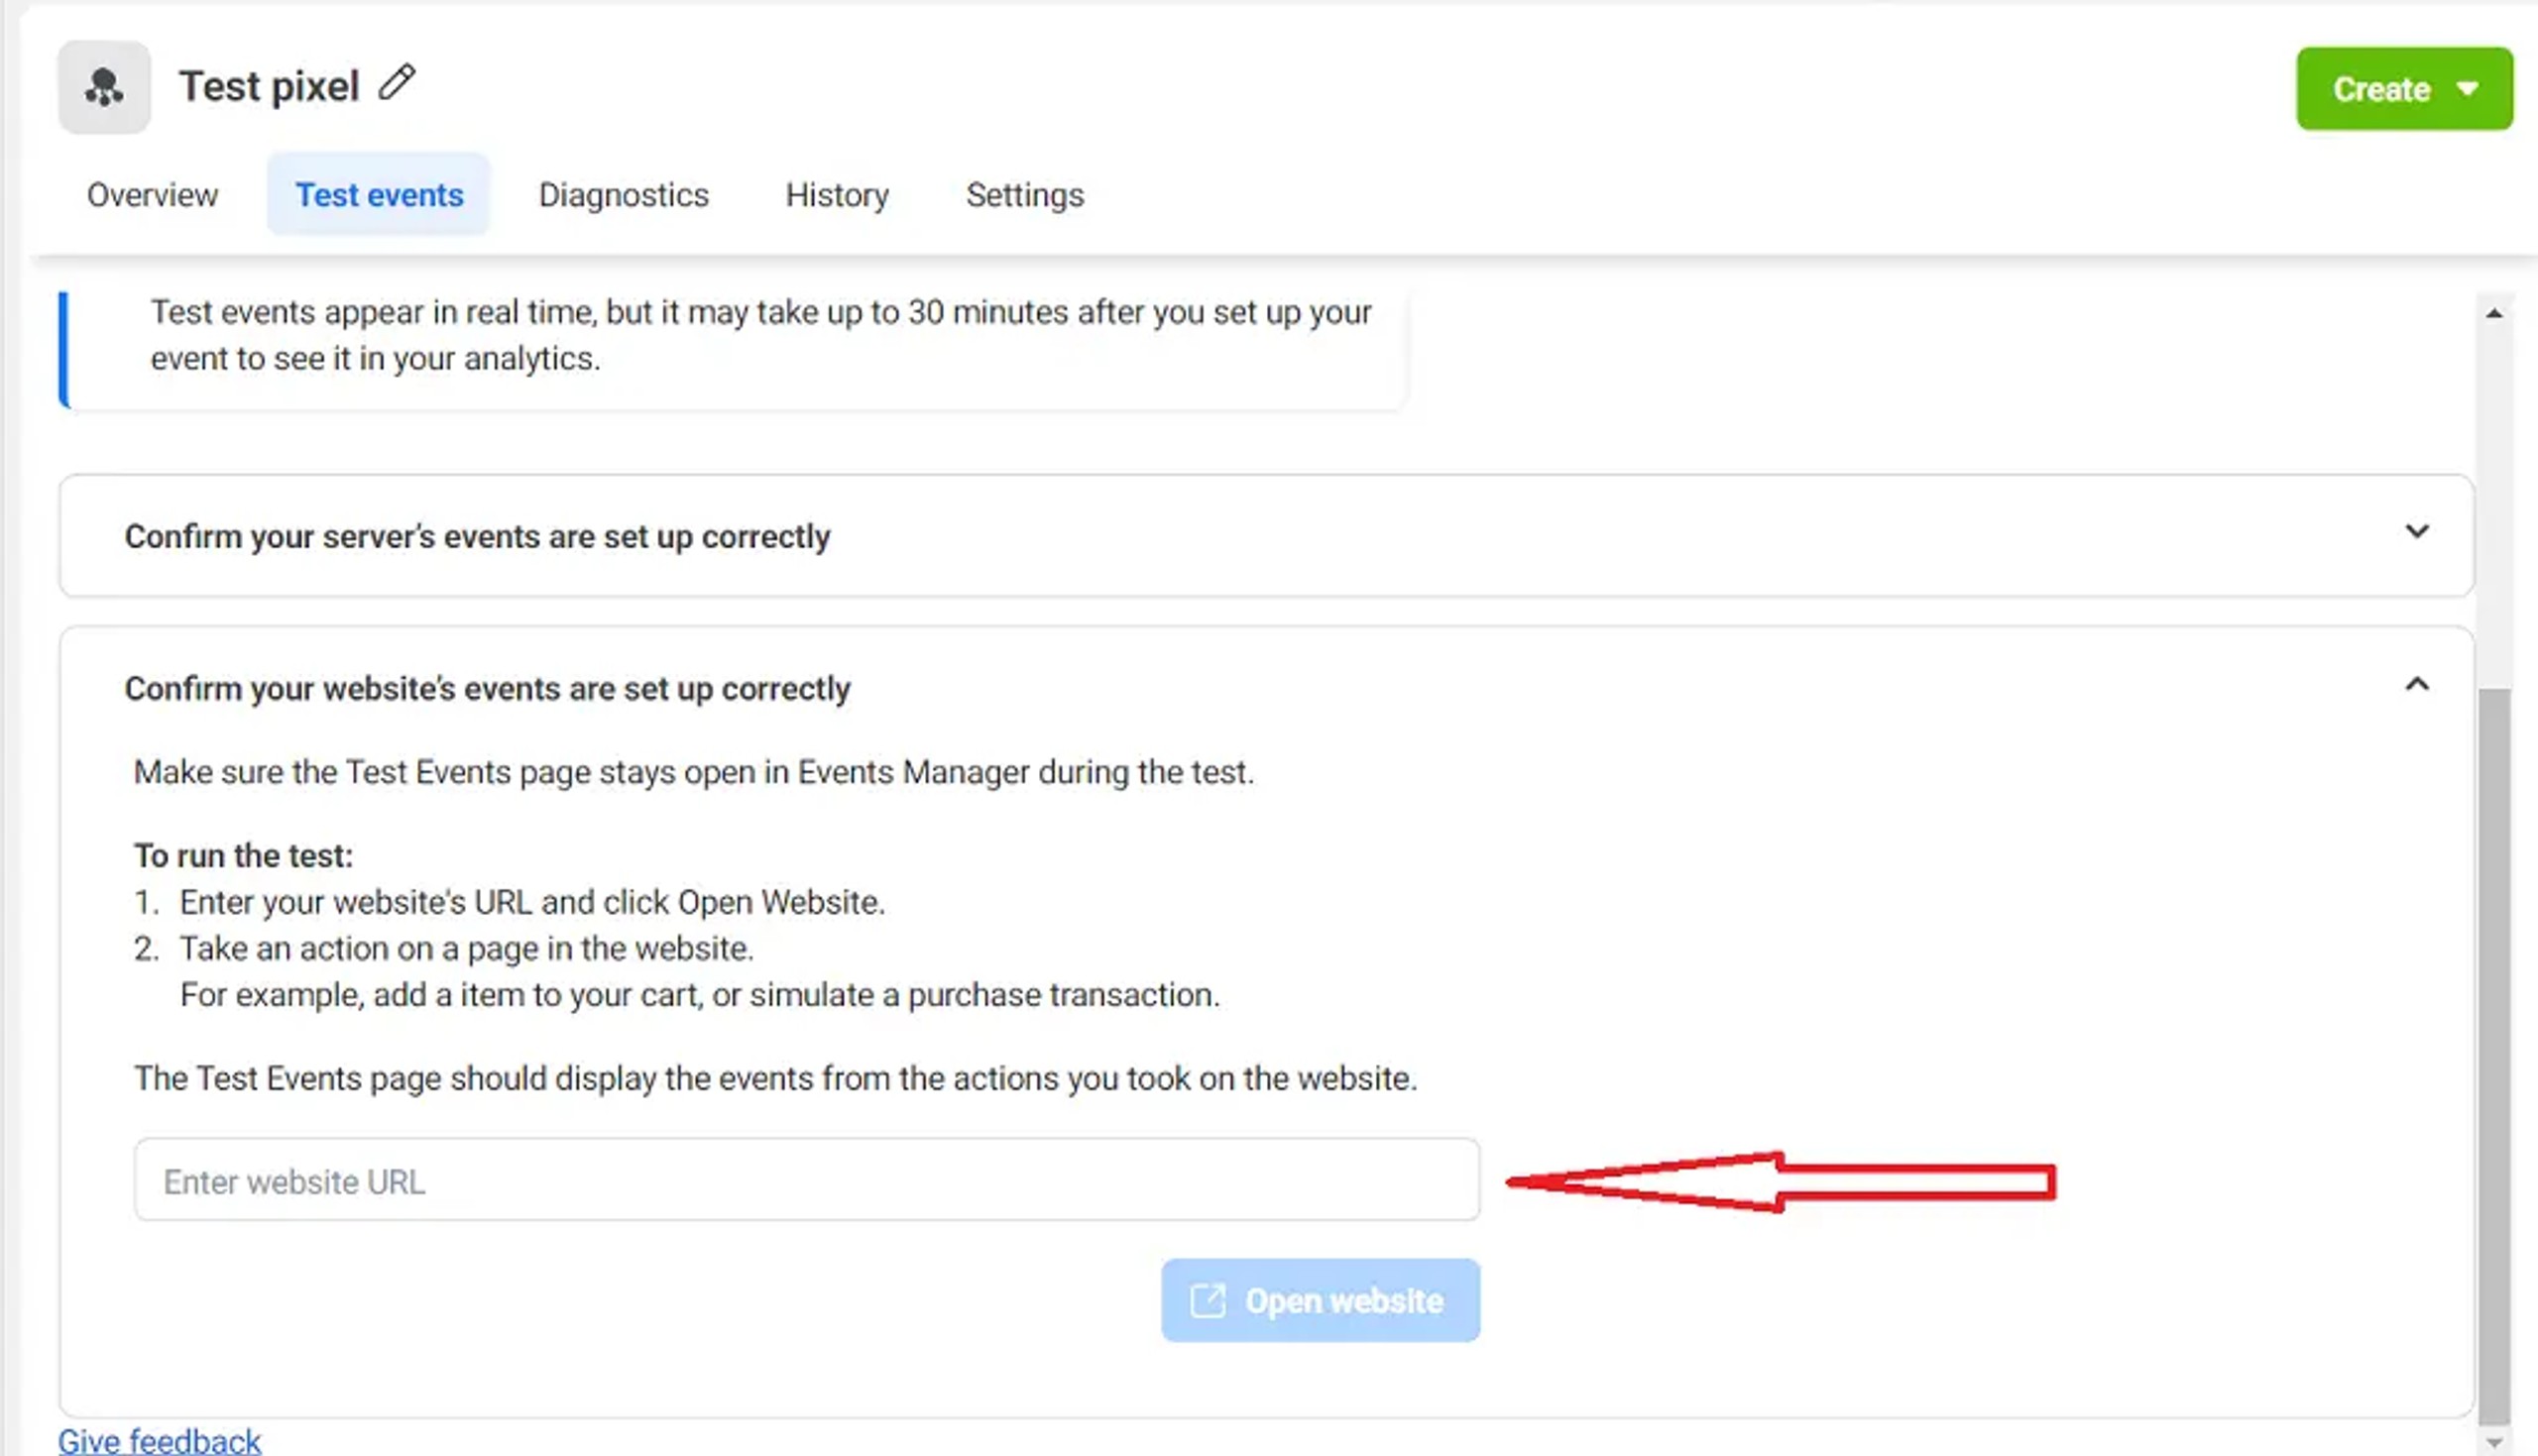
- Your store will be opened in a new tab, then browse some pages of the website.
4. Check Events Manager: Return to the Events Manager's "Test Events" tab. If your Pixel is working, your recent actions will appear as test events received.
Troubleshooting:
- Pixel Not Firing: Carefully review the installation instructions. Common mistakes include incorrect code placement, not saving your changes in the store code editor or not published changes sitting in the GTM container.
- Still Having Trouble?: Consult Facebook's comprehensive help resources or contact their support team for assistance.
- Request help from our experts
Success! Once you've verified your Meta Pixel setup, you're ready to start utilizing the valuable customer data it collects.
Conclusion
Meta Pixel is like having X-ray vision into your website. It gives you the information you need to make smarter marketing decisions and get better results. Here's how:
- Understand how people use your website: See what people do, what pages they visit, and where they drop off. This helps you fix problems and improve your site.
- Target the right people with your ads: Show your ads to people most likely to be interested in your products or services. This means less wasted ad spend.
- Bring back potential customers: Remind people who visited your site about your products, even after they've left. This can lead to more sales.
- Track what matters most: See how many people buy, sign up for your email list, or take other important actions. This shows you what's working and what's not.
- Keep up with the latest trends: Meta Pixel is always being updated to match the latest in digital marketing.
- Get more out of Meta: Meta Pixel integrates with Facebook and Instagram, giving you even more powerful tools for your marketing.
In short, Meta Pixel helps you stop guessing and start getting real results from your online marketing.
FAQ
Why do I need the Meta Pixel on my WordPress store?
The Meta Pixel serves as your gateway to comprehending customer behavior, crafting impactful advertisements, and ultimately boosting sales.
Is the setup process difficult?
No! WordPress provides a simple integration procedure, and even manual installation is user-friendly by following our step-by-step instructions.
How long does it take for the Meta Pixel to start collecting data?
Meta Pixel becomes operational immediately upon installation. You'll start observing data in your Events Manager almost instantly.
Can I use the Meta Pixel to track sales and conversions?
Сertainly! The Meta Pixel's custom conversion functionality is robust. It allows you to monitor purchases, add-to-carts, sign-ups, and any other significant actions within your store.
I'm not very technical. Can I still do this?
Absolutely! We've prepared this guide to cater to beginners. In case you encounter any challenges, Facebook offers exceptional support resources, or you may explore the option of hiring a specialist to assist with the setup.