How to Set Up Facebook Pixel on Shopify
Posted on 2/26/2024
updated at 3/3/2024
Introduction

Tired of guessing what works and what doesn't on your Shopify store? The Facebook Pixel on Shopify takes the guesswork out of marketing. You will know what's what and why, and be able to frame your marketing activities accordingly.
Think of the Meta Pixel as a tiny piece of code which works behind the scenes, tracking how people interact with your website. The data it produces is pure gold – it helps you create laser-targeted ads and marketing campaigns which drive real results.
Don't worry - you don't need to be a tech whiz to set it up. The process is surprisingly simple, and we'll guide you through it step-by-step.
Ready to start understanding your customers better than ever? Let's dive in!
Creating a Meta Pixel
Before we start looking at your Shopify store itself, let's get your Facebook Pixel ready to roll. Follow these steps:
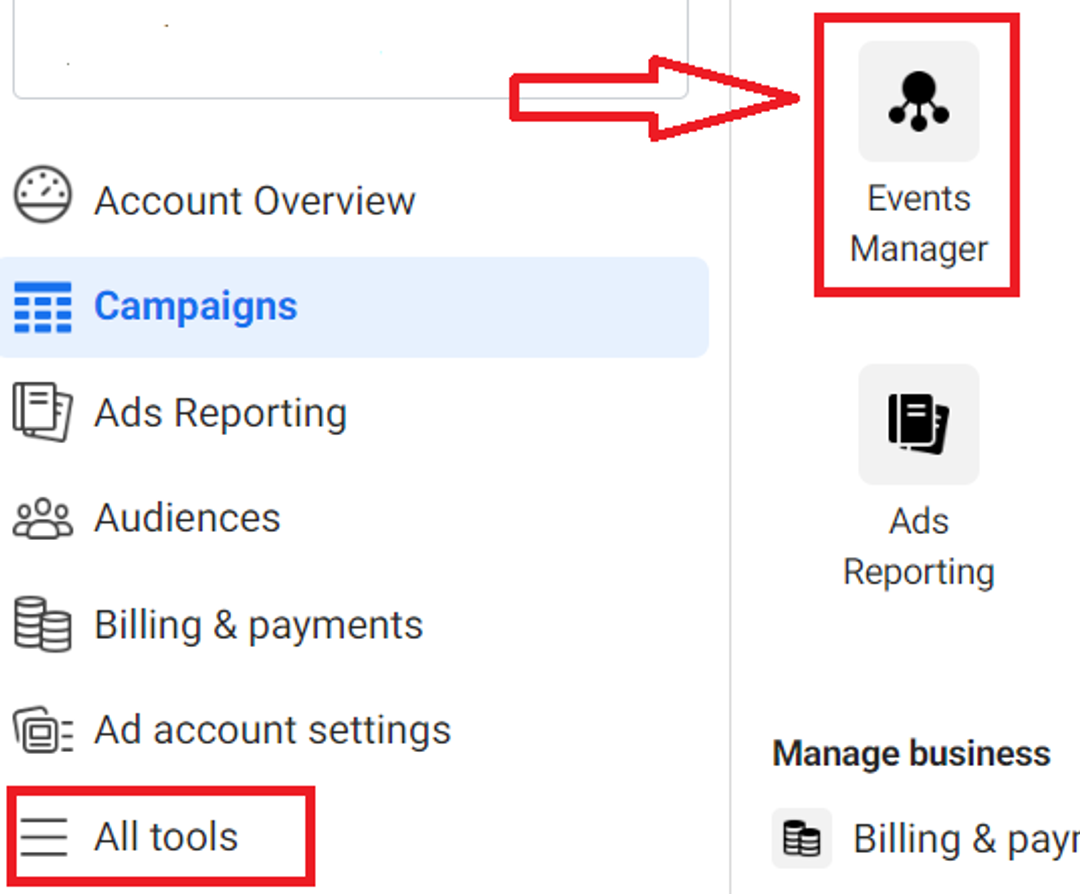
1. Find 'Events Manager':
- Look for the "Events Manager" section in the primary navigation menu.
- If you don't see it, click the three-line menu icon and look for "All Tools" – the Events Manager should be listed there.
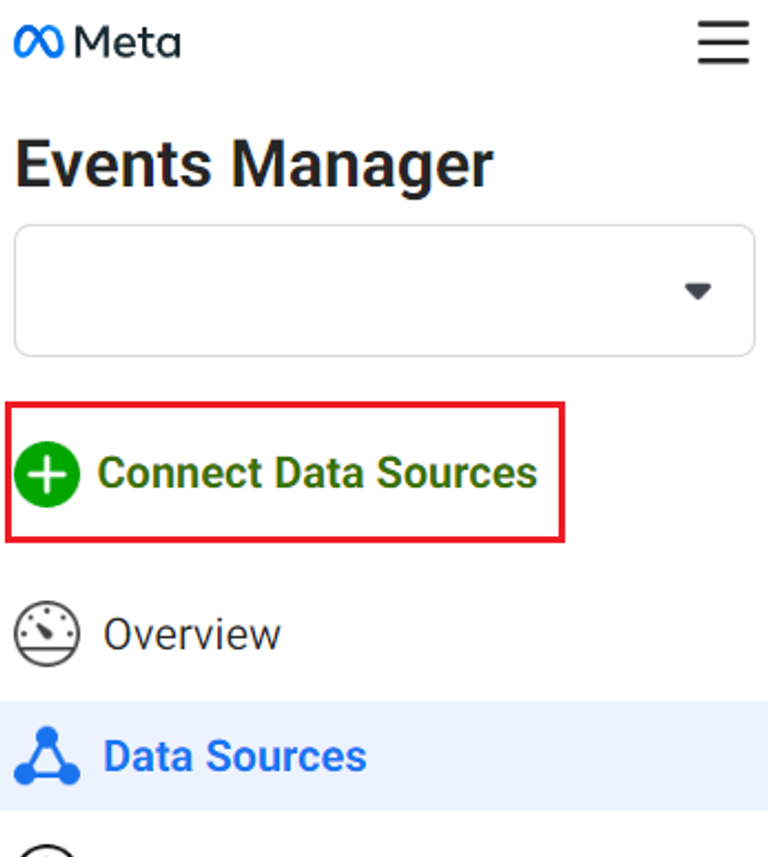
2. Click 'Connect Data Sources': In the same Events Manager section of the menu locate the green button which says "Connect Data Sources" and click it.
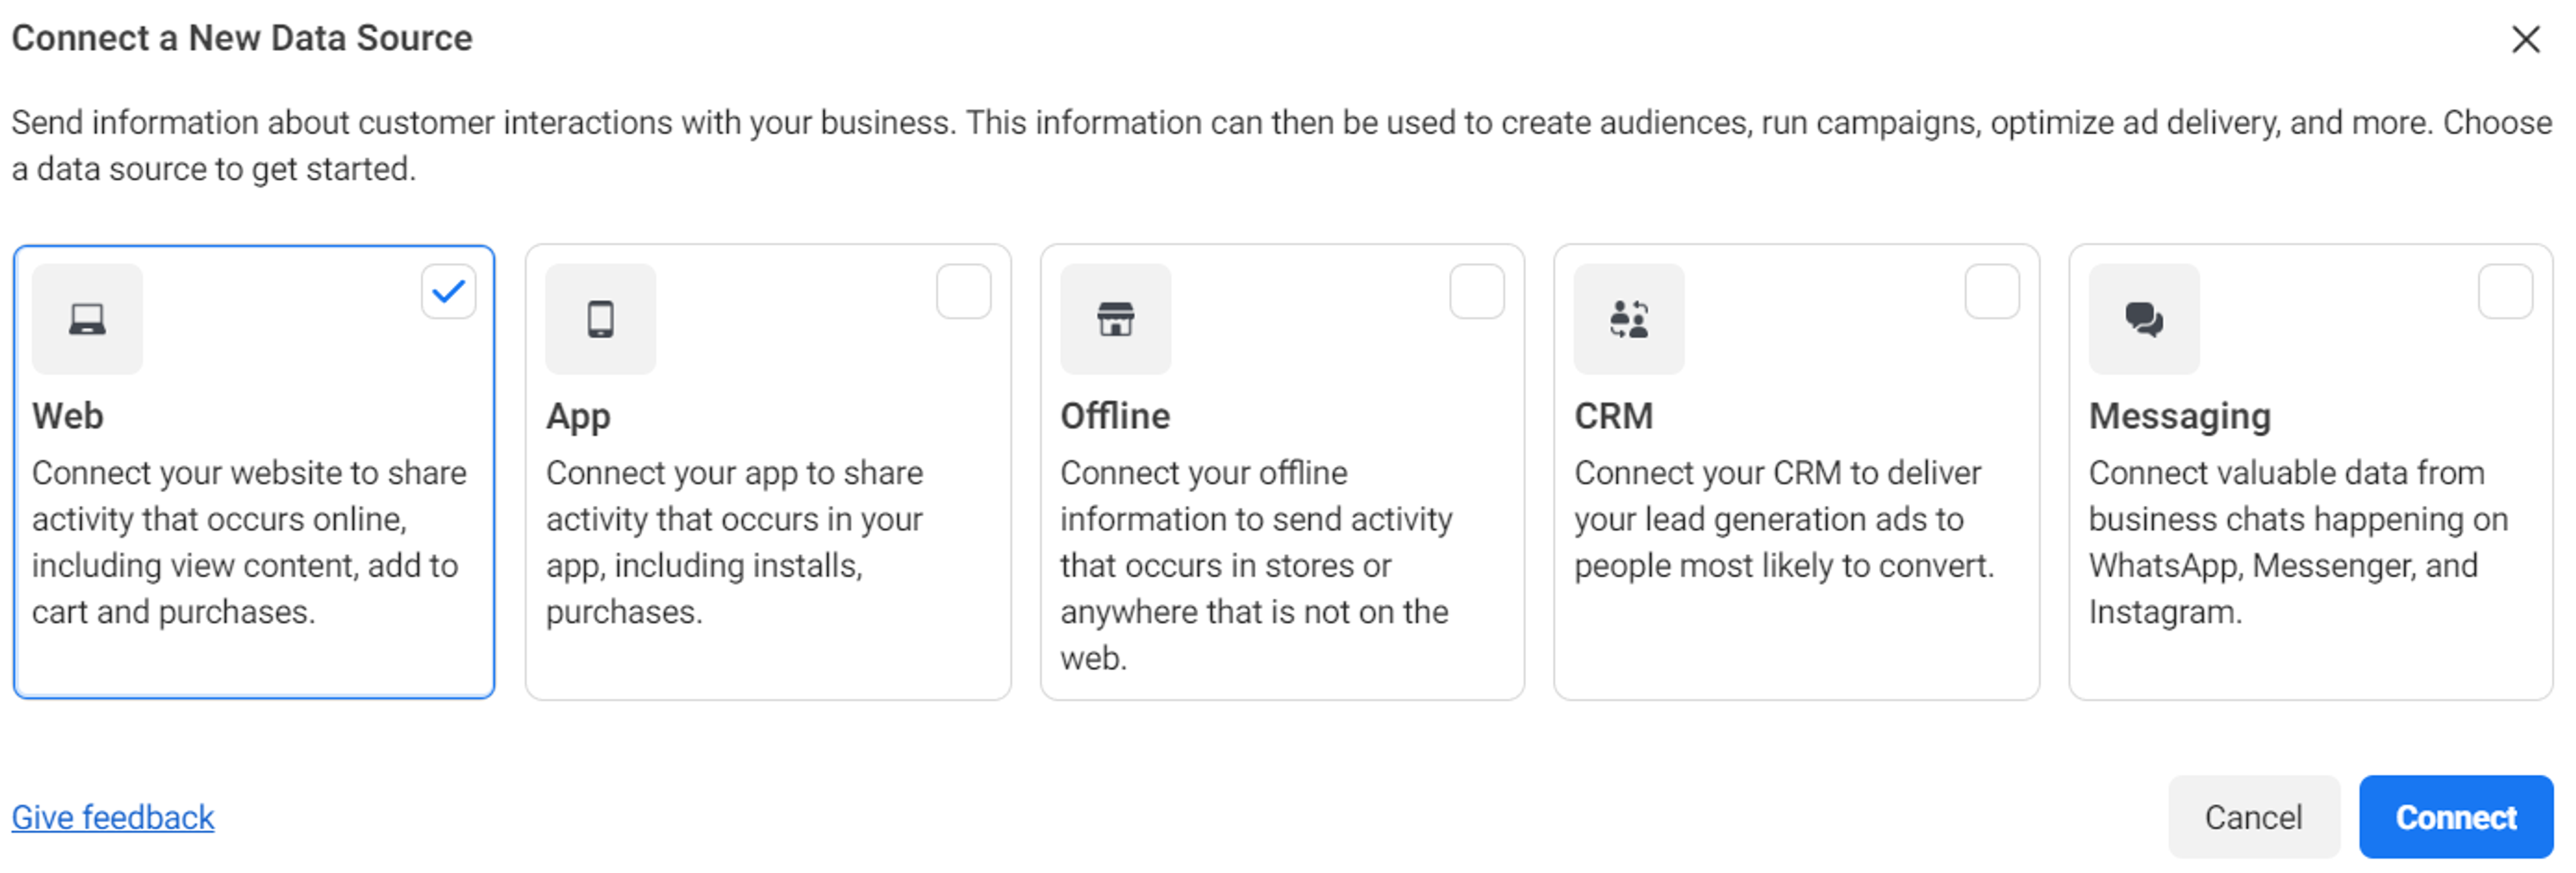
3. Choose 'Web': Facebook can track data from different sources, but for your Shopify store, select "Web" then press "Connect"
4. Name Your Pixel: Choose a name which makes sense for your business (example: "[Store Name] Pixel"). Don't overthink this; you can always change it later!
5. Click 'Create Pixel': Having taken these steps, if you click on Create Pixel, your correctly formatted Meta Pixel will be ready.
Installing Meta Pixel on Shopify
There are several ways you can add your Meta Pixel to Shopify. We don't recommend installing Events, via the Events Setup Tool inside the Meta Pixel itself, as this can generate potentially inaccurate tracking. Here we outline more reliable methods of installation (Shopify-Meta Pixel integration, directly into the code, or with Google Tag Manager), starting with the most straightforward option.
Option 1: Shopify Integration
Shopify understands the power of the Meta Pixel, so it has made connecting it a breeze. First you install the Facebook app in Shopify store.
To do this, search for "Facebook" in the Search bar at the top of your Shopify store page.

Then choose and install the "Facebook & Instagram" app.
Then proceed by taking the following steps:
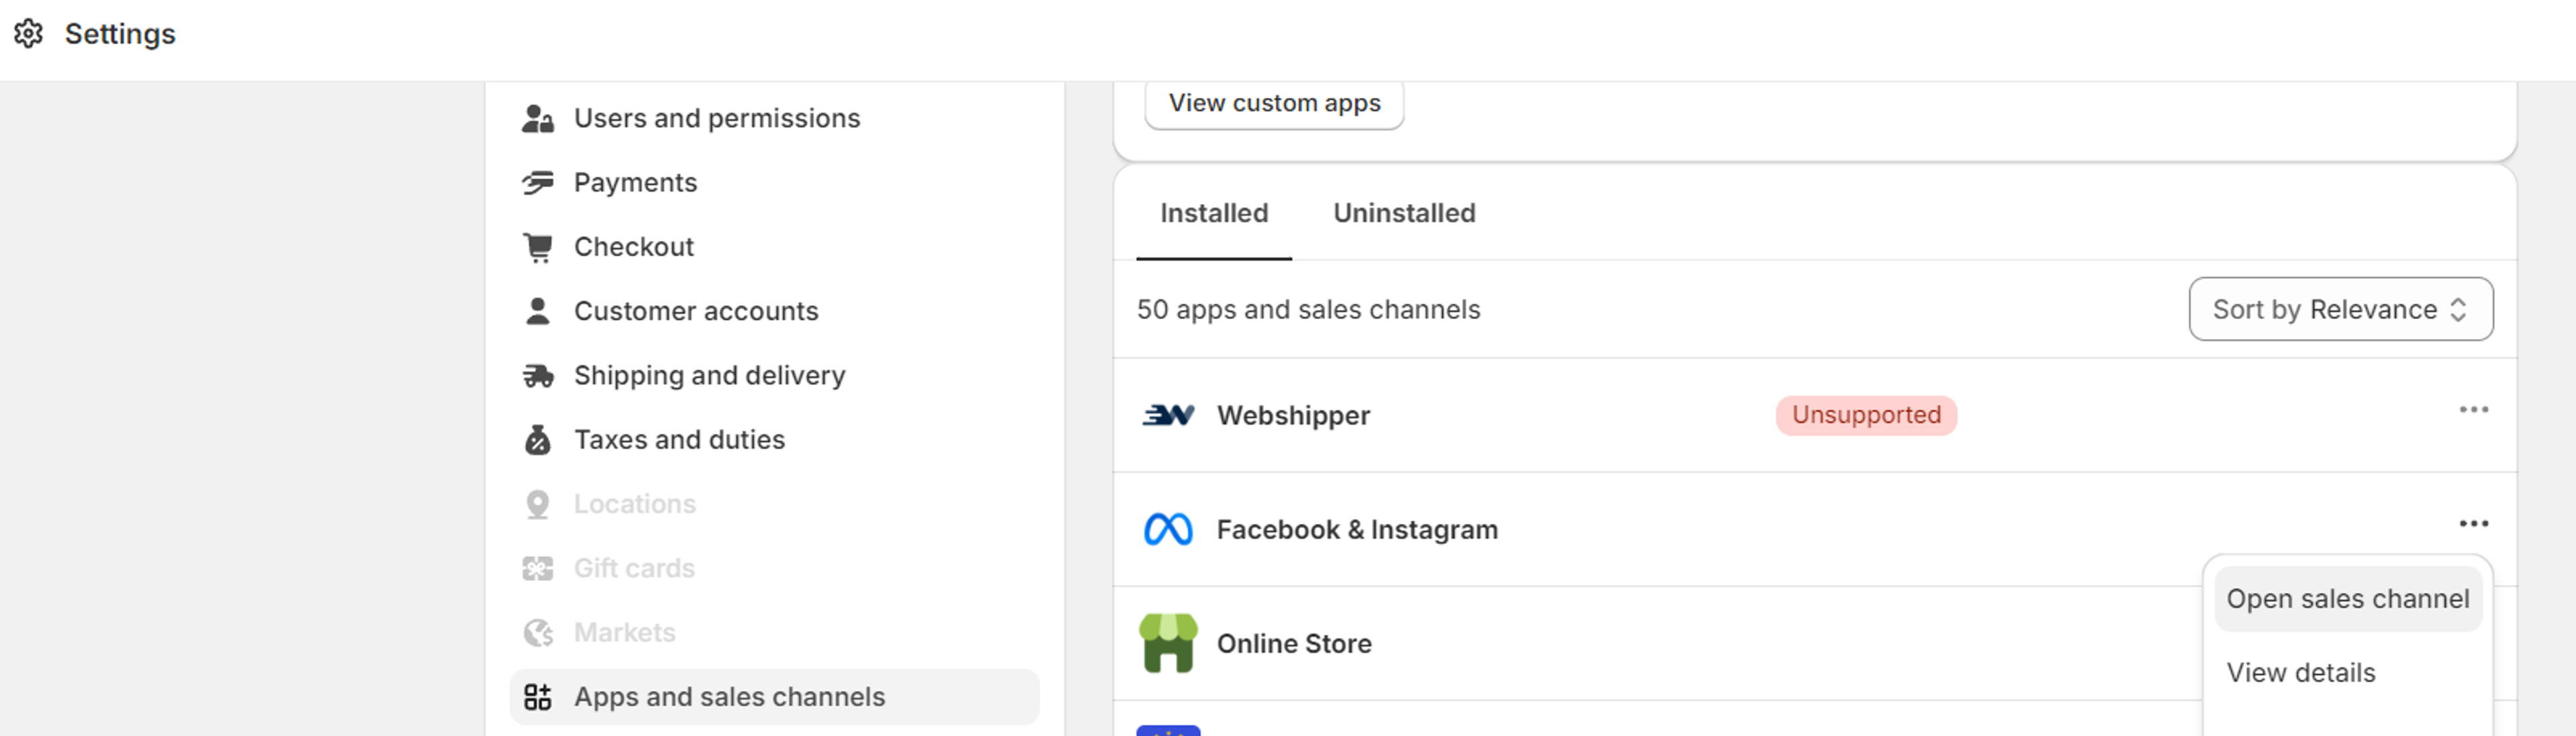
1. Find 'Settings': Look for "Settings" in the bottom left-hand corner of your dashboard and click on it.
2. Select 'Apps and sales channels': This will open up a new page with options for your store.
3. Open 'Facebook & Instagram': You should see that the Facebook & Instagram have been installed. Click on "Open sales channel".
4. Click 'Settings' within the Facebook and Instagram app.
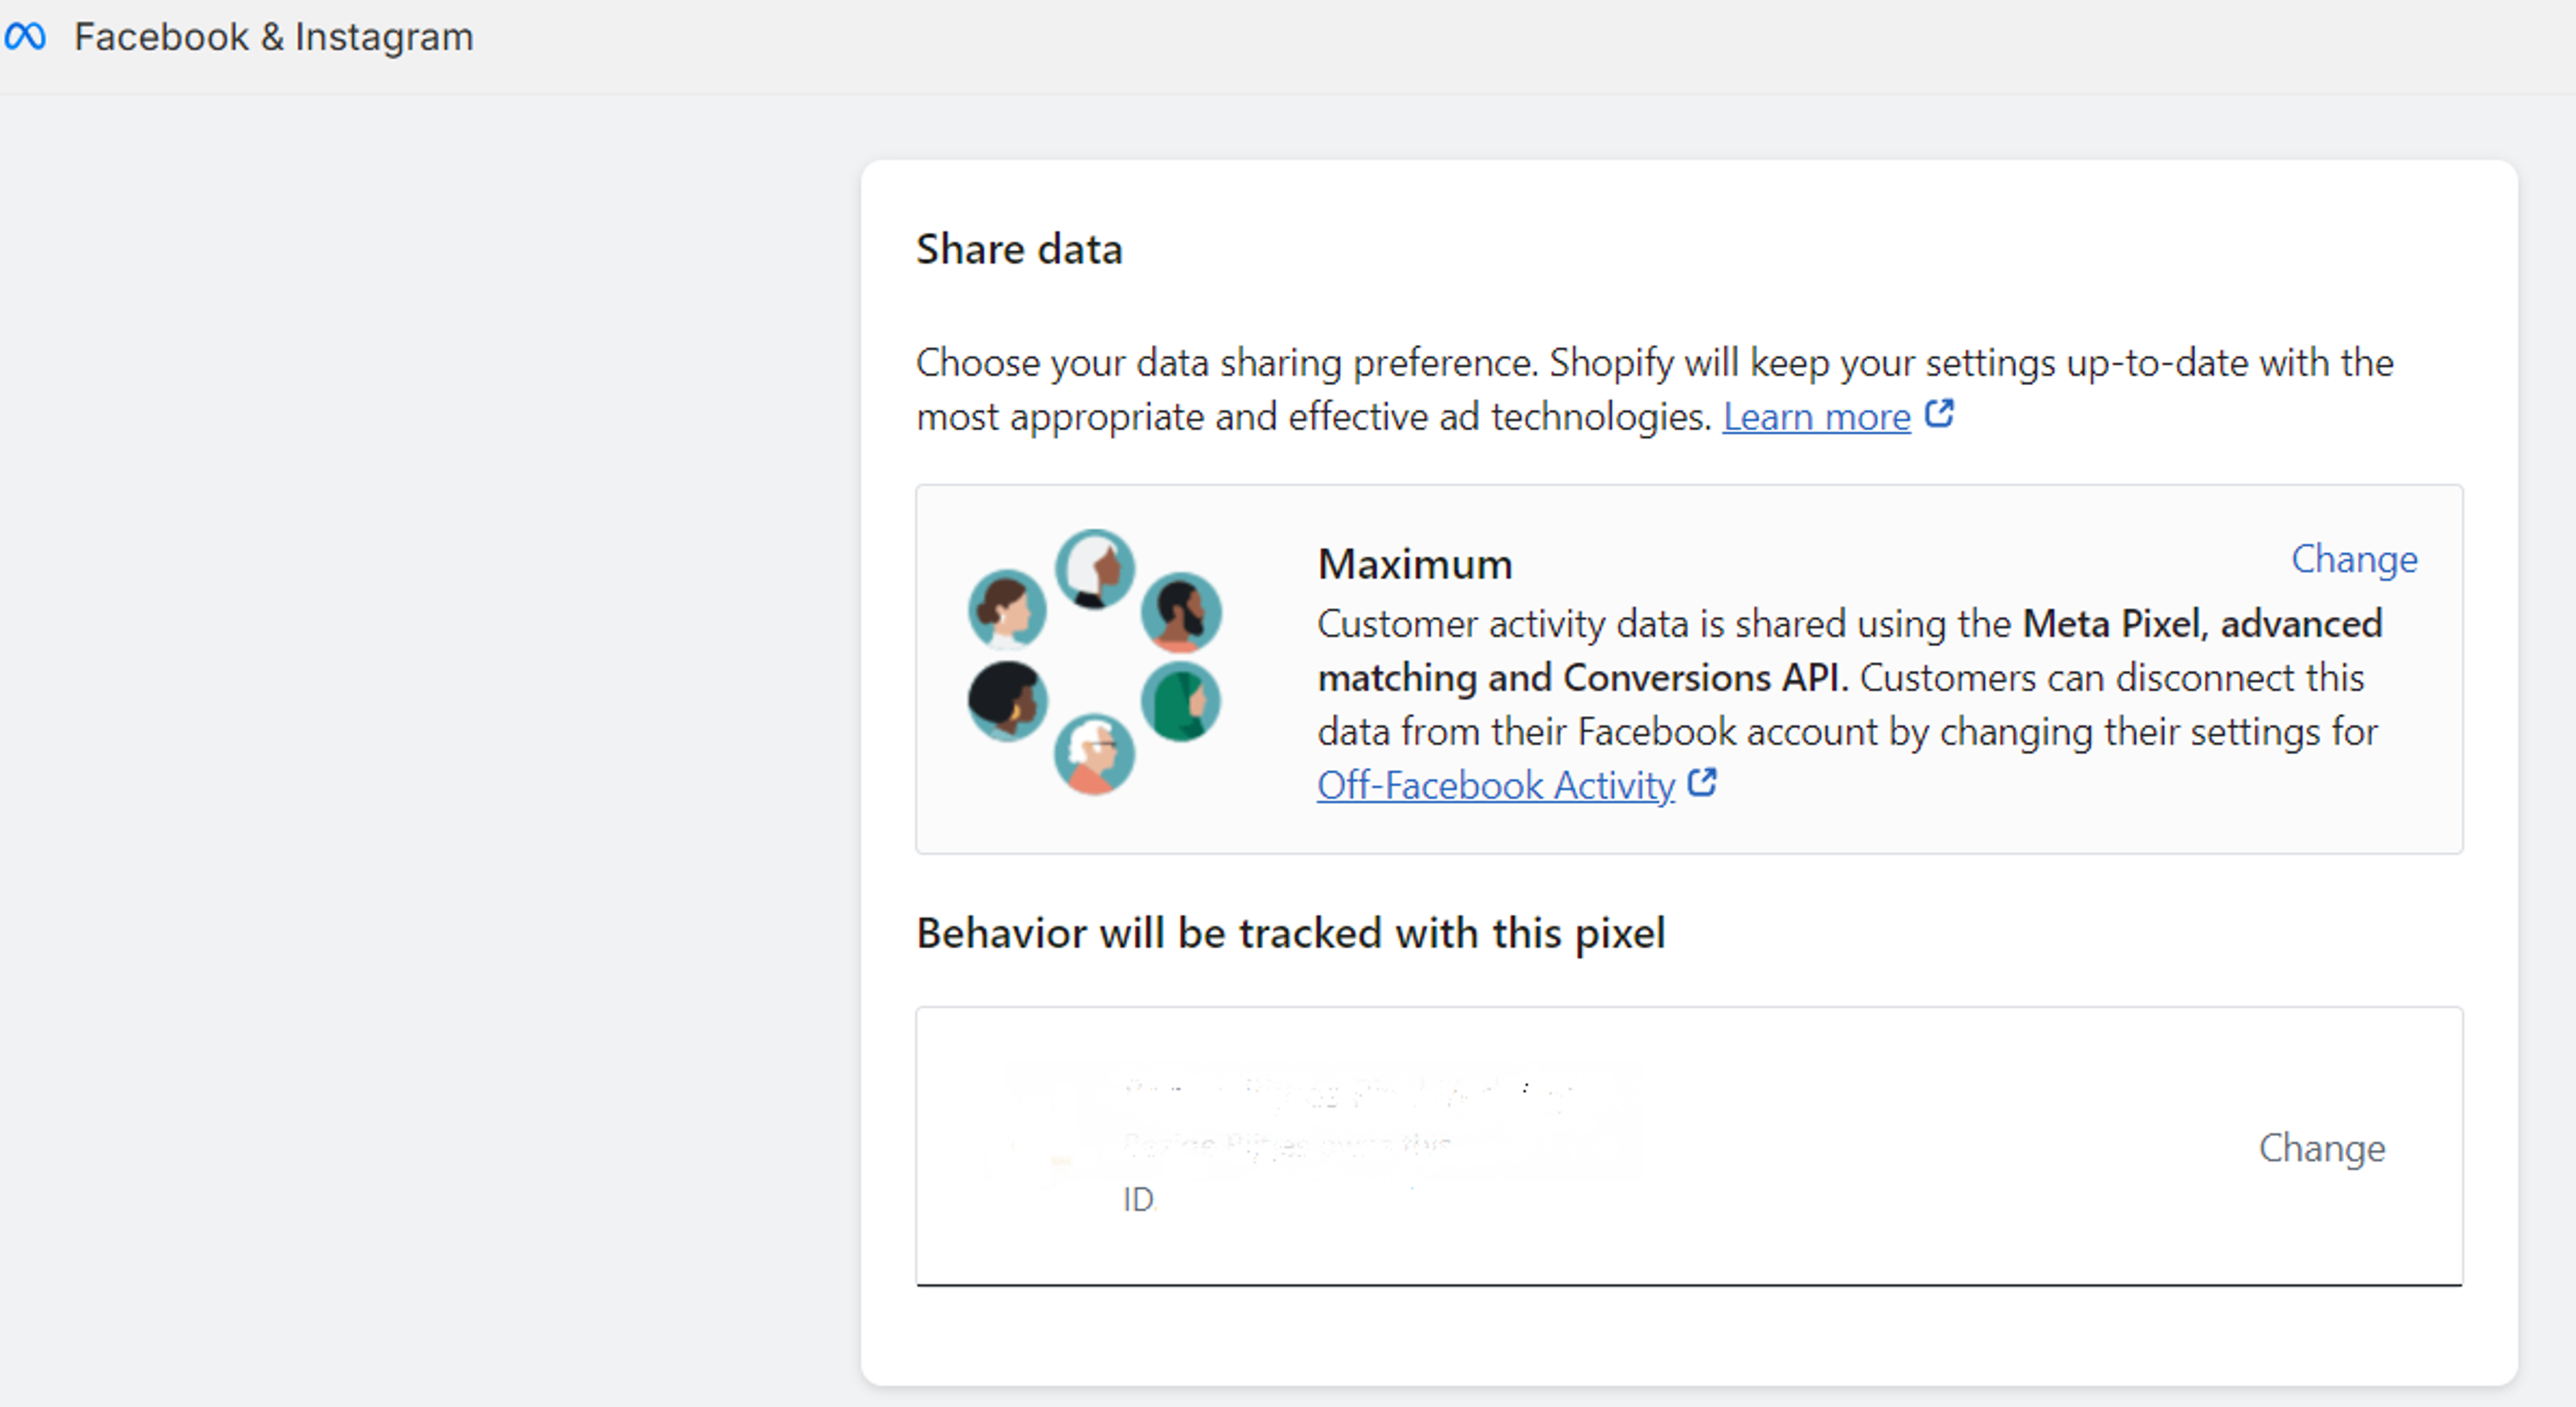
5. Go to 'Data Sharing Settings': Find the "Customer data-sharing" section and click on "Data sharing settings."
6. Enable Data Sharing: Toggle the "Enable data sharing" button to 'on'. We recommend selecting the "Maximum" option in the “Choose data-sharing level” section to produce more accurate data about your customers and events for the Pixel.
7. Select Your Pixel: A list of your Meta Pixels will appear. Choose the one you just created.
8. Hit 'Confirm': Click the "Confirm" button to save your changes. This will then install your Meta Pixel.
That's it! Shopify and the Meta Pixel are now happily connected. This method is super simple and avoids the need to mess around with code.
Option 2: Manual Installation directly into the code
If you are more conservative, and feel more confident with or even simply like basic code edits, this method is for you.
Important Note: Before you start, make a backup copy of your theme.liquid file just in case. Then you will be able to restore any changes if needed.
This is the process to follow:
1. In Shopify, go to 'Themes': From your Shopify admin dashboard, click on "Online Store" and then "Themes."
2. Find your active theme: You'll see the theme currently running on your store. Click the "Actions" button next to it and select "Edit code."
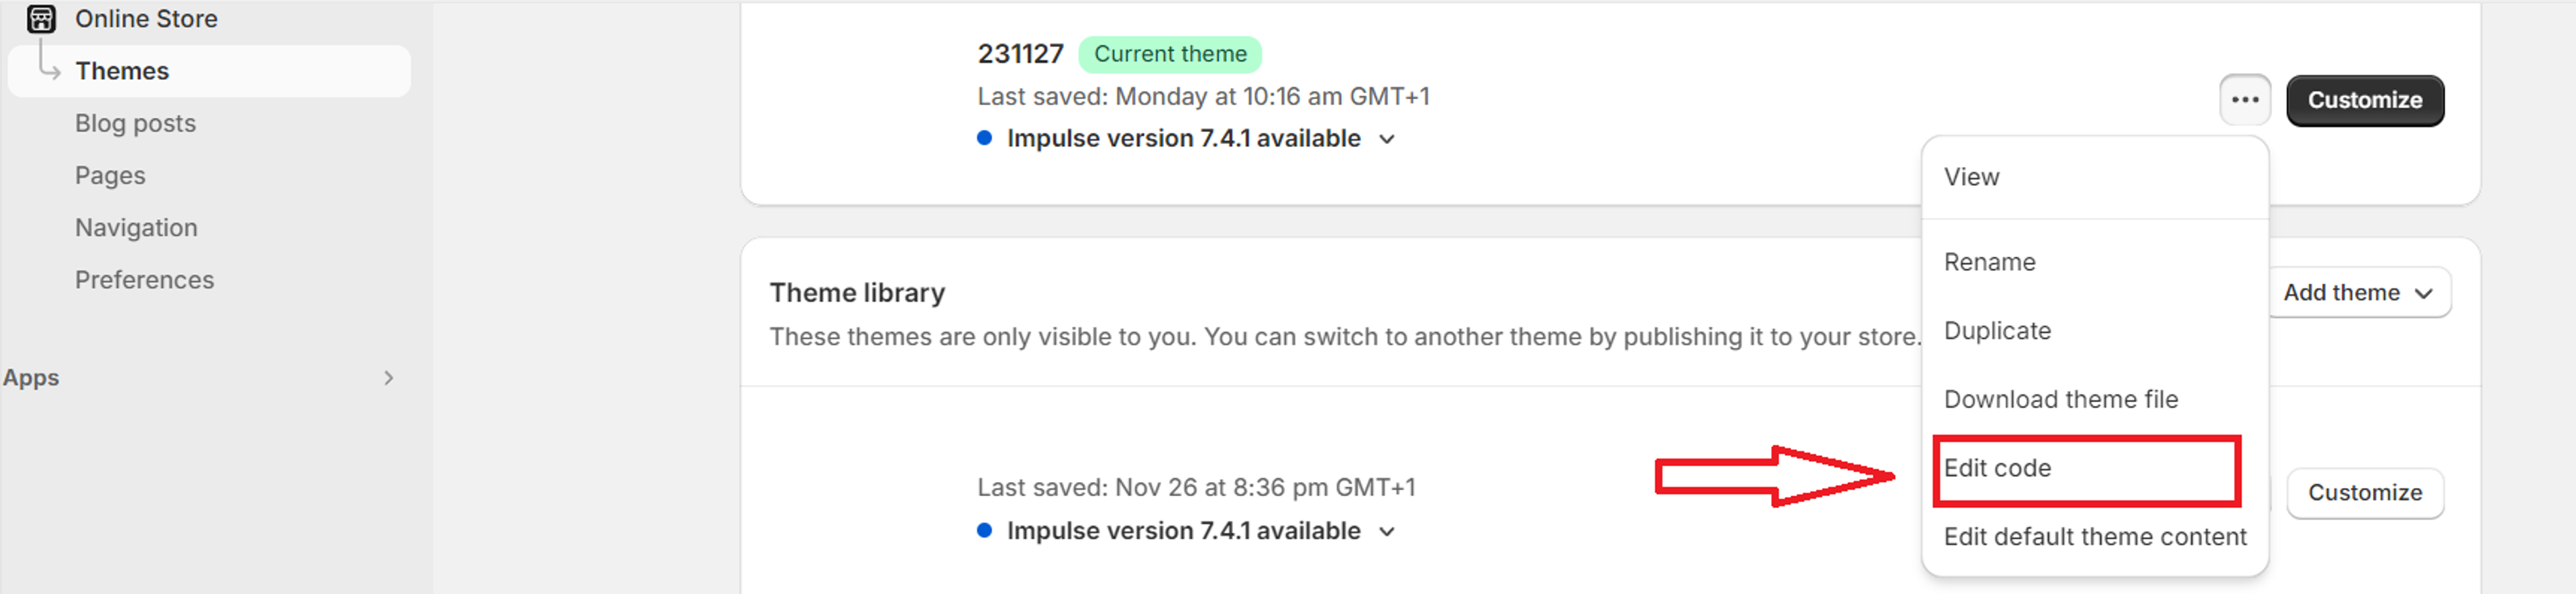
3. Locate 'theme.liquid': In the code editor's file list, look for the "Layout" section and click on "theme.liquid."
4. Find the <head> tag: Scroll through the code until you see a <head> tag at the top, which will be accompanied by a closing </head> tag.
5. Get your Meta Pixel code: Back in Facebook's Events Manager, find your newly created Meta Pixel and click on "Setup".
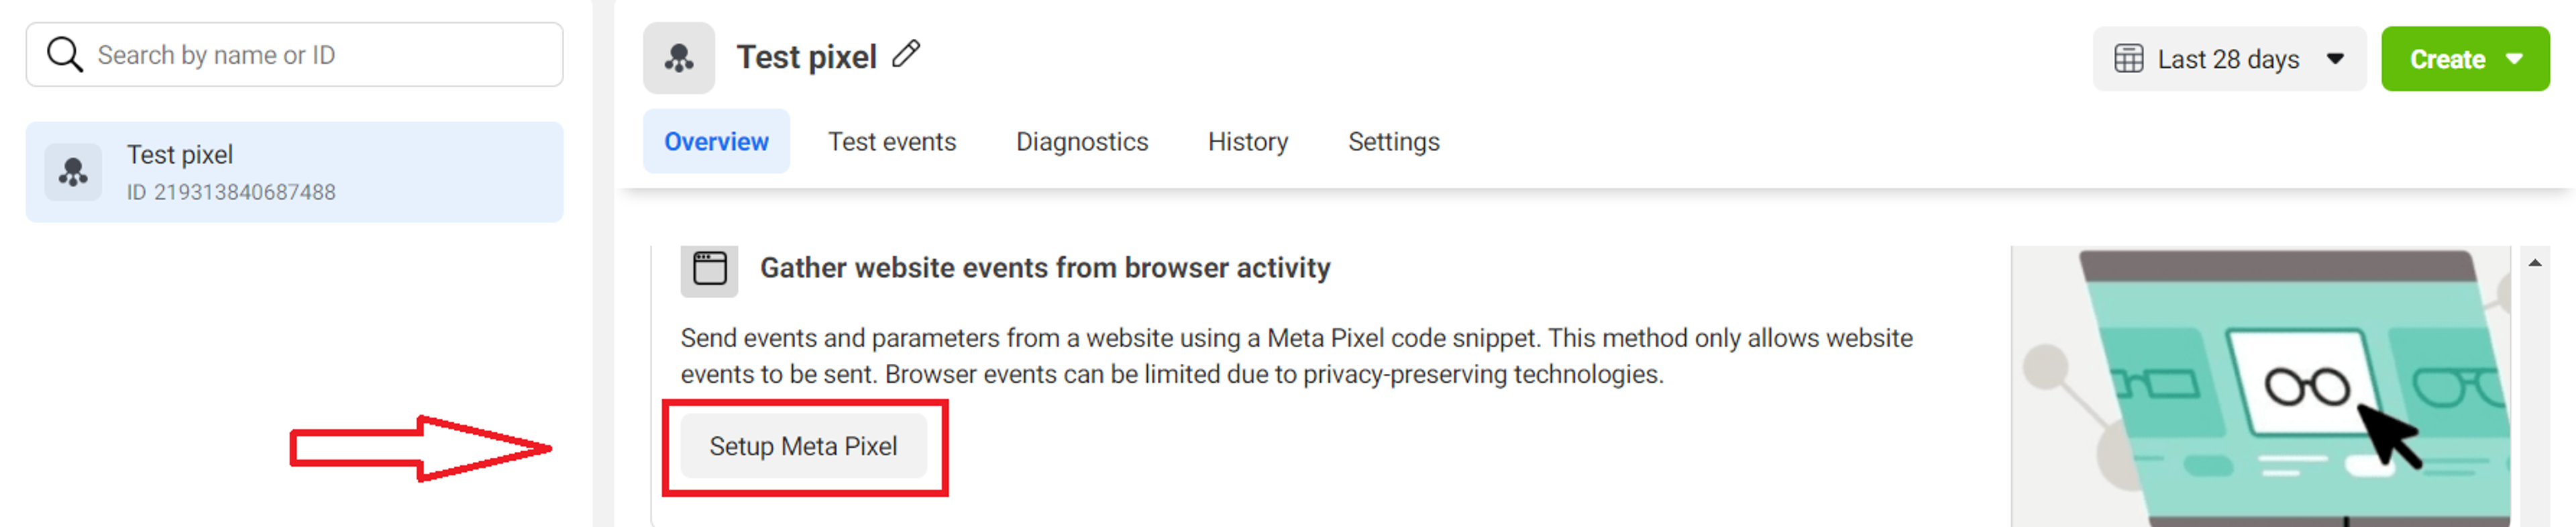
Choose the "Manually add pixel code to website" option and copy the entire code snippet by pressing the "Copy Code" button.
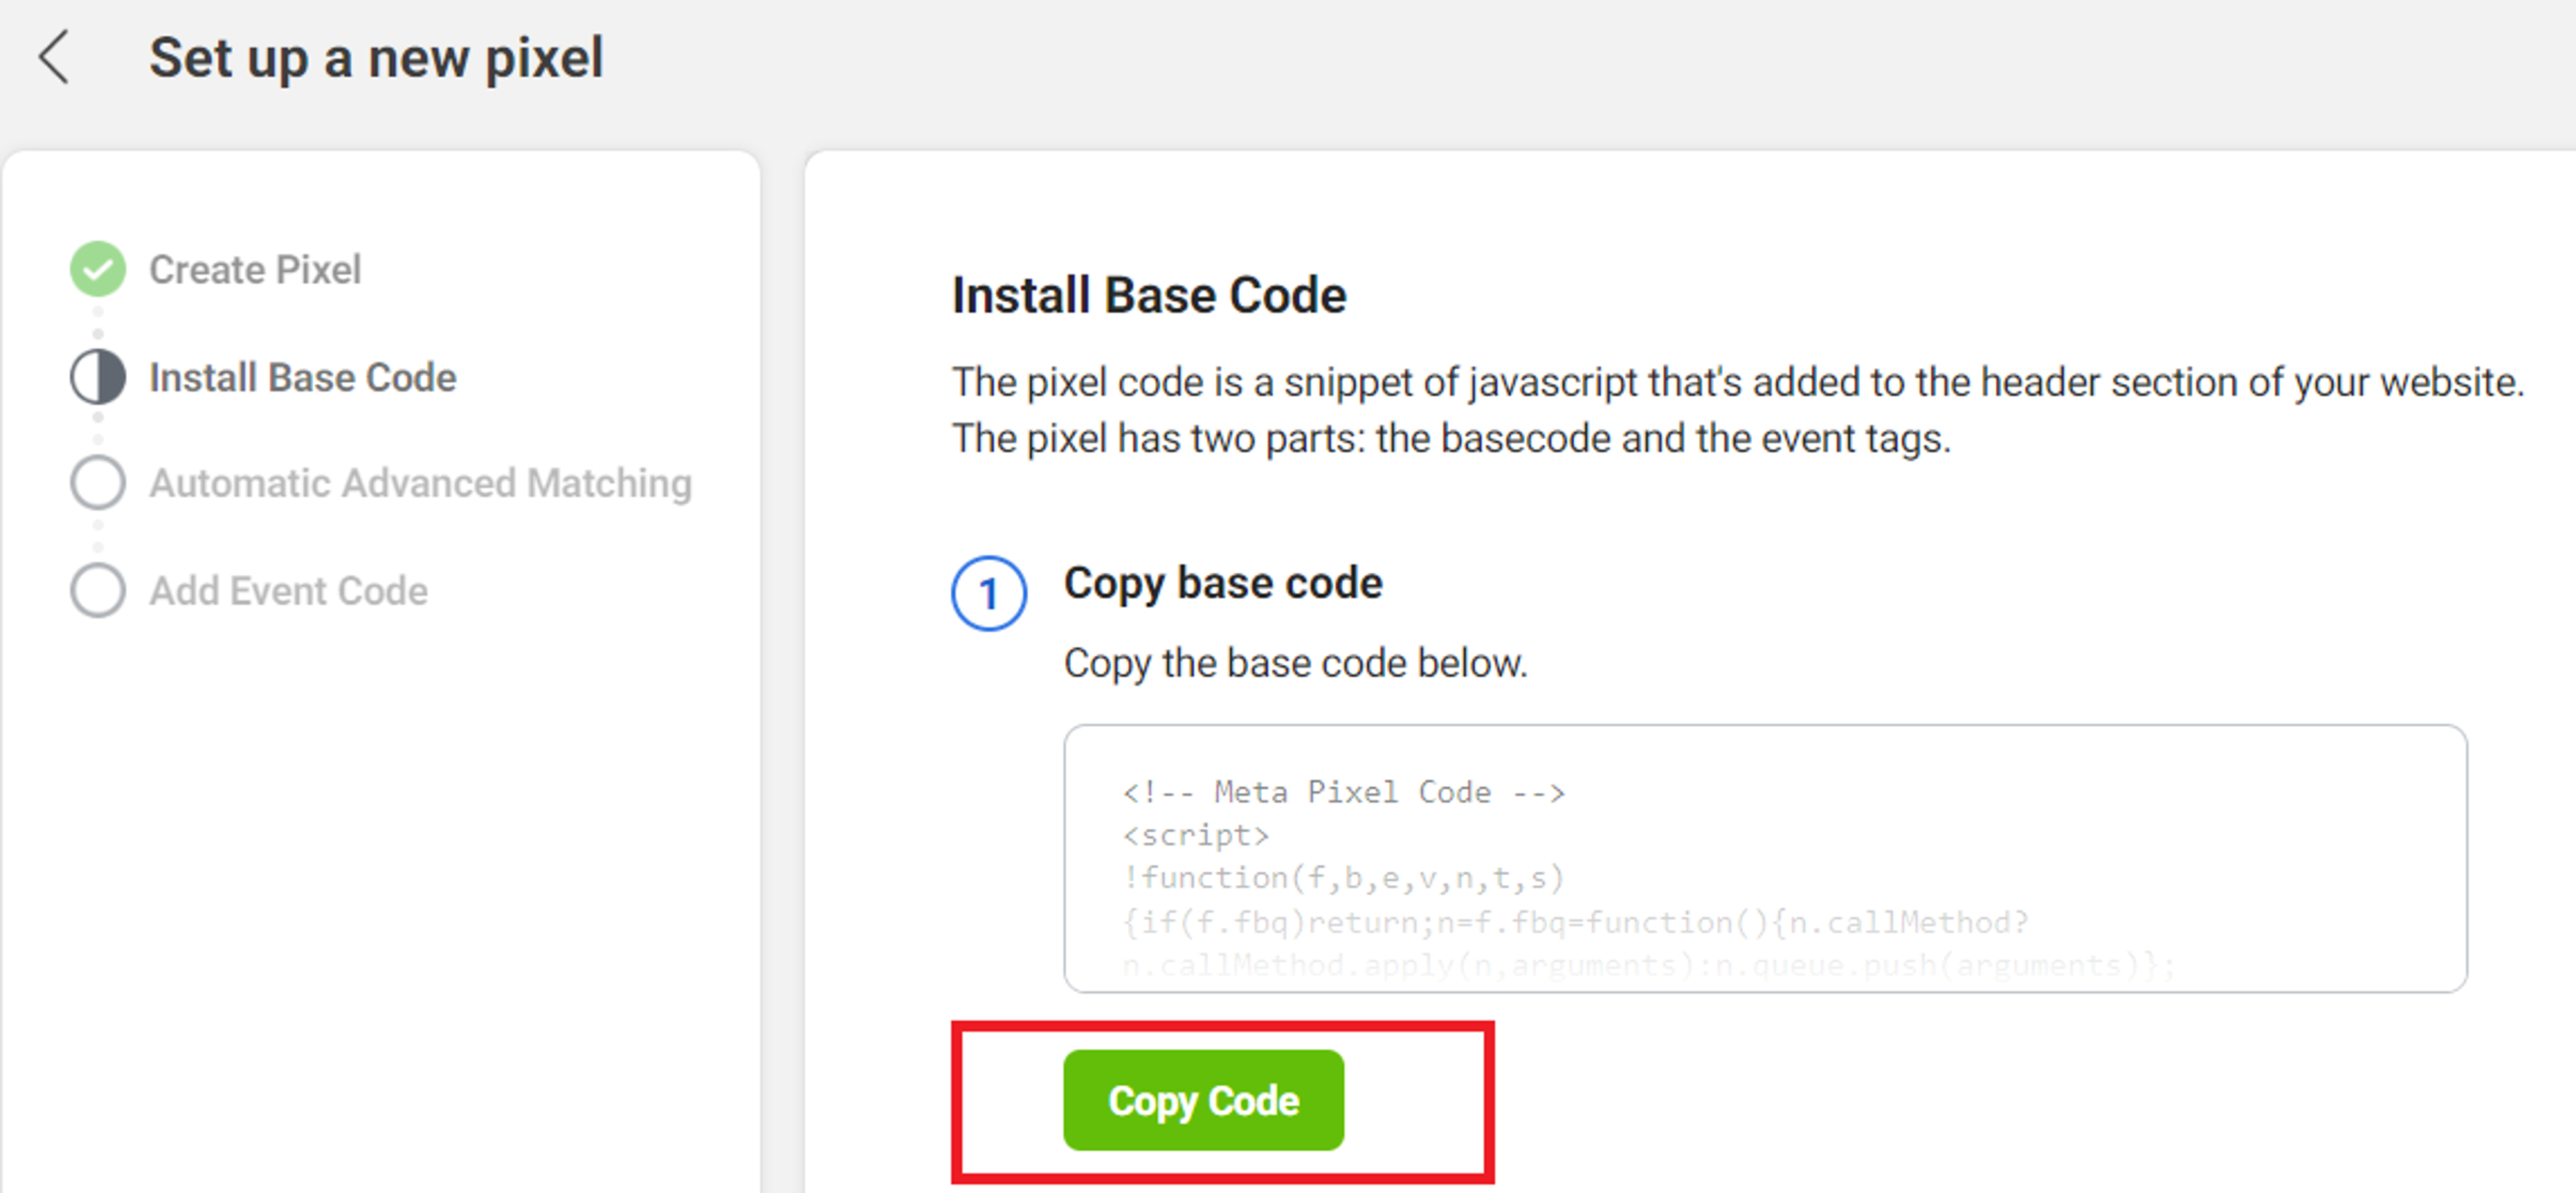
6. Paste the code: Go back to the Shopify store tab and within the theme.liquid file, paste the Meta Pixel code you just copied right between the <head> and </head> tags, preferably not far from the starting <head>
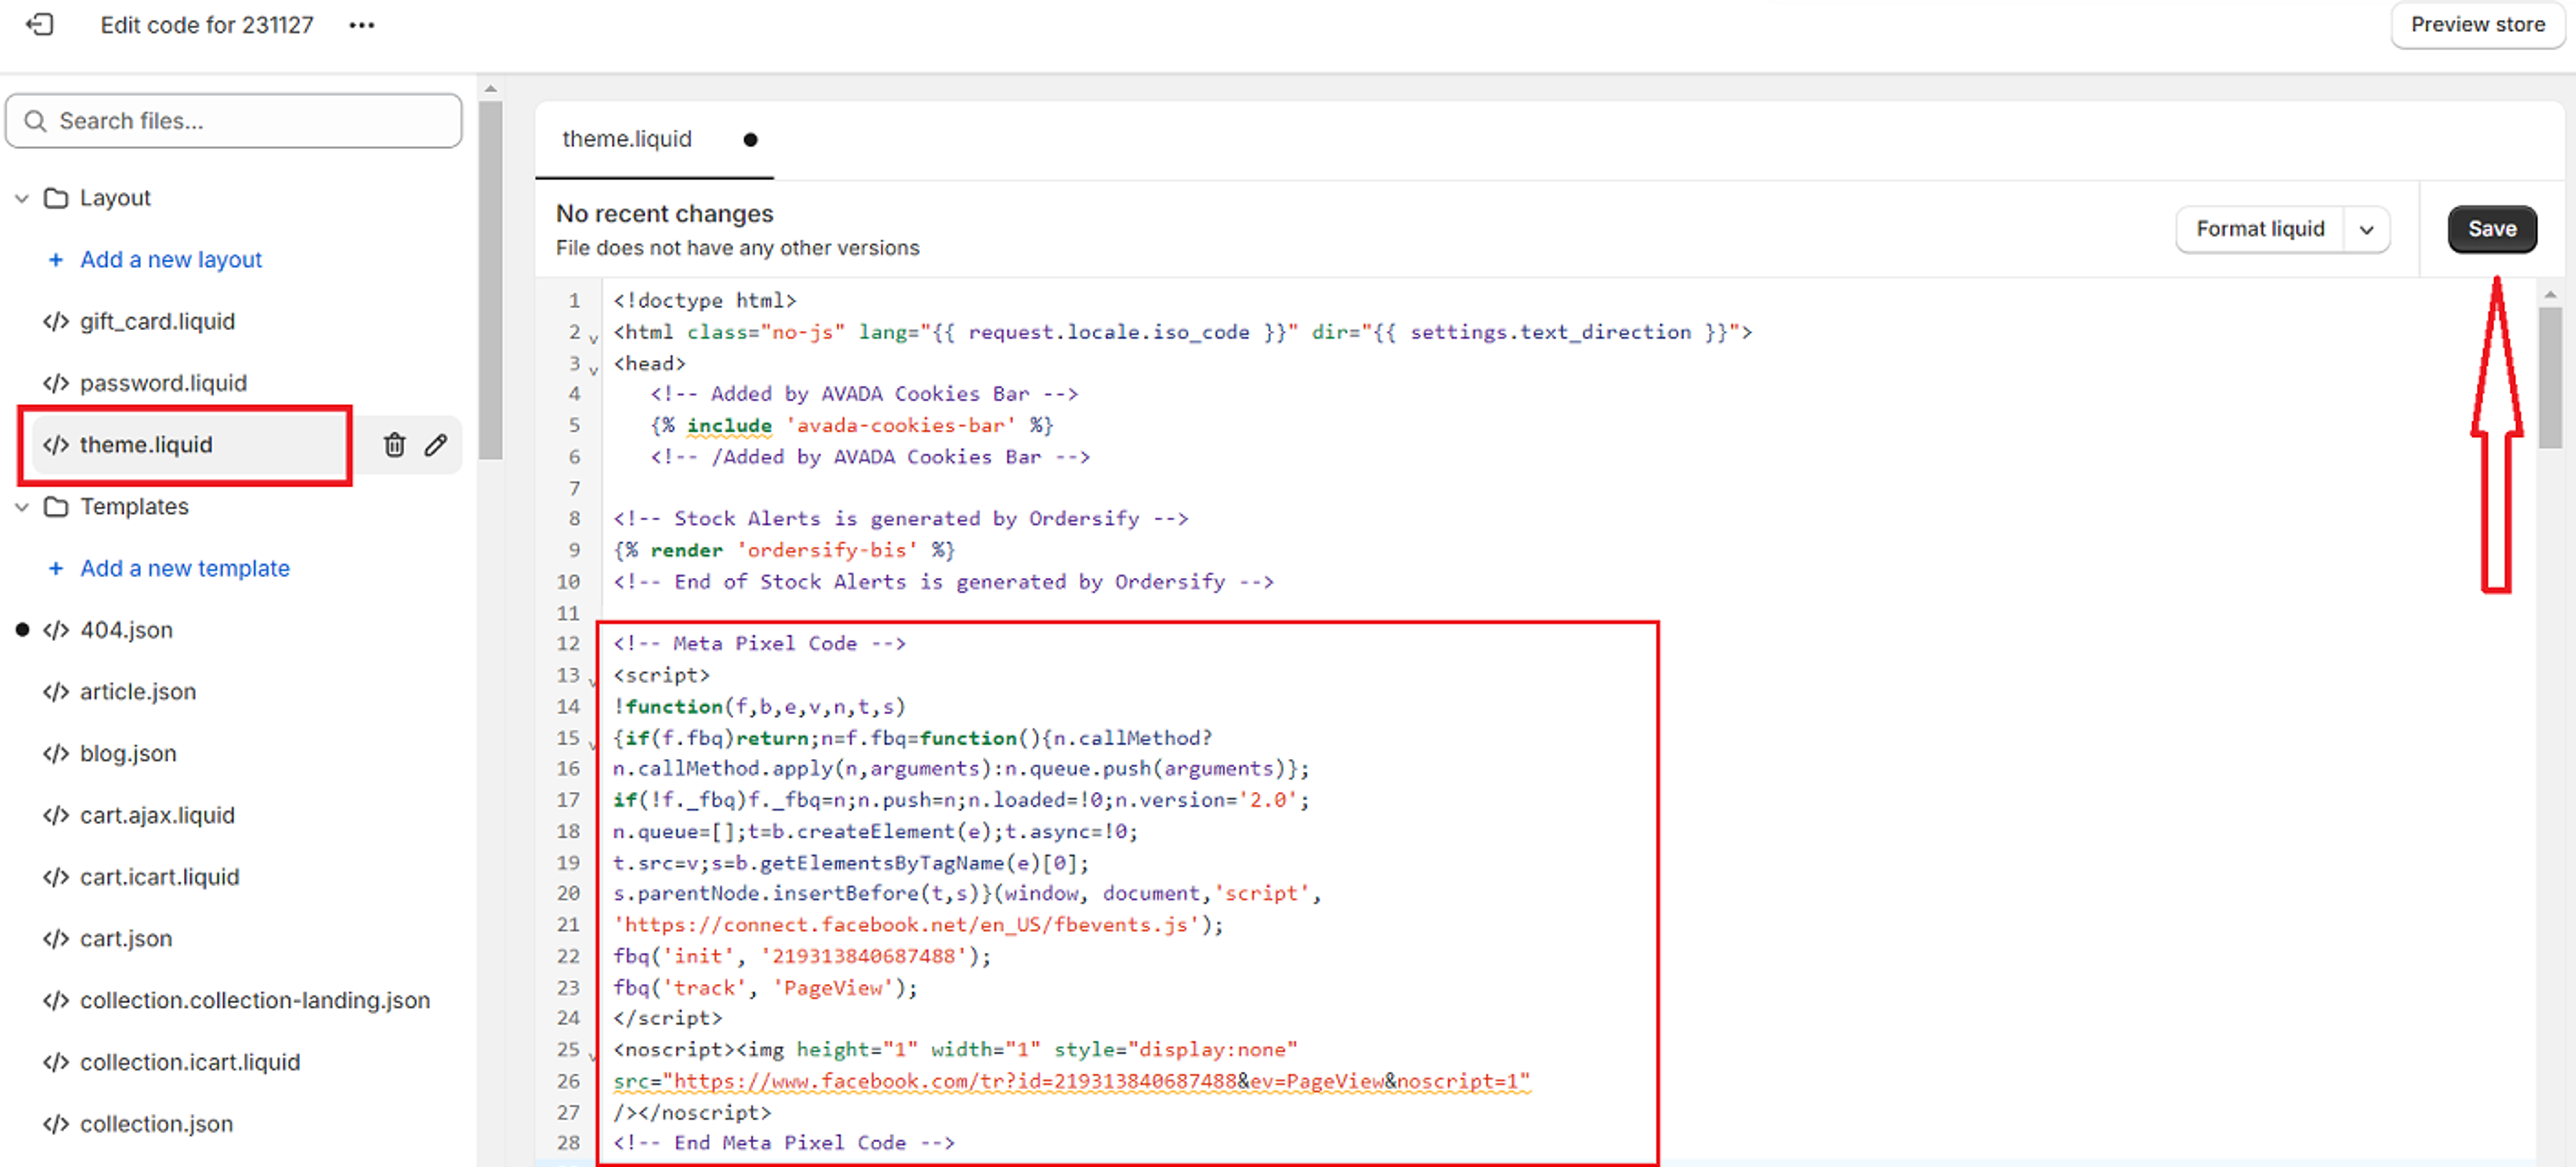
7. Click 'Save': Save your changes to the theme.liquid file.
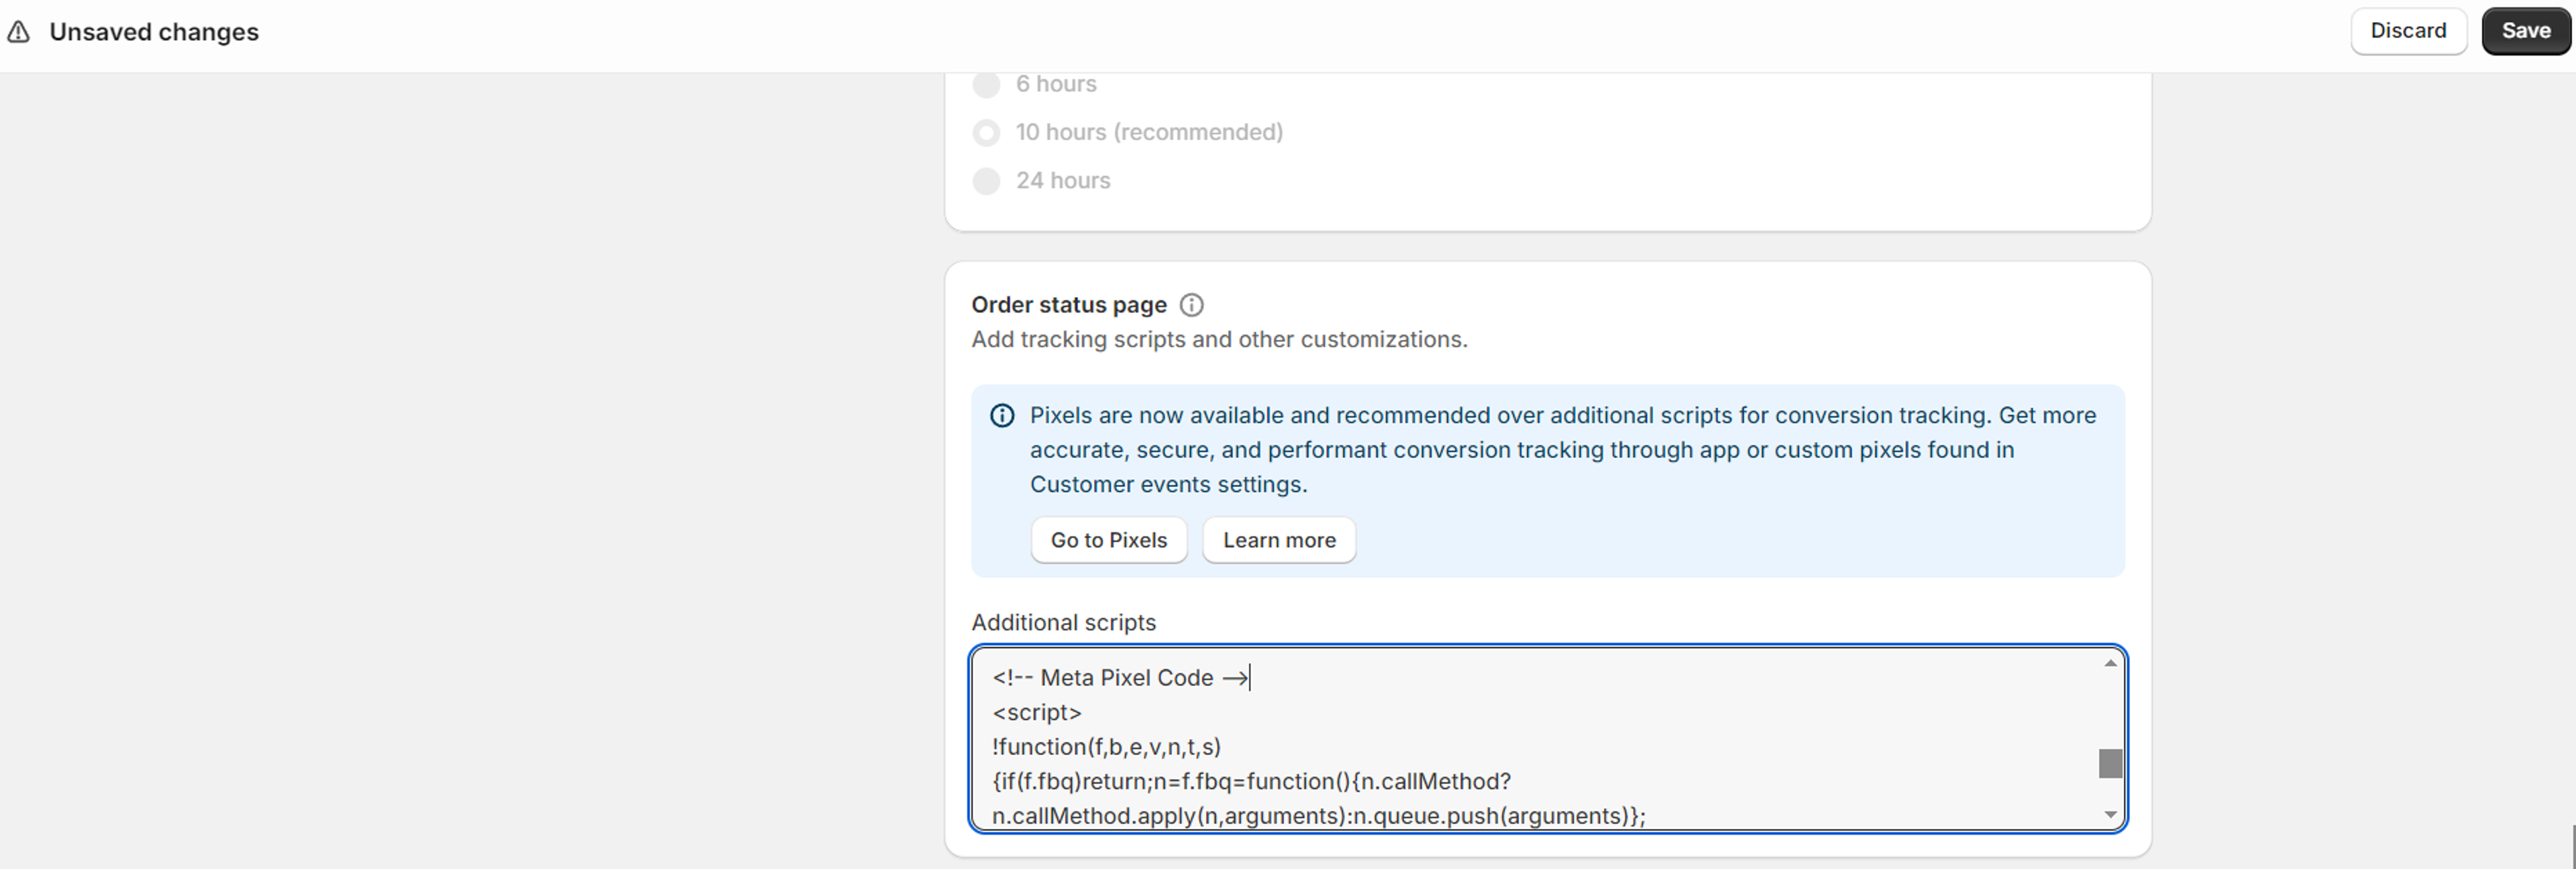
8. Last step: You'll also need to ensure that your "thank you" page is tracked by the Meta Pixel. In order to do this, open your Settings-Checkout section in Shopify and scroll down to the Order status page-Additional scripts field. Paste the copied Meta pixel code again, and press "Save"
You did it! Your Meta Pixel is now manually installed in your Shopify store.
Option 3: Manual Installation with GTM
This option is for those who want to achieve the highest level of control of the Meta Pixel tracking. Installing your Meta Pixel with GTM empowers you to segment its operation, so that the Meta Pixel will or won't fire on any desired page of your website. You will also be able to create as many Pixel events as you want upon the application of any desired triggers.
Assuming you have created your Google Tag Manager account and container, let's dive into the steps needed to install Meta Pixel tracking with GTM.
1. Complete the steps 1-4 of the previous option: This is needed to install the GTM snippets to your Shopify store code.
2. In your GTM account: Open your created GTM container, then press the container ID on the main page.

You'll see the Google instructions alongside your GTM container snippets. Press "Copy" for the first part of the instruction. This will give you the opportunity to install that code in the <head> tag in your Shopify code.
3. Paste this code: Open your Shopify tab and paste the code as near as possible to the <head> tag.
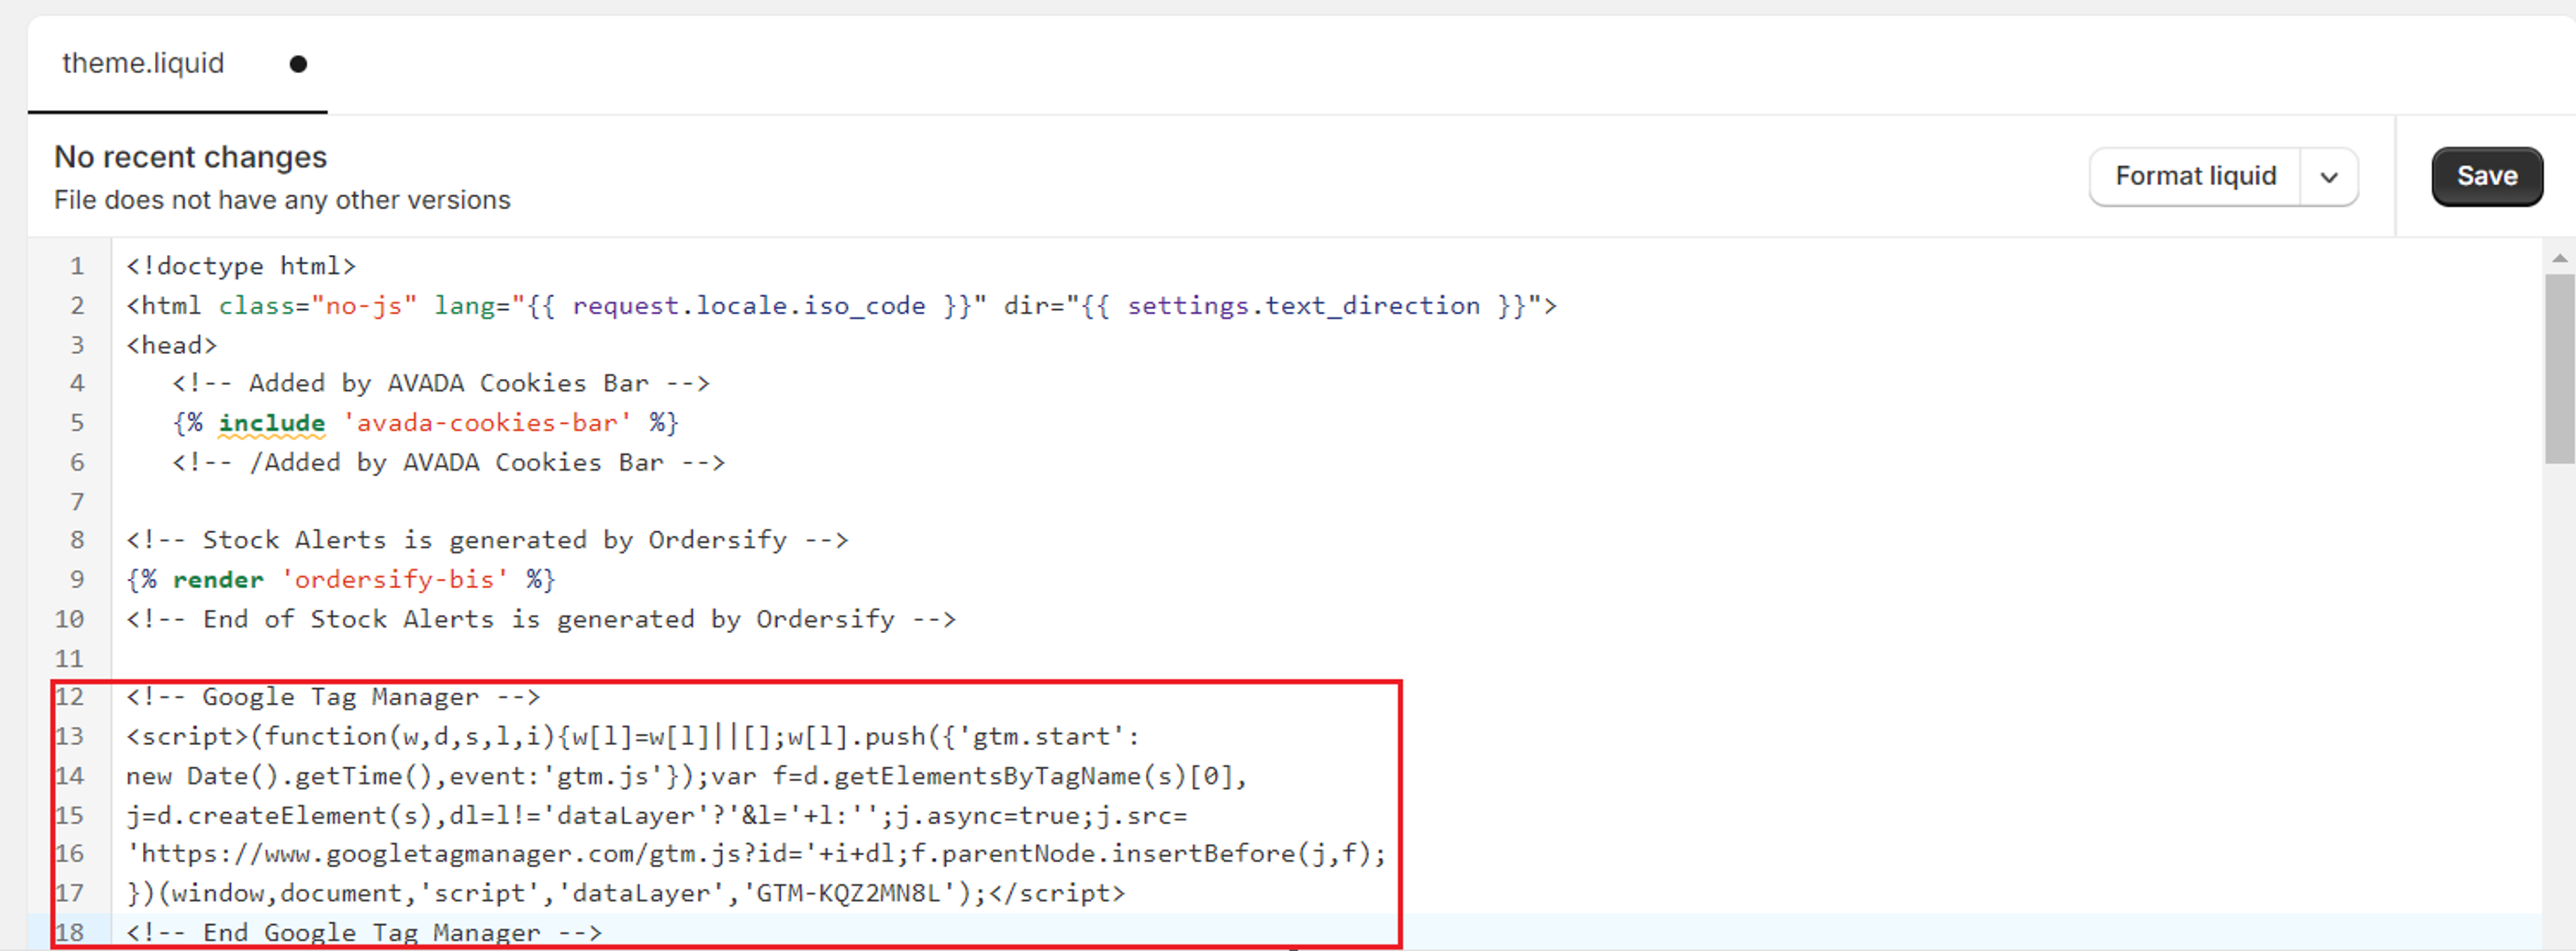
Press Save, and repeat the process for the second part of the GTM script by locating the <body> tag in the theme code below and installing the second GTM snippet there.
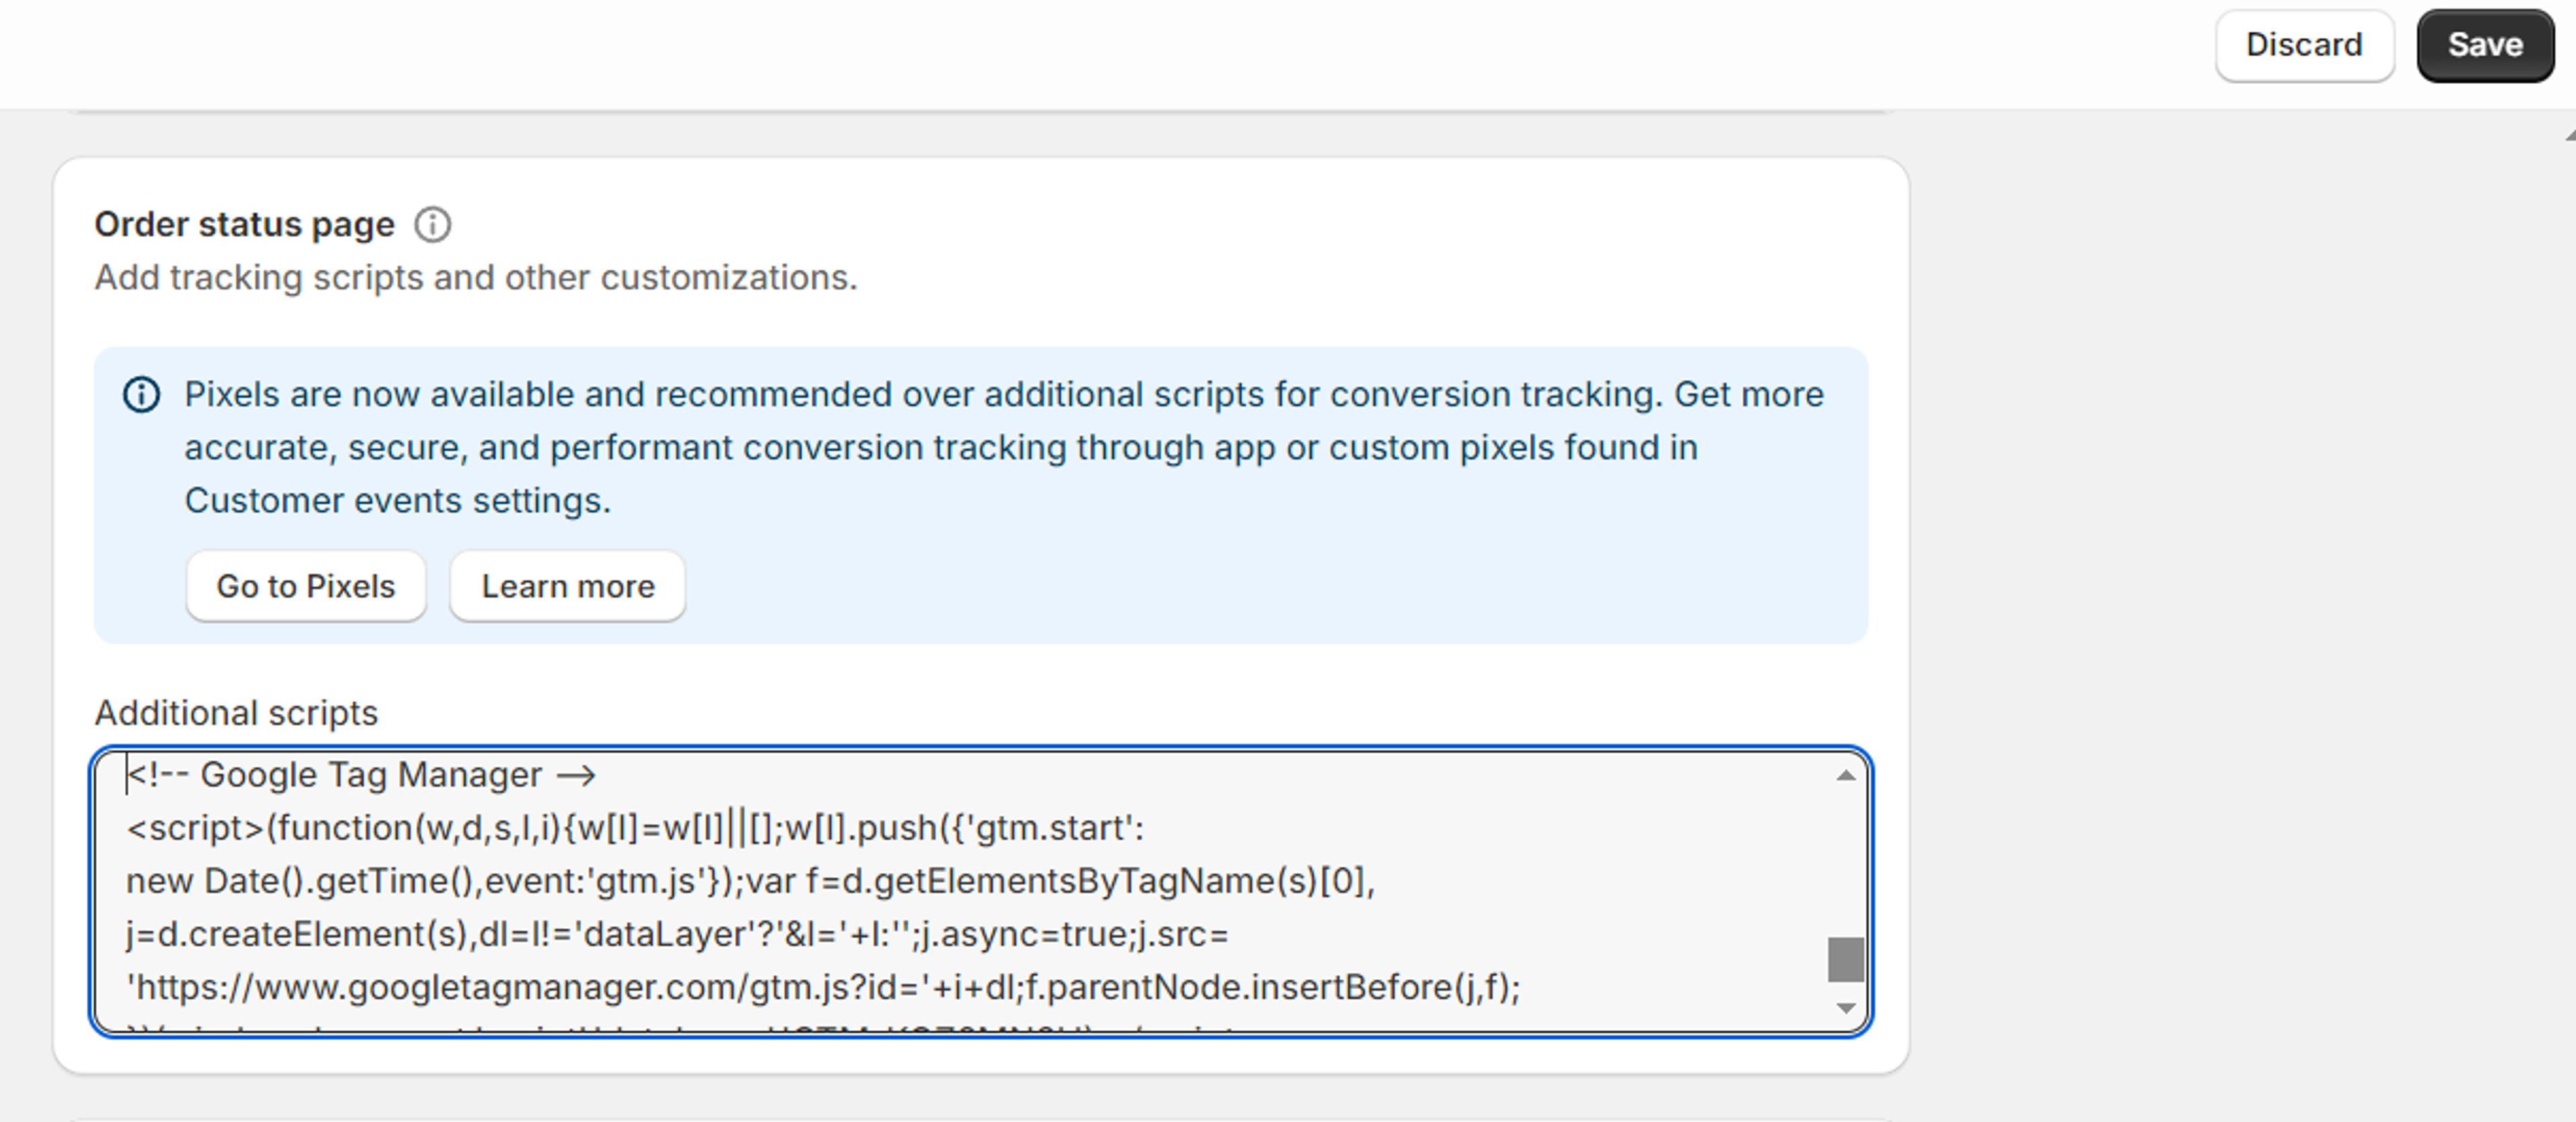
As with Step 8 of the instructions for the previous option, you'll need to install just the first part of the GTM to the "Order Status Page-Additional Scripts" field to achieve Thank You page tracking. This will appear on your page as follows:
4. Open your GTM container again: Press the "Add a new tag" button on the main page.
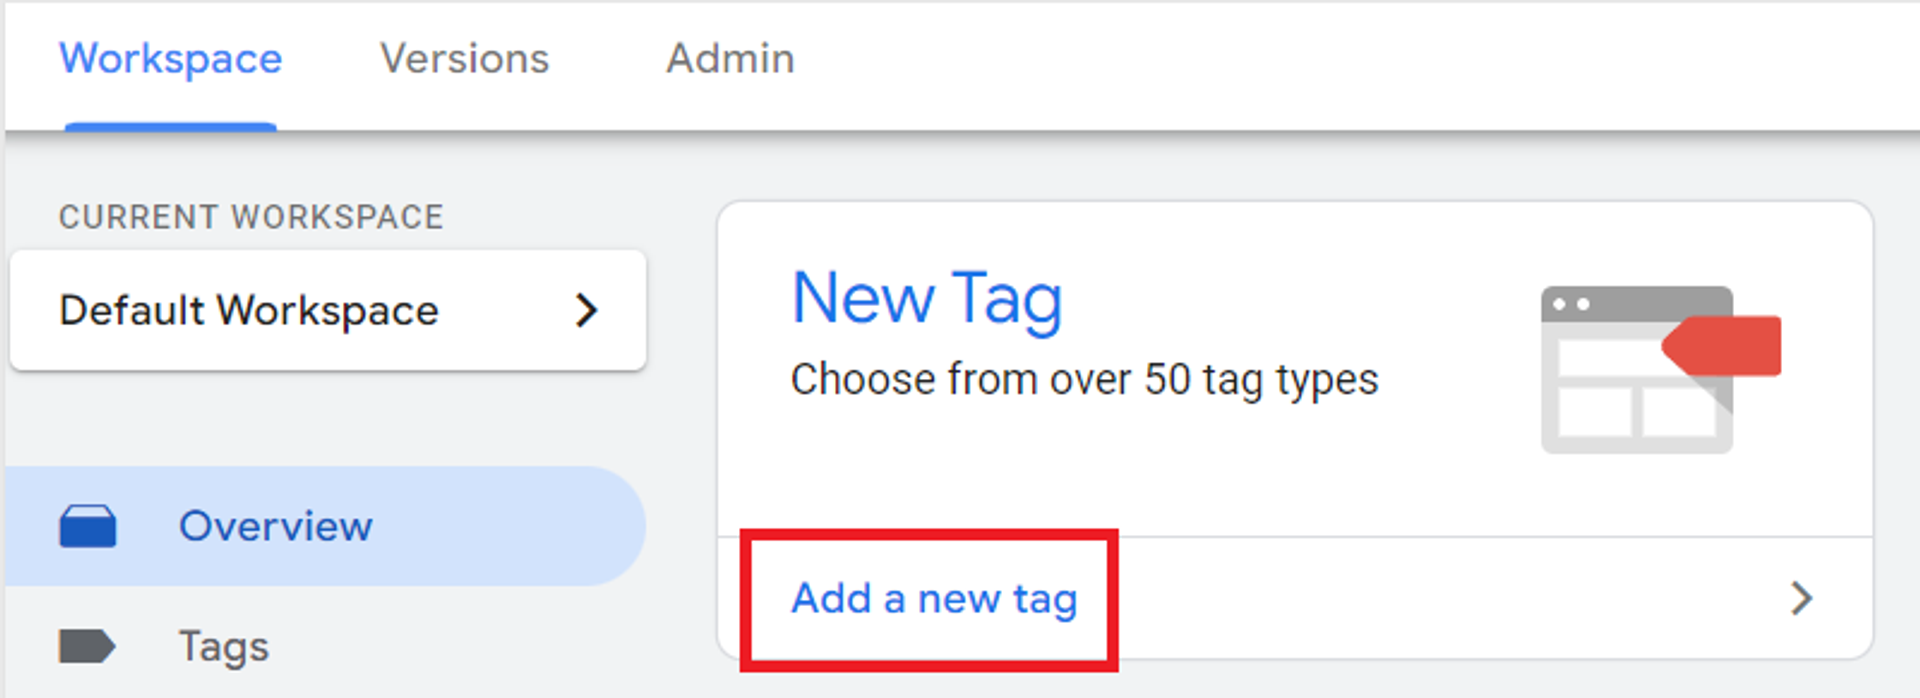
Then the "Tag configuration"-"Discover more tag types" button.

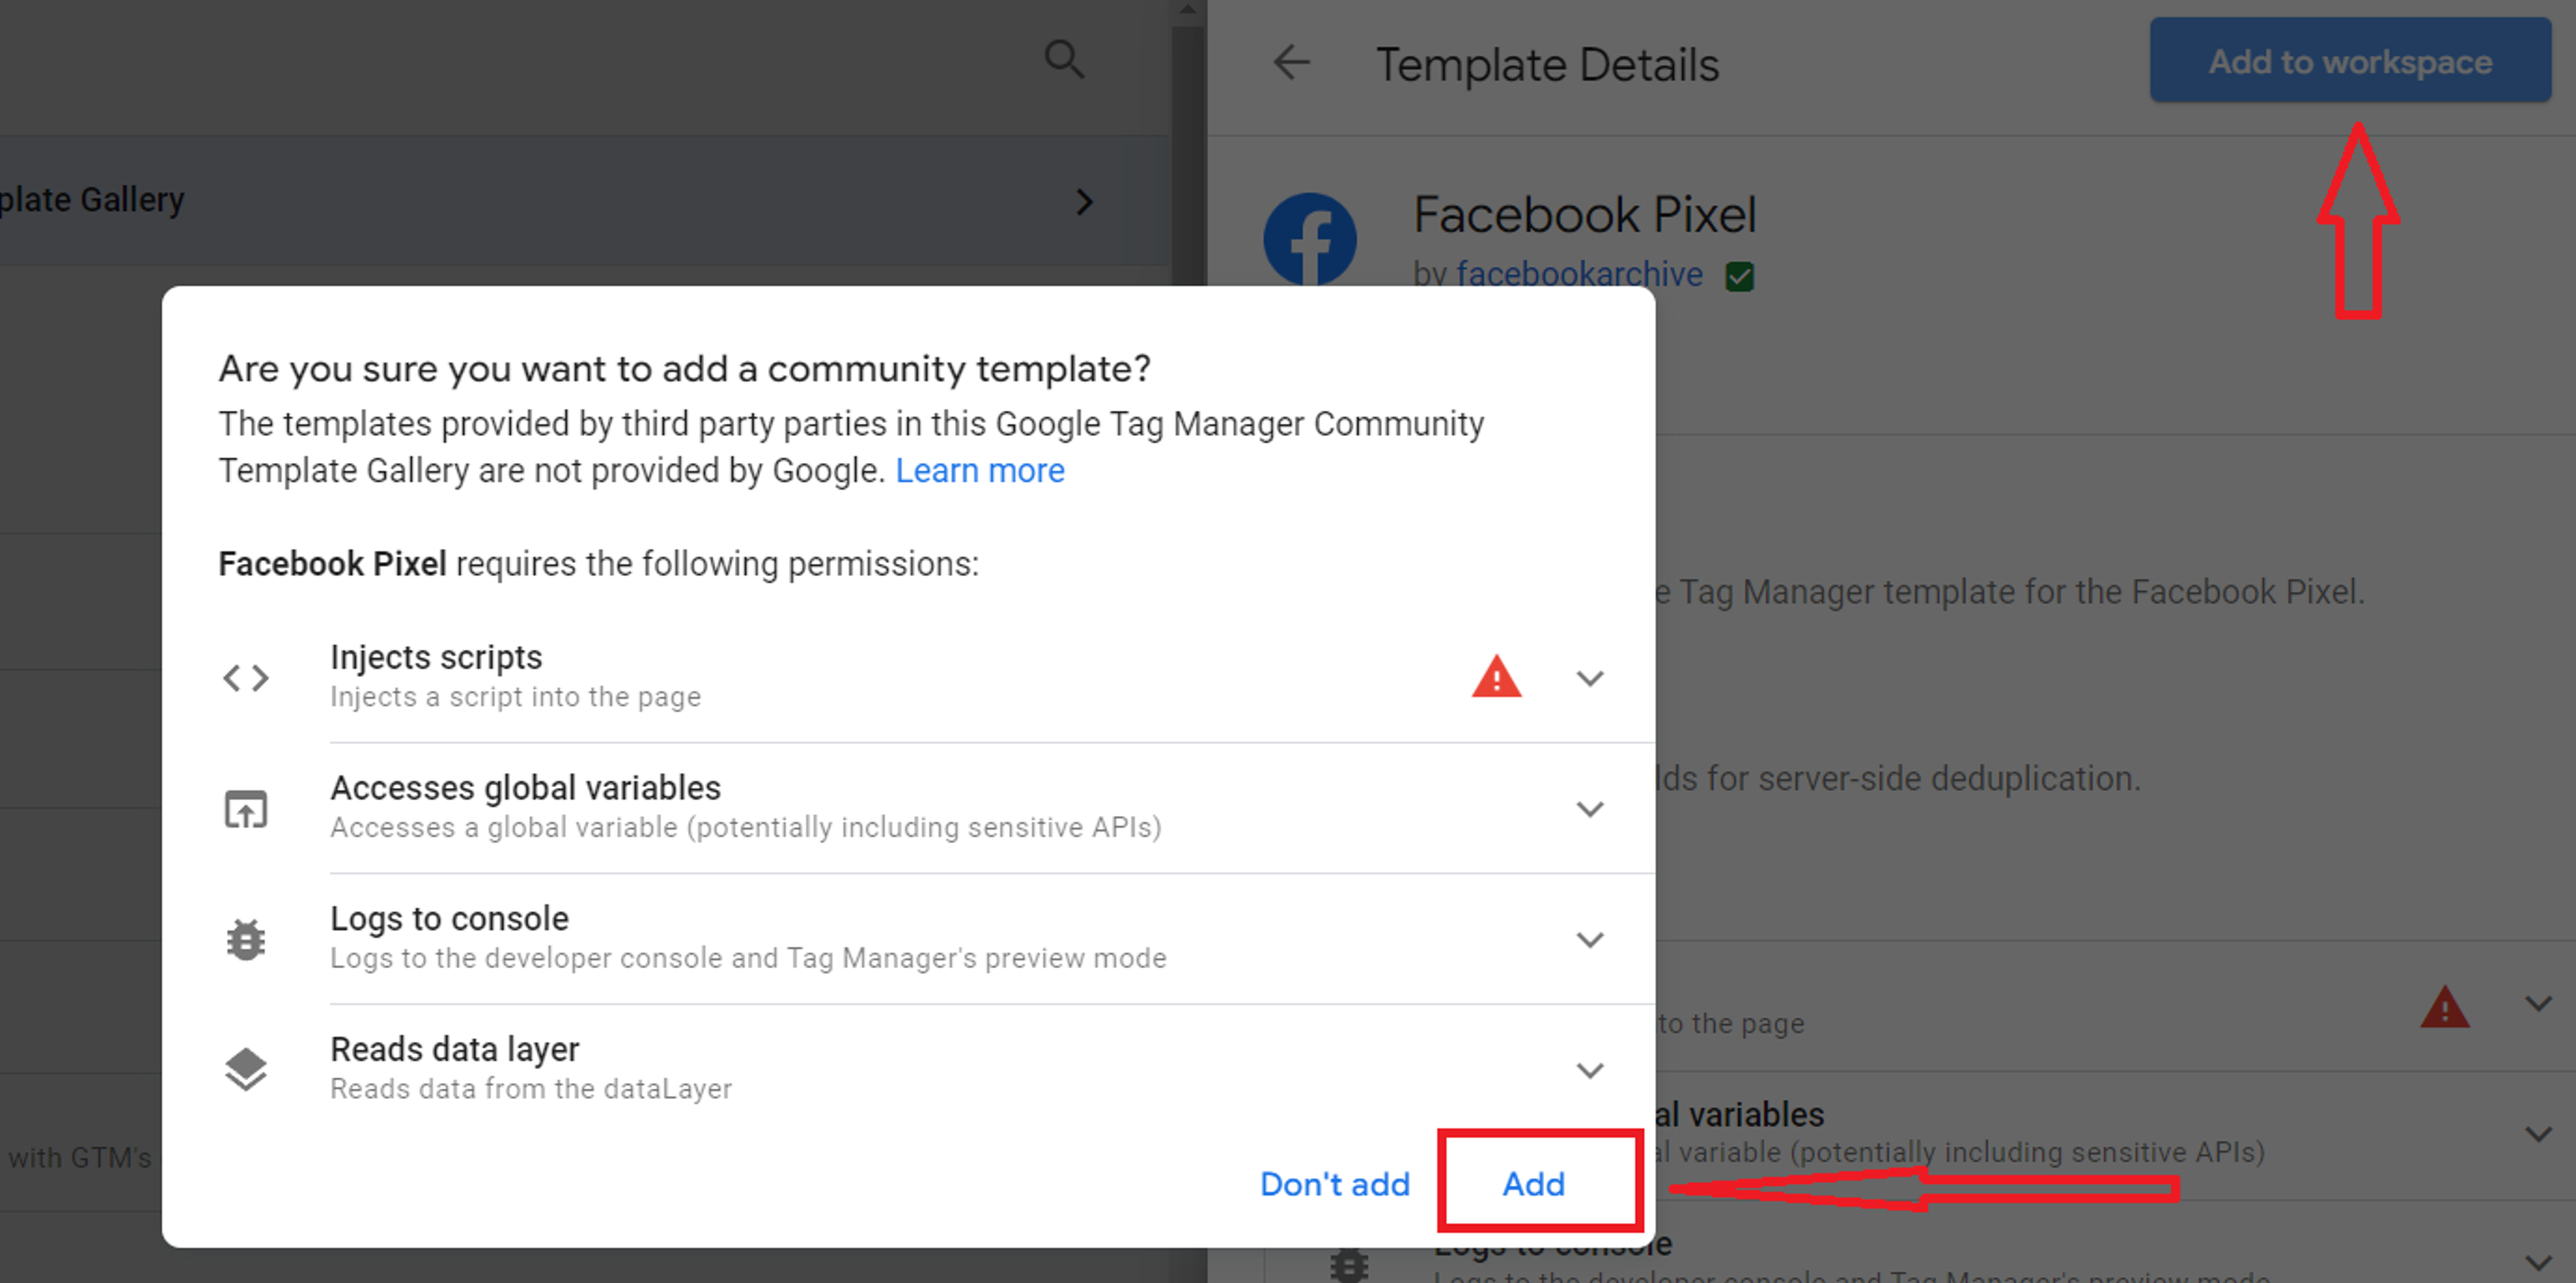
Then look for this official Facebook Pixel template tag.

Then press "Add to workspace" and "Add".
5. Template will be automatically added: The next step is to name your tag so that you can evaluate its effectiveness and develop a consistent naming policy to ensure ongoing control. You then need to add your Meta Pixel ID from your Events Manager.
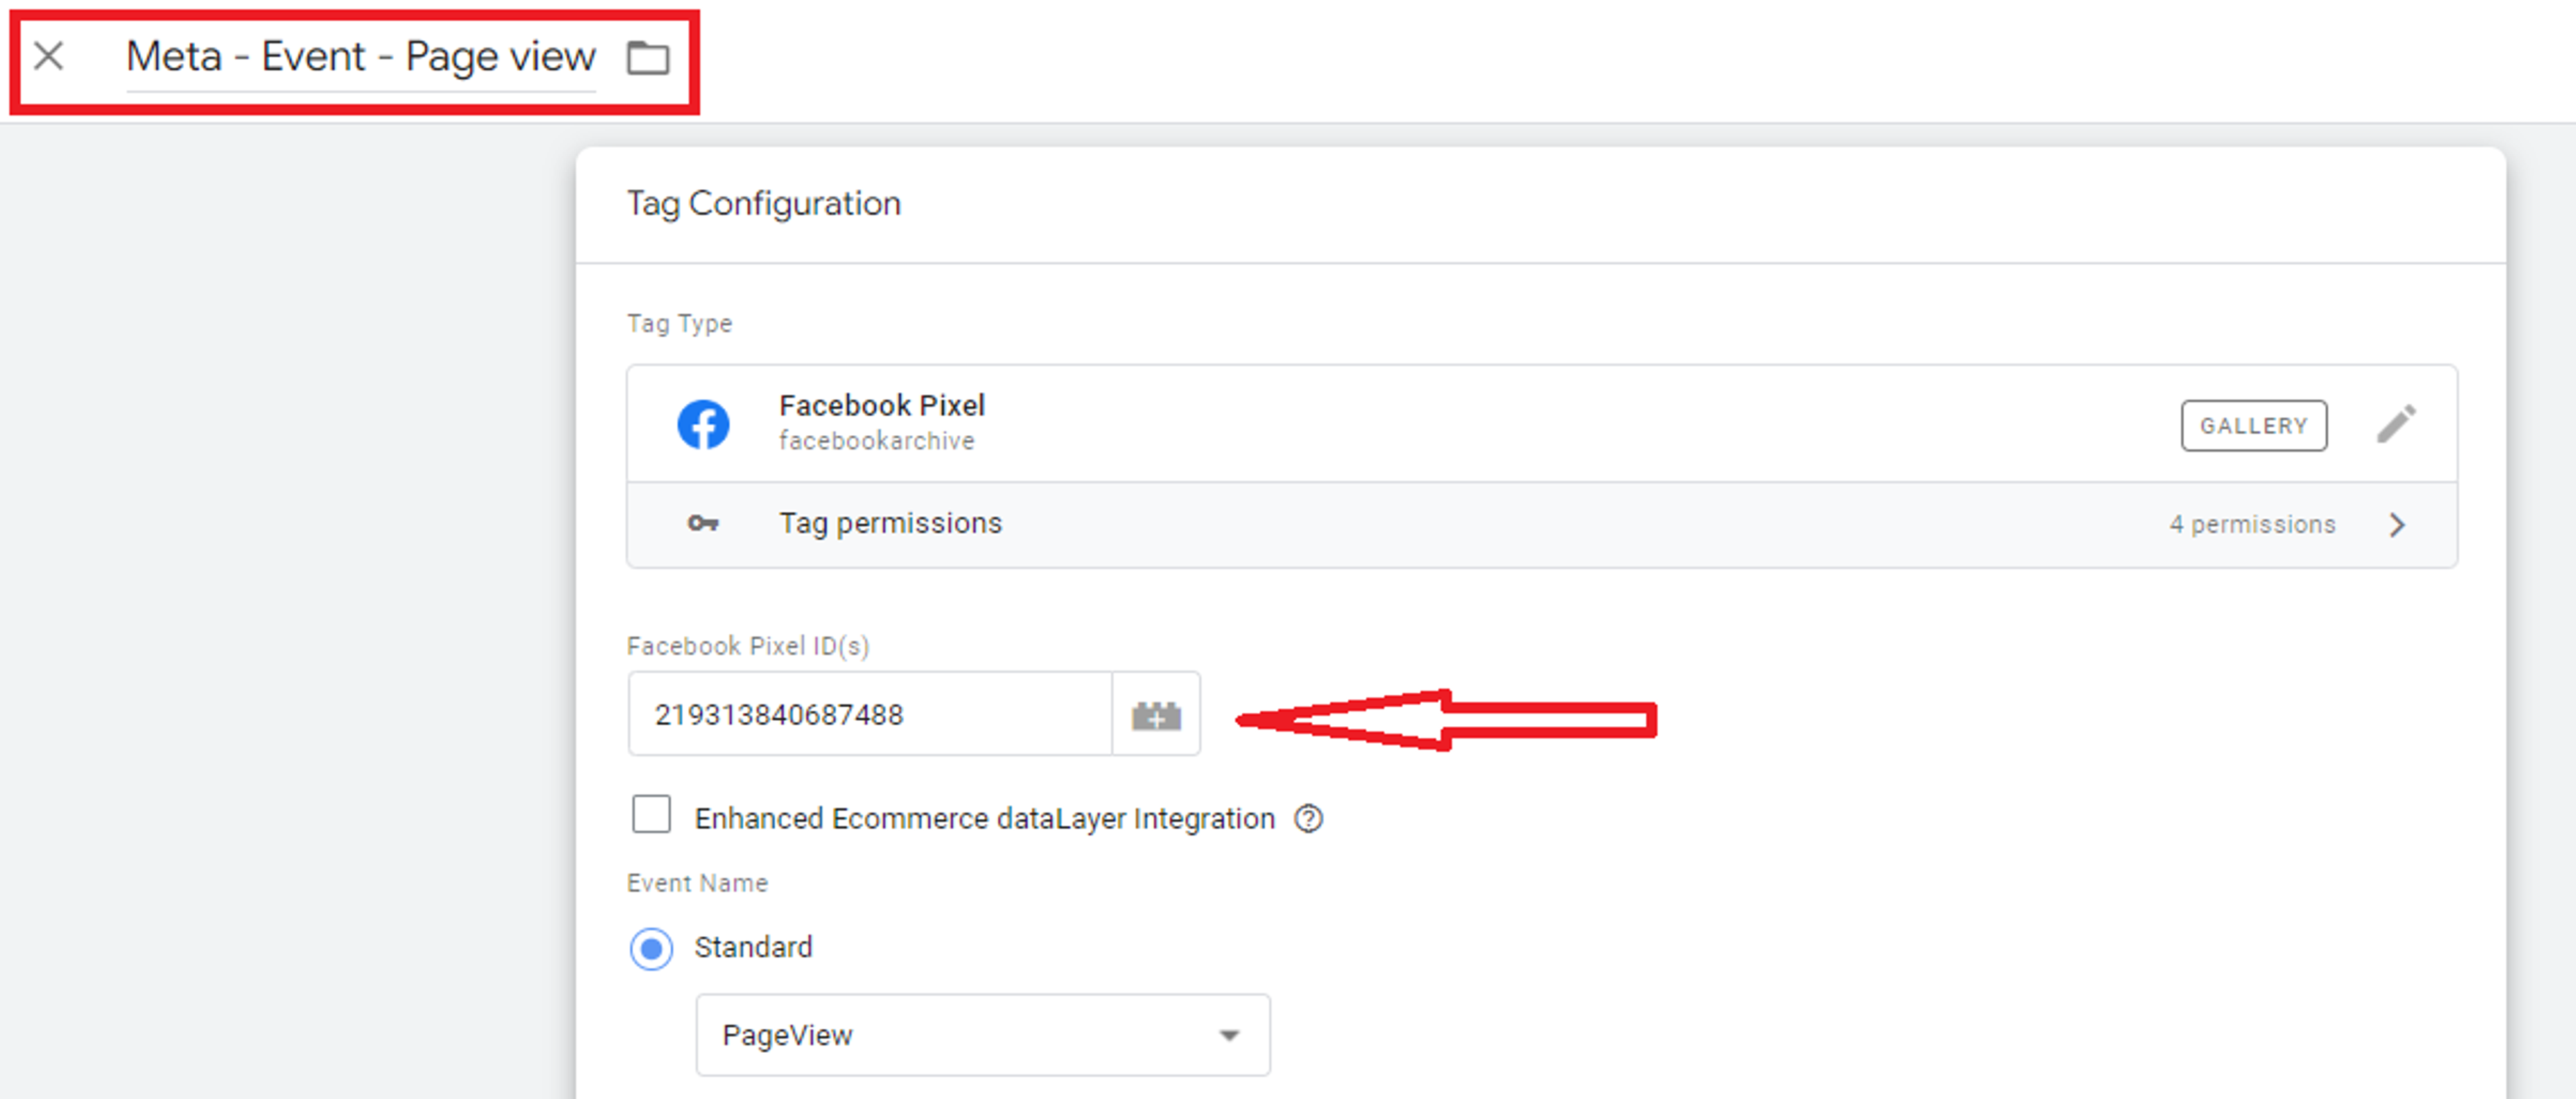
6. Choose trigger for your Meta Pixel tag: Press "Triggering", and then choose either the "All Pages" or "Initialization - All Pages" trigger types. Both will work well enough for your purposes.

Then press "Save". Your first Meta Pixel tag has now been created.

7. Check whether the tag fires: First press the "Preview" button on the top right-hand side of the GTM container main page:

Then add your store URL:
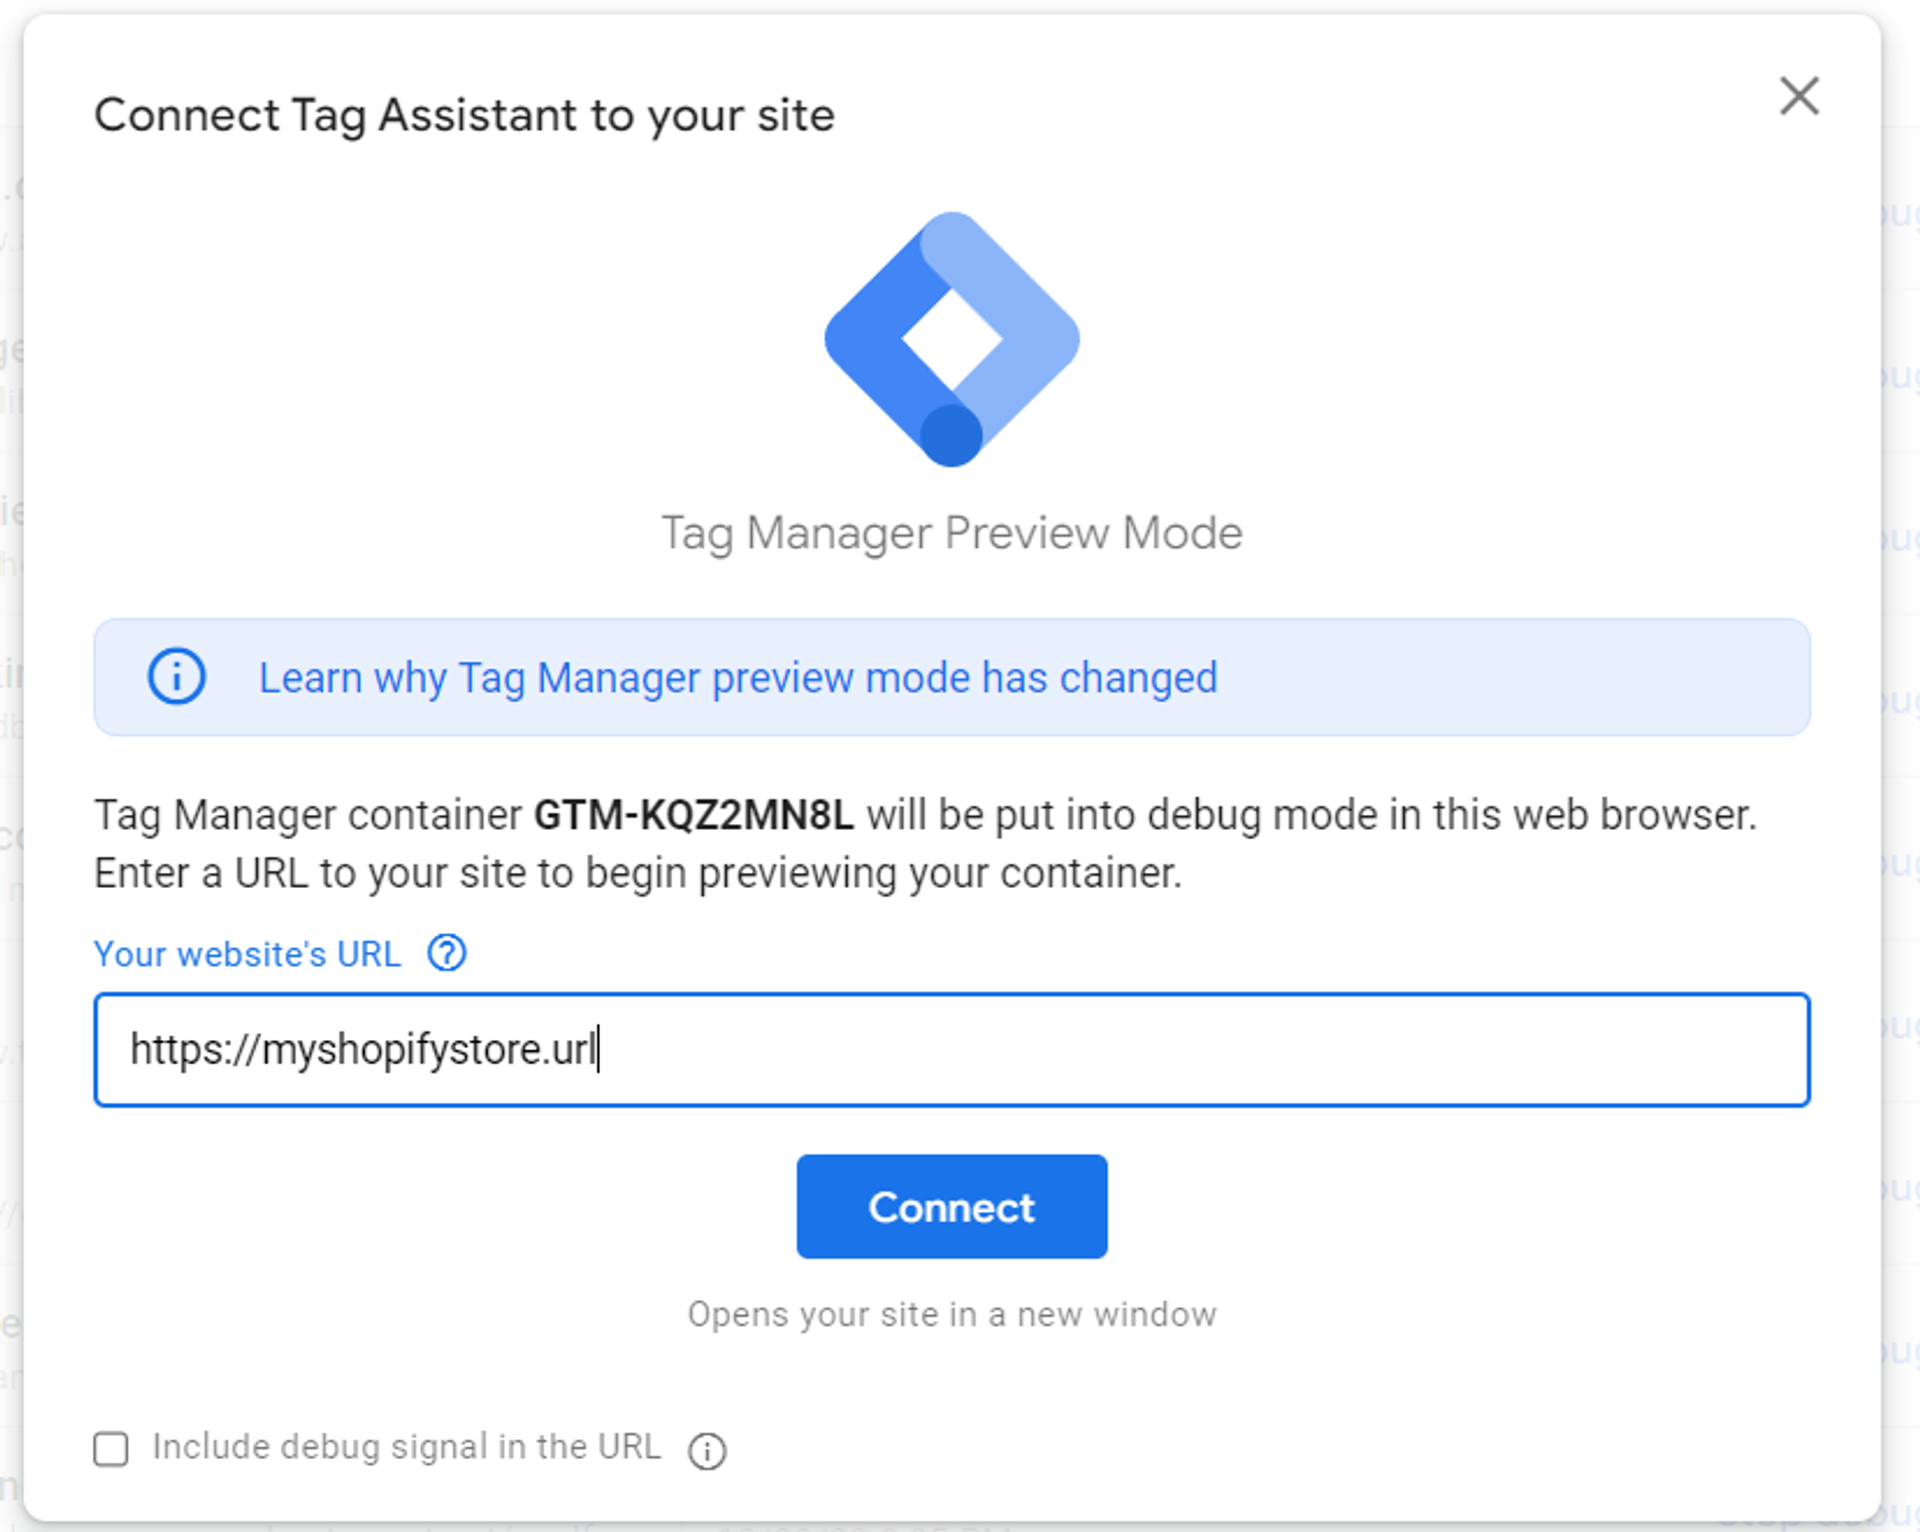
As soon as your store opens in a new tab, check the tab with the URL "https://tagassistant.google.com/". This will show whether all the tags are firing on your page, including your Meta Pixel tag.

8. Final step: When you have confirmed that the Meta Pixel tag is firing successfully, publish the changes in your GTM container. Press the "Submit" button on the top right, choose the appropriate version name, add a comment in the "Version Description" box if needed and then press "Publish".
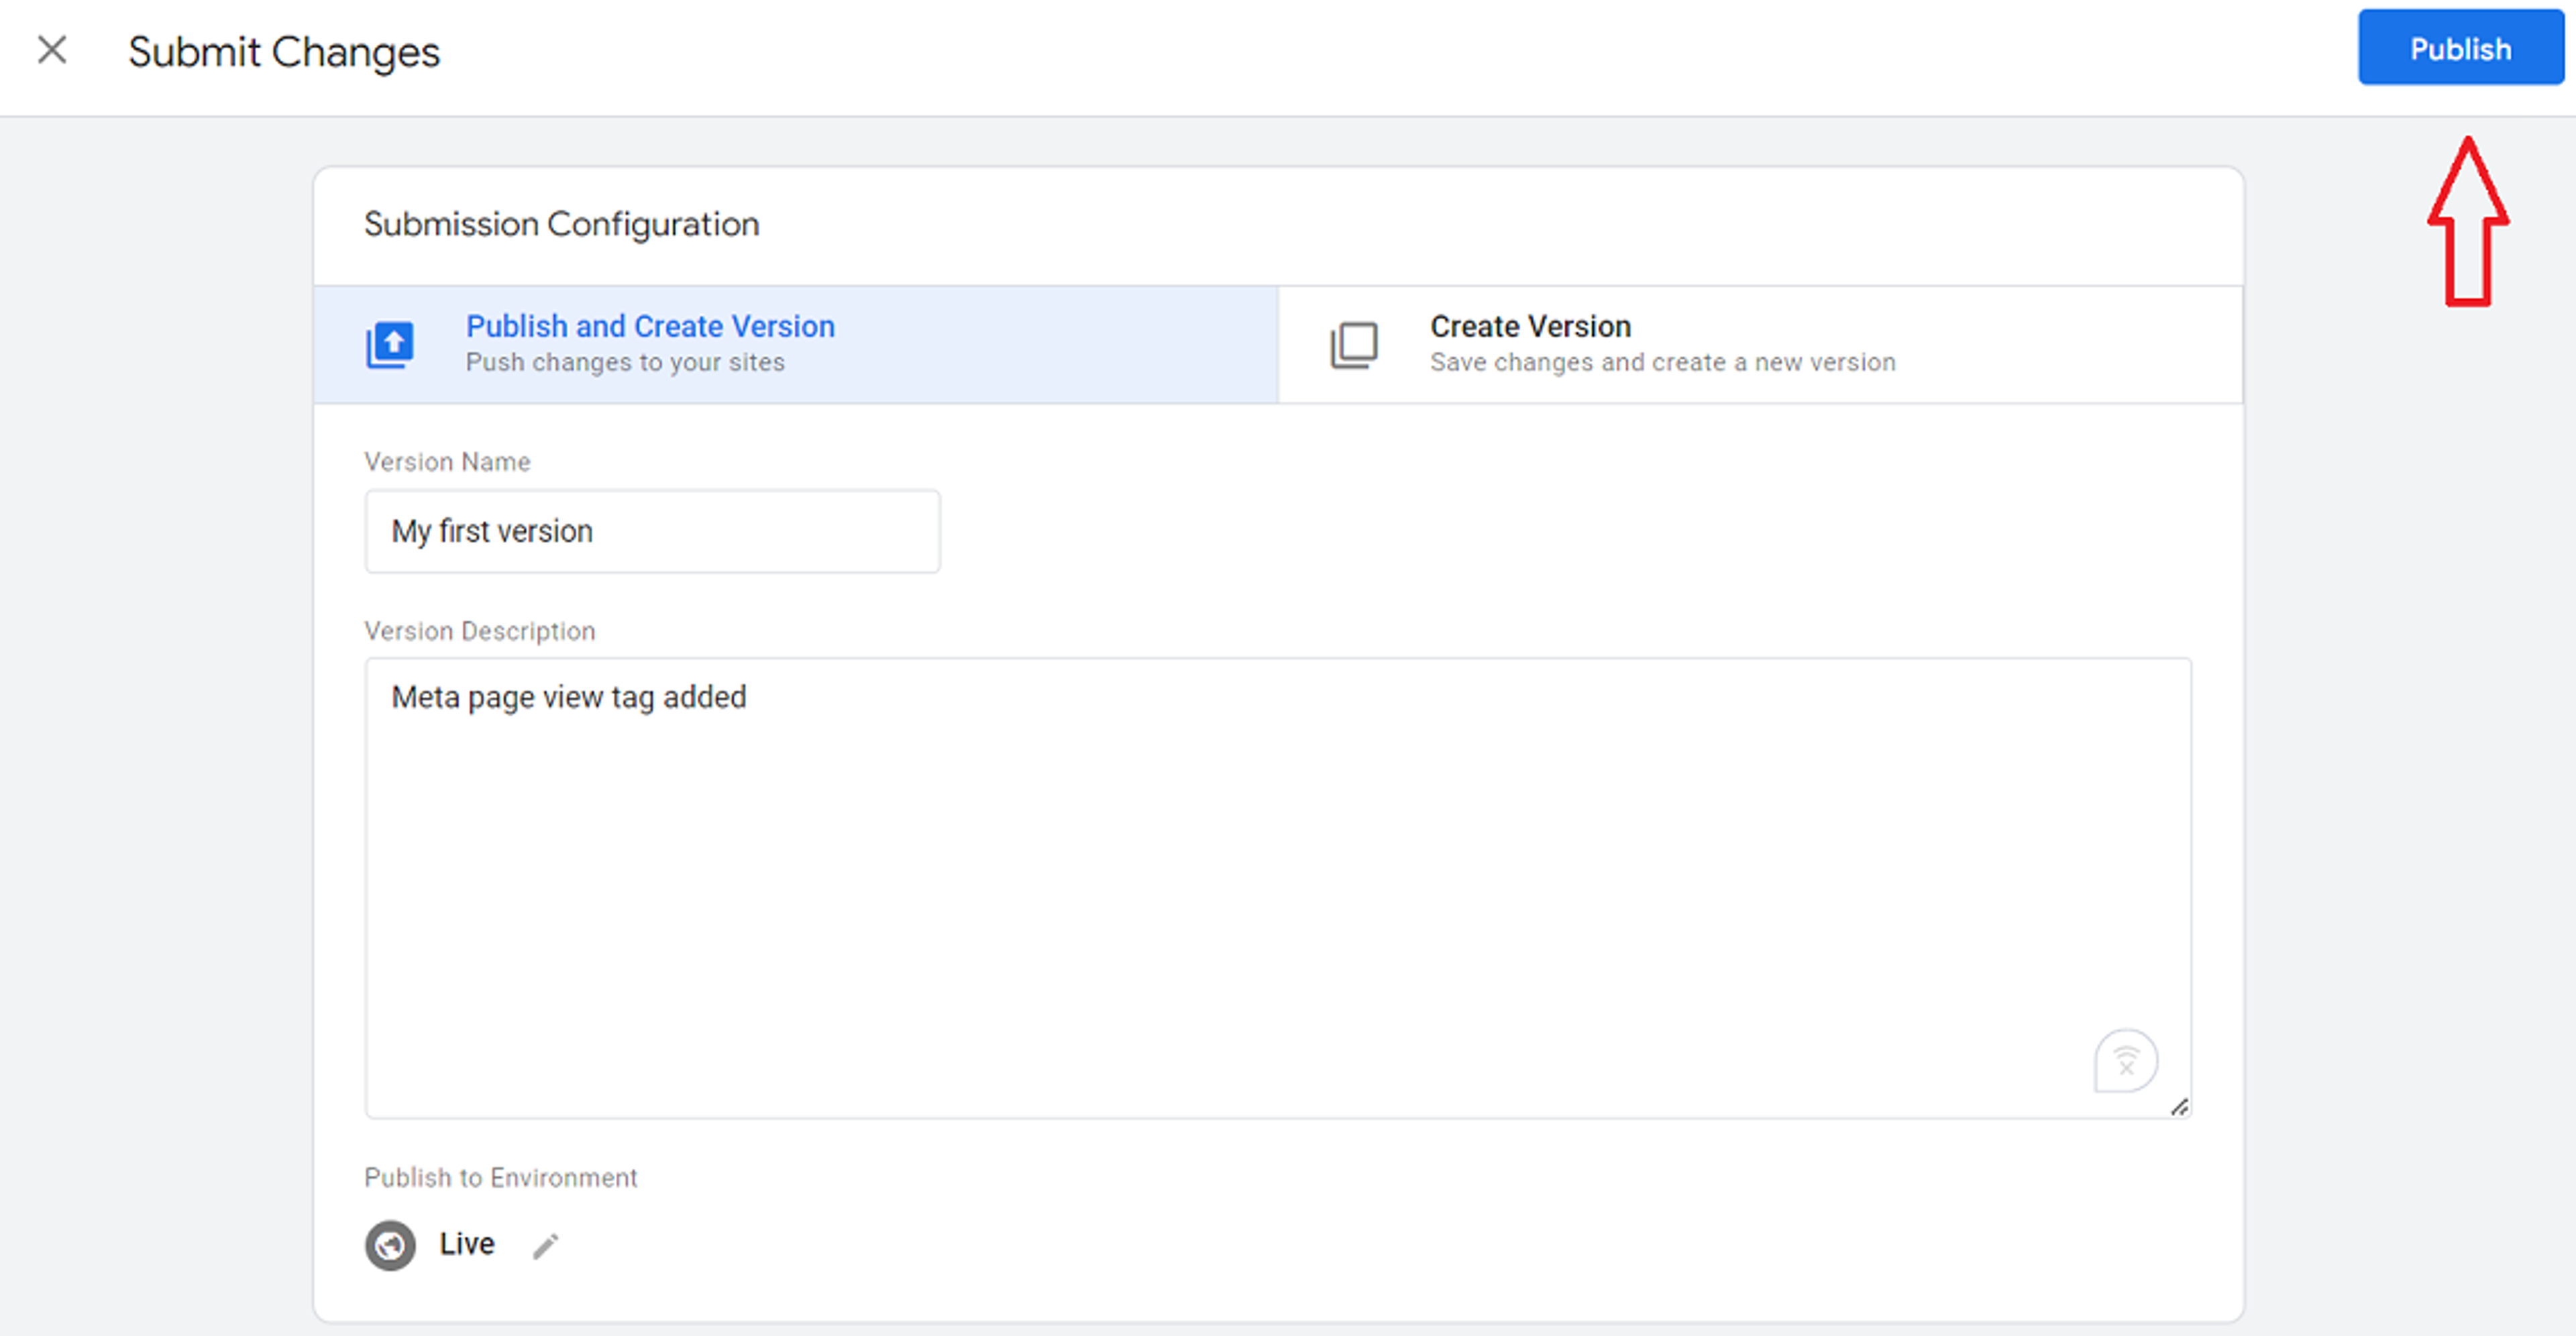
Congratulations! You have configured Meta Pixel tracking with GTM for your Shopify store.
Verifying Installation
Now that your Meta Pixel is in place, it's essential to ensure that it's functioning correctly. Accurate data collection is the foundation on which to make informed marketing decisions.
Here's a step-by-step approach to testing your installation:
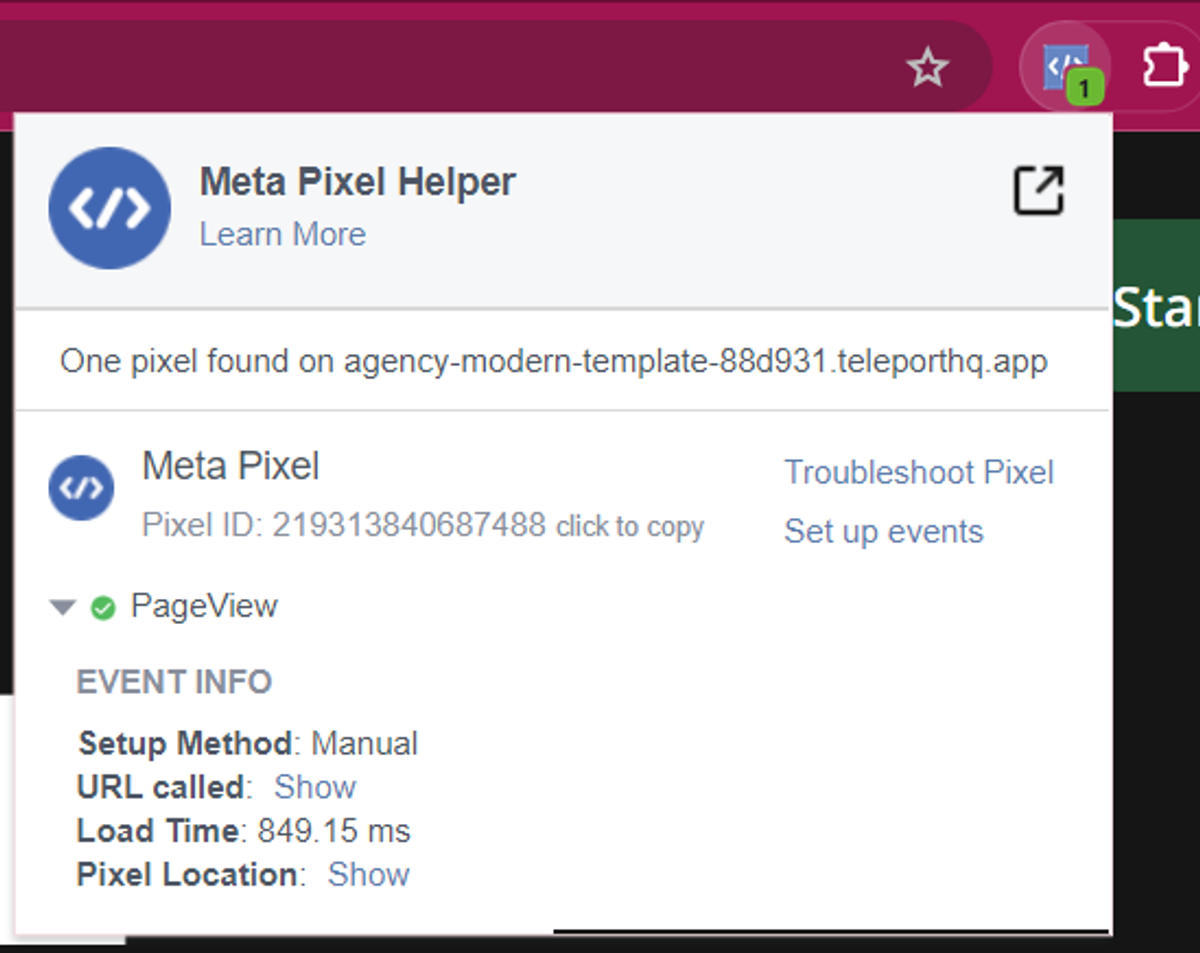
Tool 1: Facebook Pixel Helper
1. Install the Extension:
- Visit the Chrome Web Store (https://chrome.google.com/webstore).
- Search for "Meta Pixel Helper" and click "Add to Chrome"

2. Visit Your Store: Open your Shopify store in a new tab.
3. Look for the Icon: The Pixel Helper icon (a small blue square) in your Chrome toolbar should change color and display a number, indicating that the Pixel is installed.
4. Click the Icon: Clicking on the Pixel Helper icon will provide details of the events your Meta Pixel is tracking on your website.
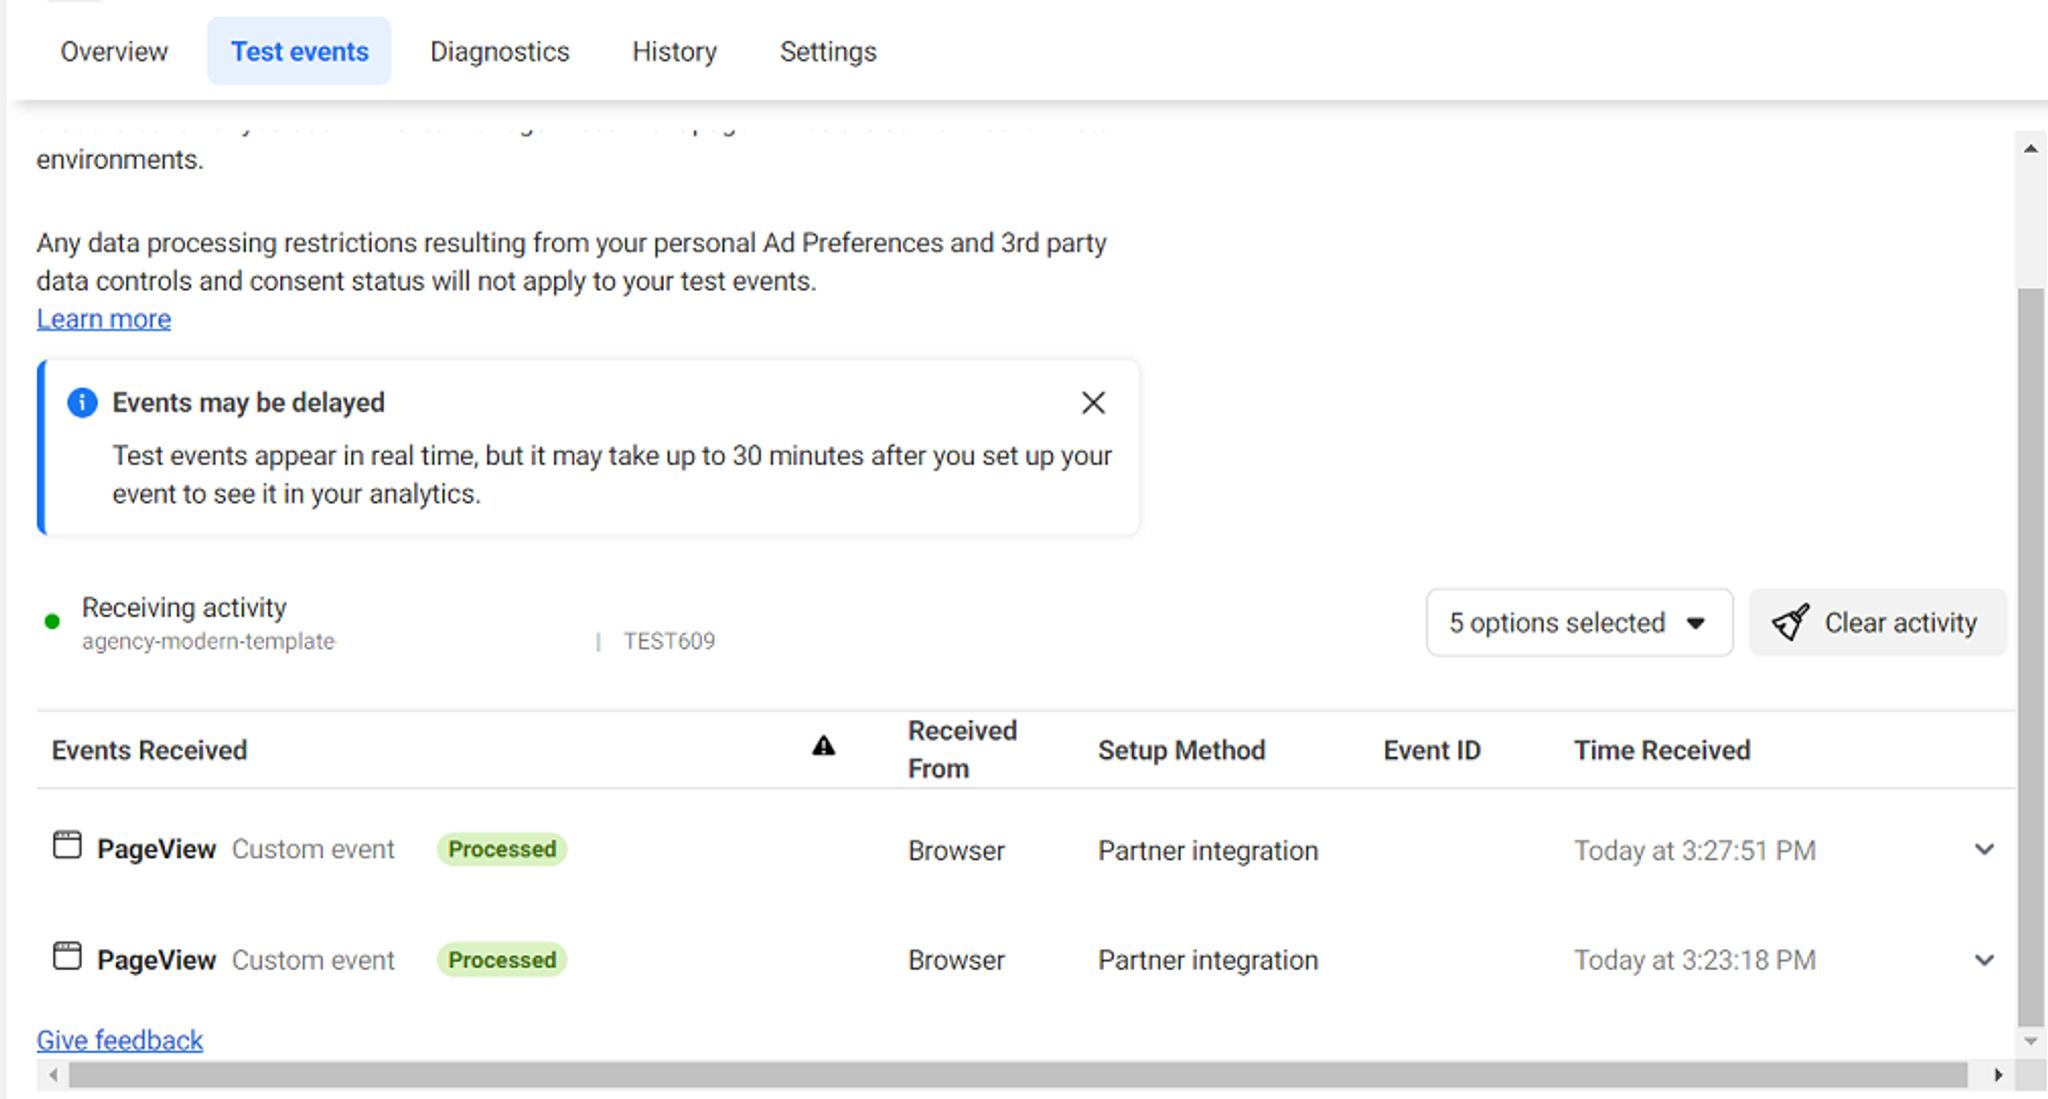
Tool 2: Events Manager Test Events
1. Open Events Manager: Navigate to Events Manager and select your Meta Pixel.
2. Go to the 'Test Events' tab: You'll find this tab within your Pixel's settings.
3. Perform the Following Actions:
- Enter your Shopify store URL
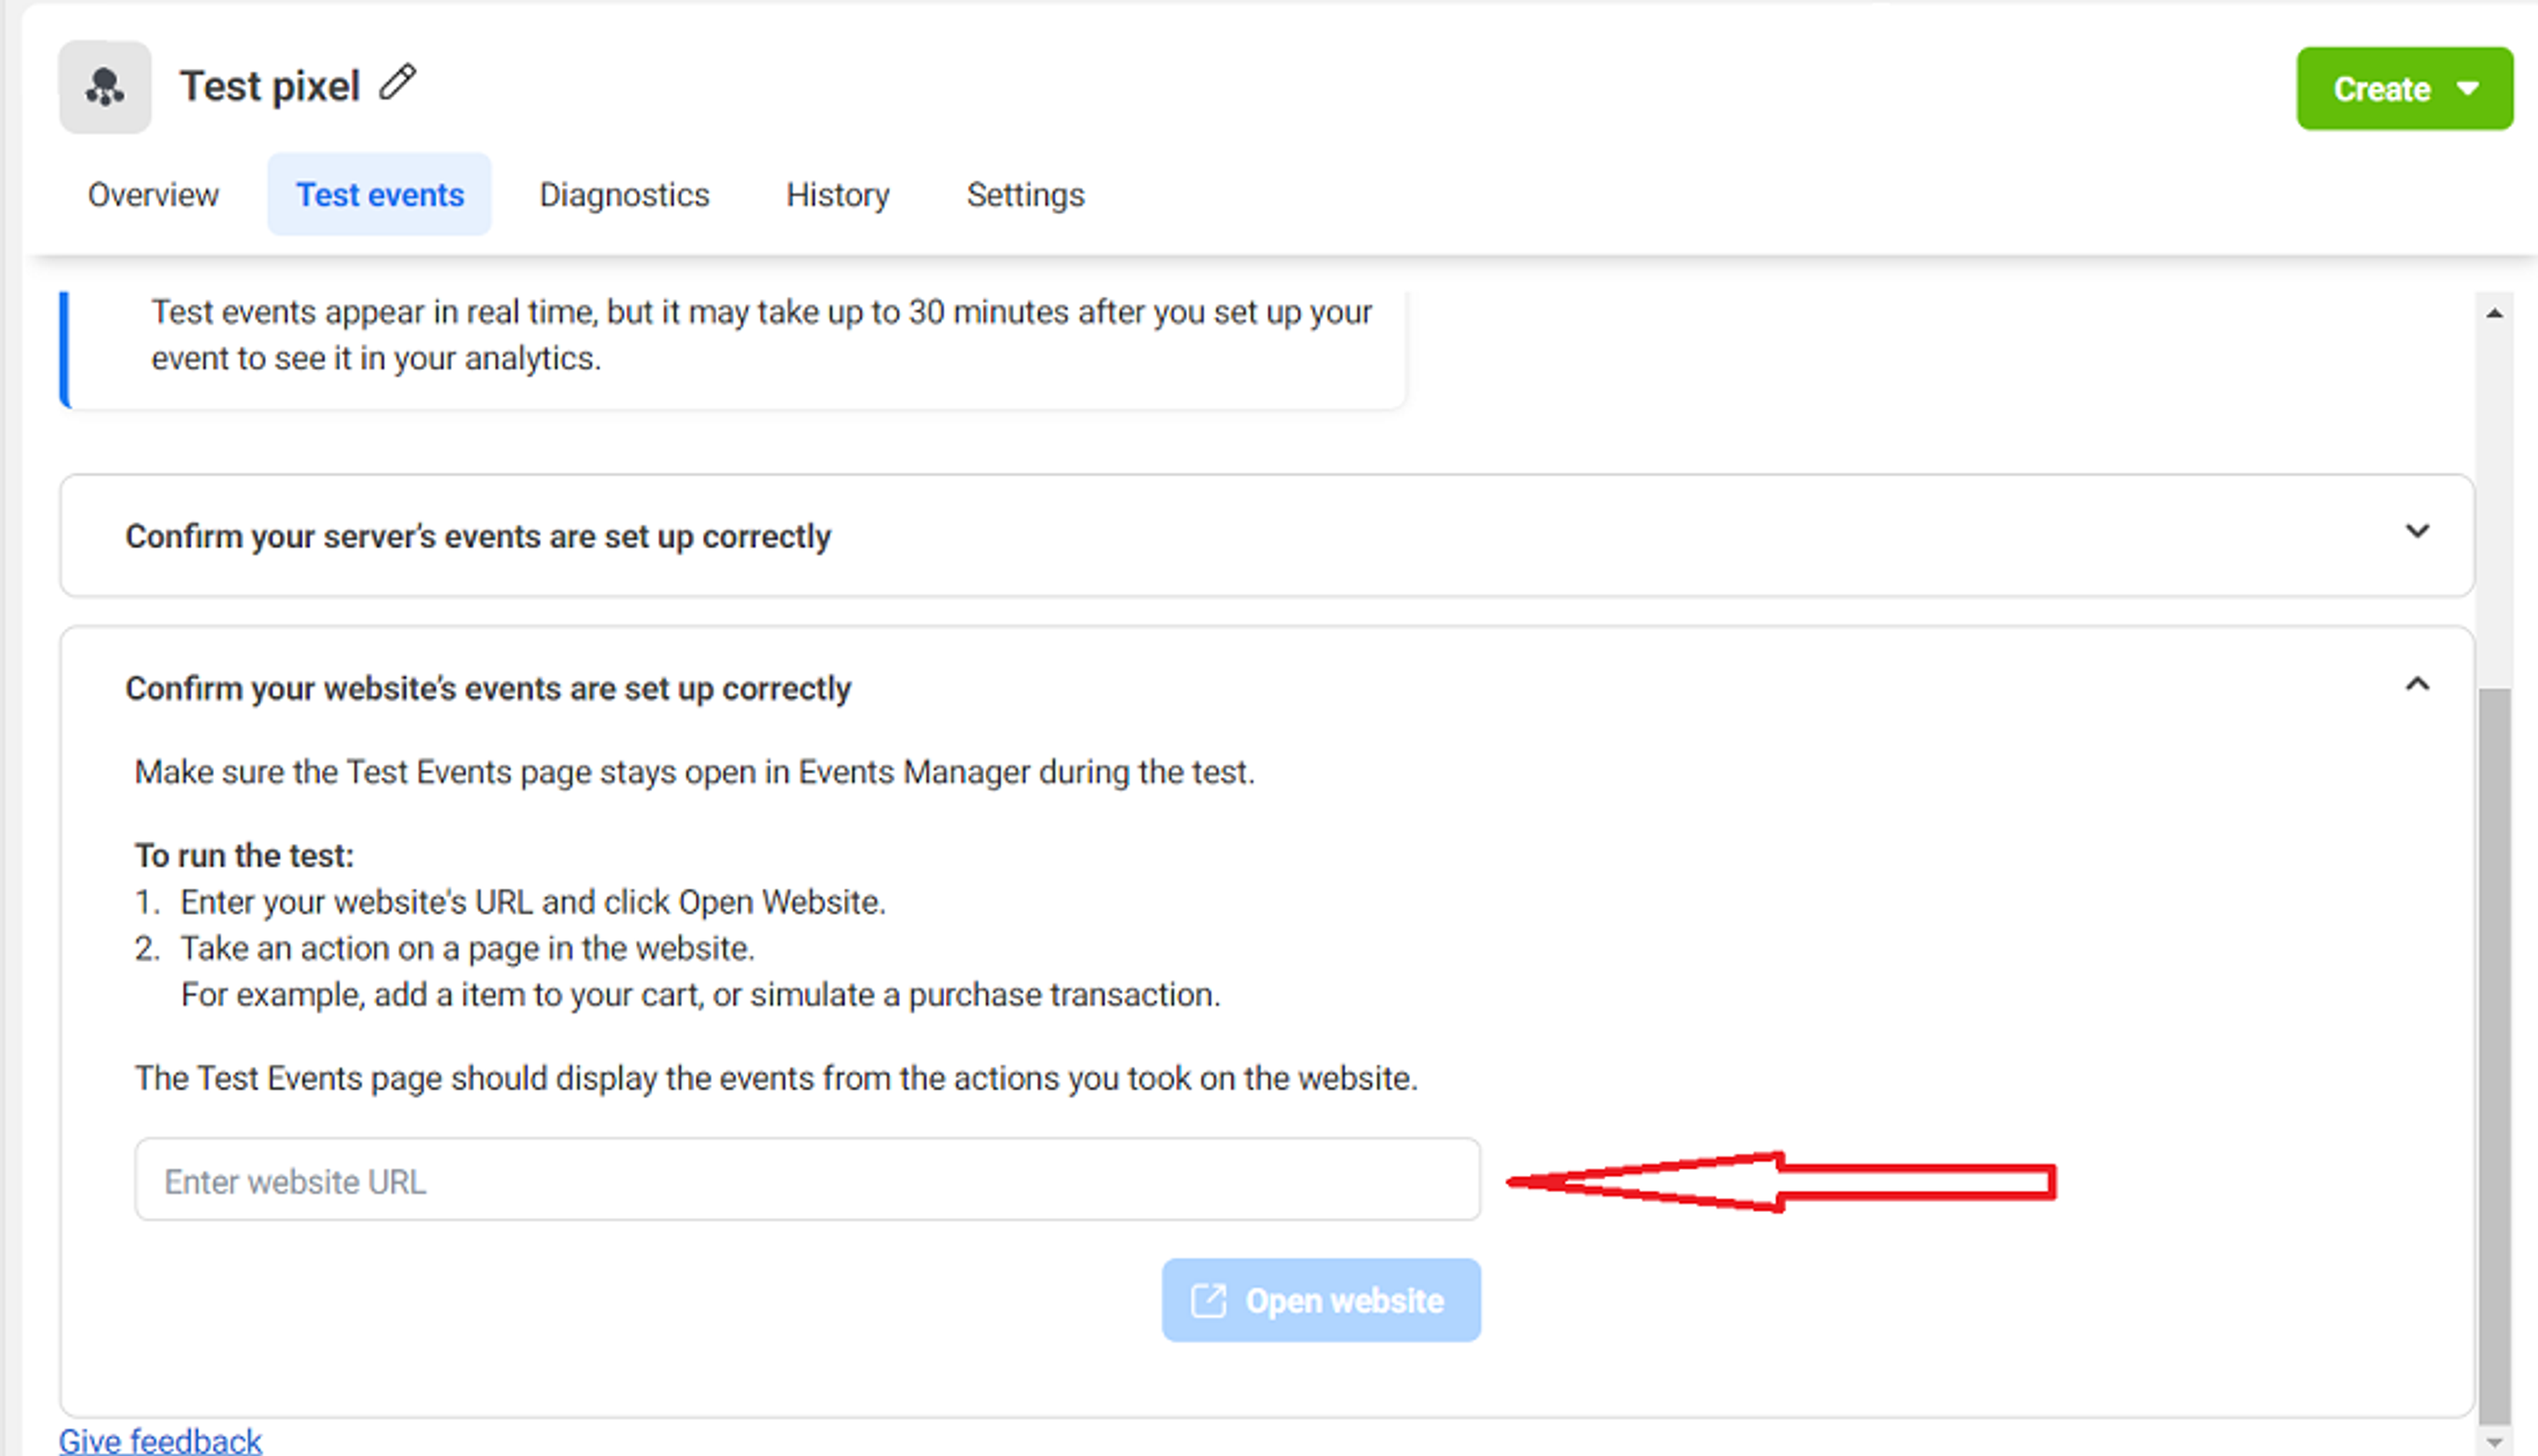
- Your store will be opened in a new tab, then browse some pages of the website.
4. Check Events Manager: Return to the Events Manager's "Test Events" tab. If your Pixel is working, your recent actions will appear as test events received.
Troubleshooting:
- Pixel Not Firing: Carefully review the installation instructions. Common mistakes include incorrect code placement, not saving your changes in the store code editor or not published changes sitting in the GTM container.
- Still Having Trouble?: Consult Facebook's comprehensive help resources or contact their support team for assistance.
- Request help from our experts
Success! Once you've verified your Meta Pixel setup, you're ready to start utilizing the valuable customer data it collects.
How to Delete the Meta Pixel from Shopify
Need to remove the Meta Pixel from your Shopify store? Here's how:
If you used Shopify Integration:
To disconnect your Meta Pixel from the Shopify store you'll first need to deactivate your "Facebook & Instagram" sales channel.

After that, if you need to use a Meta product catalog synched with Shopify (if you want to track Pixel again with other methods) you should activate Meta again but do not connect Pixel this time. This will synch the product catalogs and leave you free to install Meta Pixel tracking another way.
If you used Manual Installation:
- Find your theme.liquid file: In your Shopify admin, go to "Online Store" -> "Themes" -> "Actions" -> "Edit Code" -> "Layout" -> "theme.liquid."
- Delete the Pixel Code: Locate the Meta Pixel code you pasted within the <head> section. and on the Thank You page in the Checkout settings, and delete the entire code snippet.
- Save Changes: Click 'Save' to update your theme.liquid file.
For manual installation with GTM you need to open your GTM container and delete or pause the Meta Pixel tag.

However, do not forget to publish your changes in GTM after that.
Important Note: Deleting the Meta Pixel will stop the collection of new data. Existing data in your Events Manager will remain accessible.
Conclusion
By installing the Meta Pixel on your Shopify store, you unlock a treasure trove of customer insights. This valuable data enables you to:
- Optimize your ads: Target the right people, refine your messaging and maximize your ad spend.
- Understand your audience: Discover what makes your customers tick, and thus improve product offerings and marketing strategies.
- Boost conversions: Retarget interested shoppers and drive more sales for your business.
Remember, setting up the Meta Pixel is surprisingly straightforward. With the step-by-step guide we've provided, you will have it up and running in no time.
FAQ
Why do I need the Meta Pixel on my Shopify store?
The Meta Pixel is your key to understanding customer behavior creating effective ads, and ultimately driving more sales. It's like having a marketing analyst working for you around the clock.
Is the setup process difficult?
Not at all! Shopify offers a simple integration process, and even manual installation is easy to follow with our step-by-step instructions.
How long does it take for the Meta Pixel to start collecting data?
The Meta Pixel starts working as soon as it's installed. You'll begin seeing data in your Events Manager almost immediately.
Can I use the Meta Pixel to track sales and conversions?
Absolutely! Custom conversions are a powerful feature of the Meta Pixel. You can track purchases, add-to-carts, sign-ups, and any other important actions in your store.
I'm not very technical. Can I still do this?
Yes! We've designed this guide to be beginner-friendly. If you do encounter any issues, Facebook has excellent support resources, or you can consider hiring a specialist to help with the setup.
